1. Introduktion
This manual provides essential information for the safe and efficient installation, operation, and maintenance of your Apevia SIGNATURE900W 900W 80+ Bronze Certified ATX Semi-Modular Power Supply. Please read this manual thoroughly before use and retain it for future reference.
2. Sikkerhedsoplysninger
- Do not overload, abuse, or modify the power supply unit.
- Sørg for korrekt jording for at forhindre elektrisk stød.
- Brug ikke strømforsyningen i våde eller tørre omgivelser.amp forhold.
- Disconnect power before installing or removing components.
- Use of this unit for Bitcoin Mining is not suggested as it will shorten the life and cause failures of the power supply. Use for mining purposes is not covered by warranty.
3. Pakkens indhold
Bekræft, at alle nedenstående varer er inkluderet i din pakke:
- Apevia SIGNATURE900W Power Supply Unit
- AC strømledning
- Modular Cables (PCI-E, SATA, Peripheral, Floppy)
- Monteringsskruer
- Kabelbindere
- Brugermanual

Image: Apevia SIGNATURE900W Power Supply and included accessories.
4. Produktfunktioner
- 900W 80+ Bronze Certified Active PFC ATX Gaming Semi-Modular Power Supply.
- Modular Design for enhanced cable management.
- Connectors: 1 x 20/24pin Main Power, 1 x P8(4+4P) ESP 12V, 4 x SATA + 4 x 8(6+2)pin PCI-E, 4 x Peripheral, 1 x Floppy.
- Single 12V Output for higher power usage.
- Auto-Thermally Controlled 135mm Blue LED Fan for quiet and efficient cooling.
- Output: +3.3V@20A, +5V@20A, +12V@66A, -12V@0.3A, +5Vsb@2.5A.
- Heavy Duty Protections: Short-Circuit (SCP), Over-Voltage (OVP), Over-Power (OPP), Under-Voltage (UVP).
- Double Forward Converter Design.
- Supports ATX 12V 2.3 Version.
- Supports Dual/Quad Core CPUs.
- Supports SLI/Crossfire/Haswell systems.
5. Opsætning og installation
5.1 Fysisk installation
- Sørg for, at din computer er slukket, og at stikket er taget ud af stikkontakten.
- Åbn computerens kabinet for at få adgang til monteringsområdet til strømforsyningen.
- Carefully place the Apevia SIGNATURE900W power supply into the designated bay in your computer case.
- Fastgør strømforsyningen til kabinettet med de medfølgende monteringsskruer.
5.2 Kabelforbindelser
Connect the necessary cables to your motherboard and components. The semi-modular design allows you to attach only the cables required for your system, improving airflow and cable management.
- 20/24-pin Main Power Connector: Connect to your motherboard's main power socket.
- P8 (4+4P) ESP 12V Connector: Connect to your motherboard's CPU power socket.
- 8 (6+2)pin PCI-E Connectors: Use these for your graphics card(s).
- SATA stik: Til SATA-harddiske, SSD'er og optiske drev.
- Peripheral (Molex) Connectors: Til ældre periferiudstyr eller kabinetblæsere.
- Floppy Connector: For legacy floppy drives (if applicable).
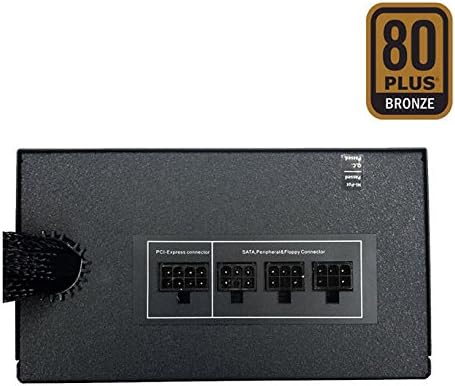
Image: Modular cable connections on the power supply.
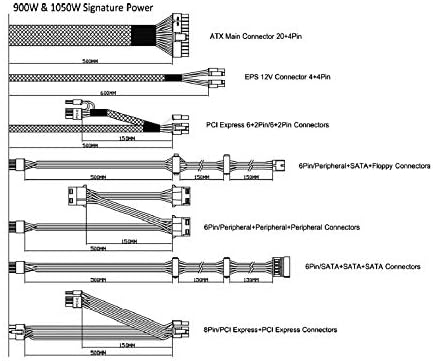
Image: Cable diagram for power supply connections.
6. Betjeningsvejledning
The Apevia SIGNATURE900W power supply features automatic voltage switching between 110V and 240V, eliminating the need for a manual toggle switch. Once all connections are secure and the computer case is closed, plug the AC power cord into the power supply and a wall outlet. Power on your computer as usual. The 135mm blue LED fan will operate automatically, controlled by the unit's thermal sensors to maintain optimal temperature and quiet operation.

Image: Apevia SIGNATURE900W Power Supply with blue LED fan.
7. Vedligeholdelse
- Regularly inspect the power supply fan for dust accumulation. Clean with compressed air as needed to ensure proper airflow and cooling.
- Ensure all cable connections remain secure. Loose connections can lead to system instability.
- Keep the power supply unit free from obstructions to allow for adequate ventilation.
8. Fejlfinding
If you experience issues with your power supply, consider the following:
- Ingen strøm: Check all power connections, including the AC power cord and the 20/24-pin main power connector. Ensure the wall outlet is functional.
- Systemustabilitet/Tilfældige nedlukninger: This could indicate an overloaded power supply or a faulty component. Verify your system's total power draw against the PSU's 900W capacity.
- Ventilatorstøj: While the fan is auto-thermally controlled for quiet operation, excessive noise might indicate dust buildup or a fan issue. Clean the fan or contact support if the issue persists.
If troubleshooting steps do not resolve the issue, please contact Apevia customer support.
9. Specifikationer
| Specifikation | Værdi |
|---|---|
| Modelnavn | SIGNATURE900W |
| Mærke | Apevia |
| Output Wattage | 900 watt |
| 80 PLUS certificering | Bronze certificeret |
| Design af strømforsyning | Semi-modulær |
| Formfaktor | ATX |
| Afkølingsmetode | Air (135mm Blue LED Fan) |
| Produktdimensioner | 6.2 x 5.9 x 3.4 tommer |
| Varens vægt | 4.51 pund |
| Fabrikant | Apevia Corp |
| Dato først tilgængelig | 8. september 2020 |
10. Garanti og support
For warranty information and technical support, please refer to the official Apevia website or contact their customer service directly. Please note that use of this unit for Bitcoin Mining is not covered by the product warranty.