1. Sikkerhedsoplysninger
Læs og forstå alle sikkerhedsadvarsler og betjeningsvejledninger, før du bruger dette instrument. Manglende overholdelse af disse instruktioner kan resultere i elektrisk stød, brand eller alvorlig personskade.
- Always ensure the multimeter is in good working condition before use. Inspect for any damage to the casing or test leads.
- Anvend ikke voltage exceeding the maximum rated input (400V DC or AC effective value).
- Vær forsigtig, når du arbejder med voltagover 30V AC RMS, 42V peak eller 60V DC. Disse voluminertages udgør en stødfare.
- Ensure the test leads are properly connected to the correct input terminals for the measurement being performed.
- Do not use the multimeter if the battery cover is not securely closed.
- Udskift batterierne med det samme, når indikatoren for lavt batteri vises, for at sikre nøjagtige aflæsninger.
- Undgå at bruge enheden i våde omgivelser eller under tordenvejr.
- Afbryd altid strømmen til kredsløbet, før du foretager modstands- eller kontinuitetsmålinger.
2. Produktet er slutview og pakkeindhold
The Walfront Digital Multimeter is a compact, auto-ranging device designed for measuring AC/DC voltage, resistance, frequency, continuity, and non-contact voltage detection. It features an LCD display and an integrated flashlight for convenience.
2.1 Pakkens indhold
- Walfront Digital Multimeter (ADMS1CL or ADMS1)
- Testledninger (røde og sorte)
- Snor
- Brugermanual
2.2 Multimeterkomponenter

Billede 2.1: Labeled diagram of the Walfront Digital Multimeter, showing the non-contact sensor probe, LCD screen, power switch, mode/flashlight switch, voltage signal indicator, and input terminals.
- Non-contact sensor probe: Bruges til ikke-kontaktvolumentage (NCV) detektion.
- LCD-skærm: Displays measurement readings, units, and indicators.
- Strømafbryder: Tænder eller slukker for enheden.
- Switch mode/Flashlight switch: Toggles between measurement modes and activates the LED flashlight.
- Voltage signal indicator: LED bar graph indicating detected voltage styrke.
- Input Terminal (COM): Fælles negativ indgang for testledninger.
- Input Terminal (INPUT): Positivt input til testledninger.
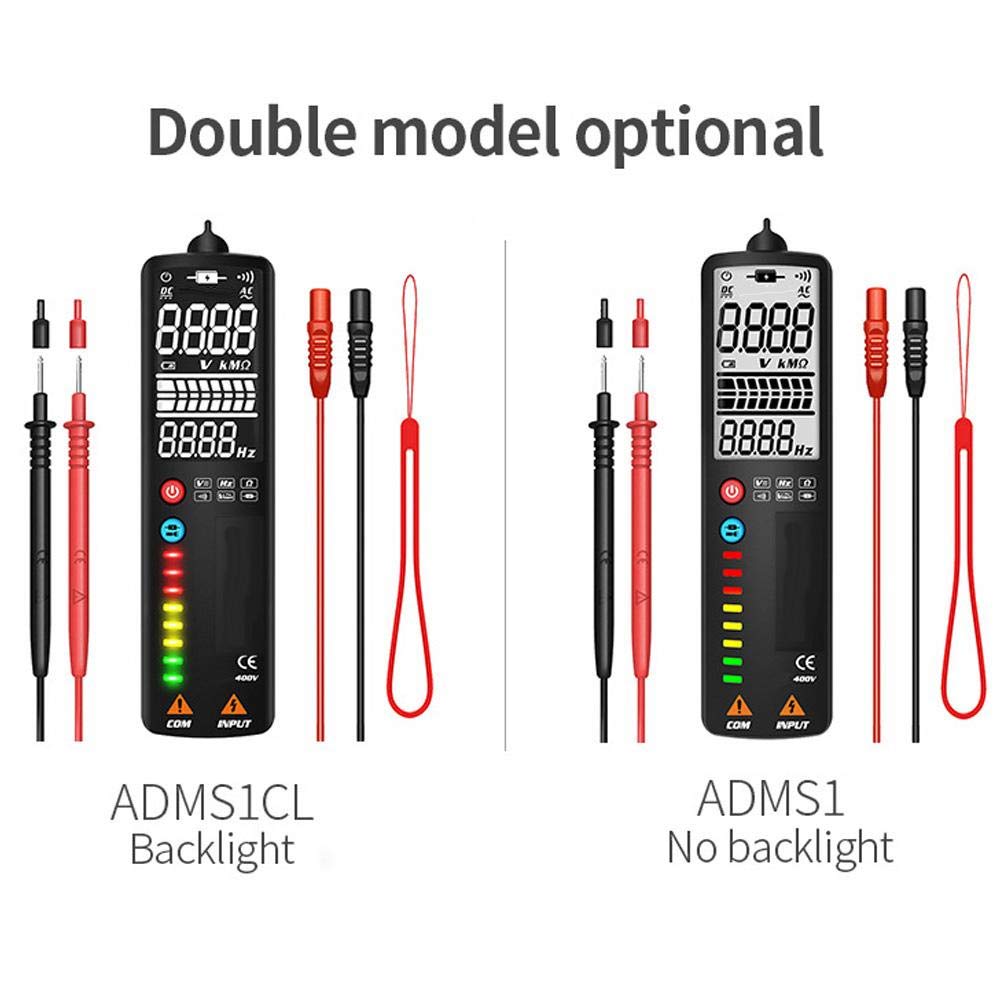
Billede 2.2: Comparison showing the ADMS1CL model with a backlit display and the ADMS1 model without a backlight.
3. Opsætning
3.1 Batteriinstallation
The multimeter requires one 3V AAA battery (not included) for operation.
- Find batterirummet på bagsiden af multimeteret.
- Brug en skruetrækker til at åbne batteridækslet.
- Insert one 3V AAA battery, observing the correct polarity (+/-) as indicated inside the compartment.
- Luk dækslet til batterirummet forsvarligt.
4. Betjeningsvejledning
4.1 Tænd/sluk
- To power on the multimeter, press the Strømafbryder knap.
- For at slukke, skal du trykke på og holde nede Strømafbryder knappen, indtil displayet slukker.
- The device features an automatic shutdown function after approximately 2 minutes of inactivity to conserve battery life.
4.2 Automatisk måletilstand
Upon powering on, the multimeter defaults to an intelligent automatic measurement mode. In this mode, the device automatically identifies and measures AC/DC voltage, modstand og kontinuitet uden manuelt områdevalg.

Billede 4.1: The multimeter being used to test electrical components on a circuit board, demonstrating its application in general electrical testing.
4.3 Manuel valg af tilstand
Tryk på Mode/Flashlight Switch button to cycle through specific measurement functions:

Billede 4.2: Icons illustrating the multimeter's capabilities: AC Voltage, DC Voltage, Resistance, Frequency, Continuity, Flashlight, V-Alert, and Live Wire detection.
- Voltage AC (V~): For measuring alternating current voltage. Connect test leads to the circuit in parallel.
- Voltage DC (V-): For measuring direct current voltage. Connect test leads to the circuit in parallel, observing polarity.
- Modstand (Ω): For measuring electrical resistance. Ensure the circuit is de-energized before connecting test leads across the component.
- Frekvens (Hz): For measuring the frequency of an AC signal.
- Kontinuitet (•))): For checking if a circuit is complete. The multimeter will beep if continuity is detected. Ensure the circuit is de-energized.
4.4 Non-Contact Voltage (NCV) Detektion
The multimeter can detect AC voltage uden direkte kontakt, hvilket øger sikkerheden.
- Sørg for, at multimeteret er tændt.
- Place the non-contact sensor probe near the conductor or outlet.
- Voltage signal indicator LEDs will illuminate, and an audible beep will sound, with intensity increasing som volumentage-styrken øges.
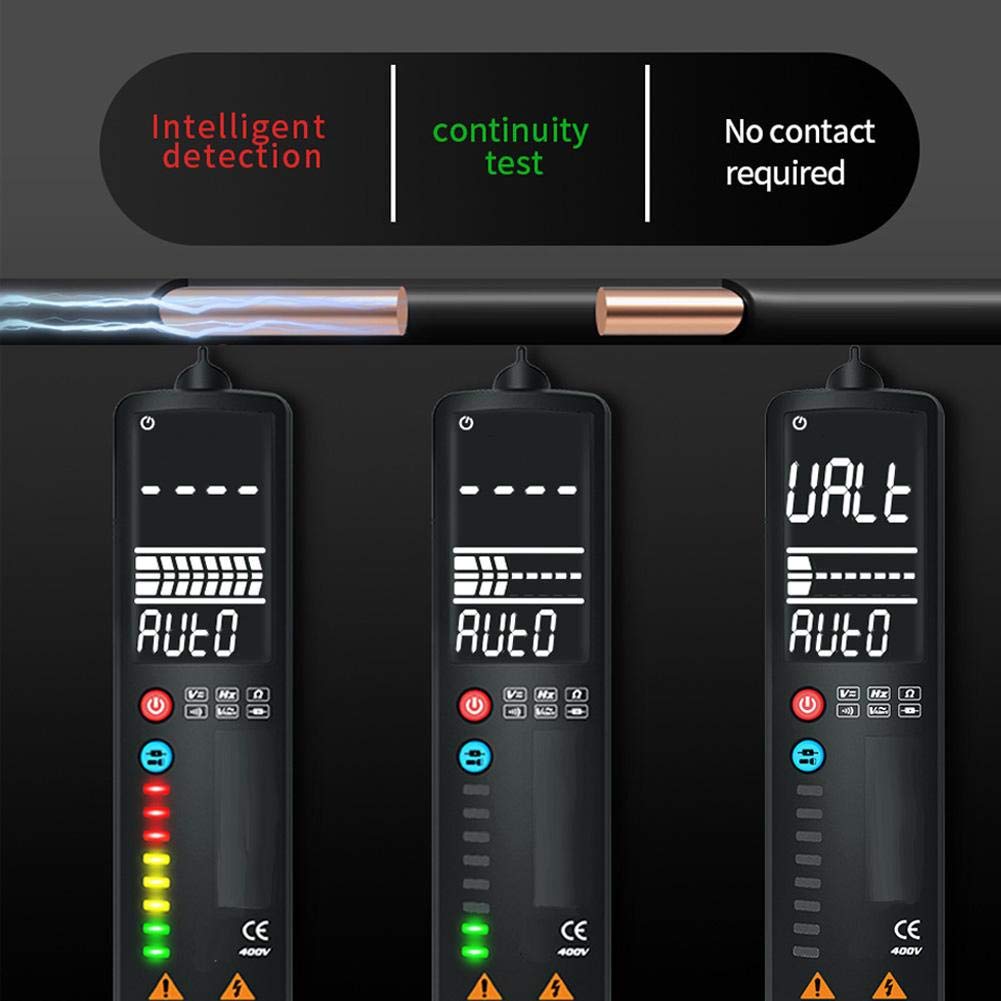
Billede 4.3: Demonstrates intelligent detection, continuity testing, and non-contact voltage detection capabilities of the multimeter.
4.5 Detektion af strømførende ledninger
Denne funktion hjælper med at identificere strømførende ledninger i et vekselstrømskredsløb.
- Sørg for, at multimeteret er tændt.
- Place the non-contact sensor probe near the wire or into the slot of an outlet.
- The multimeter will indicate a live wire with a stronger signal (more LEDs illuminated) compared to a neutral wire.

Billede 4.4: Illustrates the difference in readings and LED indications when performing a Neutral Check versus a Live Check with the multimeter.
4.6 LED-lommelygtebetjening
The integrated LED flashlight assists in working in dimly lit areas.
- For at tænde lommelygten skal du trykke på og holde Mode/Flashlight Switch knap.
- For at slukke lommelygten skal du trykke på og holde Mode/Flashlight Switch knappen igen.

Billede 4.5: The multimeter's LED flashlight in operation, illuminating a work area for convenient testing in low-light conditions.
5. Vedligeholdelse
5.1 Rengøring
For at rengøre multimeteret skal du tørre c afasing med annonceamp cloth and a mild detergent. Do not use abrasive cleaners or solvents. Ensure the device is powered off and disconnected from any circuits before cleaning.
5.2 Udskiftning af batteri
When the low battery indicator appears on the LCD, replace the battery promptly to ensure accurate measurements. Refer to Section 3.1 for battery installation instructions.
5.3 Opbevaring
If the multimeter will not be used for an extended period, remove the battery to prevent leakage and damage to the device. Store the multimeter in a cool, dry place, away from direct sunlight and extreme temperatures.
6. Fejlfinding
- Ingen visning eller svag visning: Check battery installation. Replace with a fresh 3V AAA battery if necessary.
- Unøjagtige aflæsninger: Ensure test leads are properly connected. Verify the correct measurement mode is selected (if not using auto mode). Replace battery if low battery indicator is present.
- Ingen kontinuitetsbip: Ensure the circuit is de-energized. Check if the component being tested is actually continuous.
- NCV registrerer ikke volumentage: Ensure the probe is close enough to the conductor. Verify the voltage is within the detectable range.
7. Specifikationer
- Varetype: Smart multimeter
- Materiale: ABS
- Farve: Sort
- Størrelse: Ca. 150 x 40 x 17 mm / 5.9 x 1.6 x 0.7 tommer
- Vægt: Ca. 120 g / 4.2 oz
- Vise: LCD, 2000 digits maximum display value
- Sampling sats: Approximately 3 times / second
- Automatisk rækkevidde: Ja
- Full Range Overload Protection: Ja
- Maksimal voltage Allowed at Measuring Terminal: DC: 400V or AC: 400V (effective value)
- Arbejdshøjde: 2000m
- Automatisk nedlukningstid: Cirka 2 minutter
- Fungerende strømforsyning: 1x 3V AAA battery (not included)
- DC bindtage Område: 400V
- DC bindtage-opløsning: 0.01V
- DC bindtage Nøjagtighed: ± 0.8% reading + 3 words
- Følsomhed: Minimum 0.5V DC voltage
- Maksimal indgang Voltage: 400V DC or AC effective value
8. Garanti og support
For warranty information or technical support, please refer to the product packaging or contact Walfront customer service directly through their official channels. Keep your purchase receipt for warranty claims.