eXuby B08DX95HN4
eXuby Tiny Shock Halsbånd Brugermanual
Model: B08DX95HN4
1. Introduktion
Thank you for choosing the eXuby Tiny Shock Collar. This device is designed to assist in training small dogs (5-15 lbs) by providing sound, vibration, and static stimulation to correct unwanted behaviors. Please read this manual thoroughly before use to ensure proper operation and the safety of your pet.
Vigtige sikkerhedsoplysninger
- This product is intended for use with healthy dogs weighing between 5 and 15 lbs. Do not use on puppies under 6 months old.
- Do not use this collar on aggressive dogs. If your dog exhibits aggressive behavior, consult a professional dog trainer.
- Undgå at lade halsbåndet sidde på hunden i mere end 12 timer om dagen for at forhindre hudirritation.
- Tjek regelmæssigt din hunds hals for tegn på irritation eller sår. Hvis der opstår irritation, skal brugen ophøre, indtil huden er helet.
- The static stimulation is designed to be a deterrent, not to cause harm. Always start with the lowest intensity level and gradually increase if necessary.
- This is not an automatic bark collar; it requires manual operation via the remote.
2. Pakkens indhold
Kontroller venligst, at alle nedenstående varer er inkluderet i din pakke:
- eXuby Tiny Shock Collar Receiver
- Fjernsender
- Justerbar kravestrop
- Long and Short Contact Points (2 pairs)
- Silicone Conductive Covers (2 pairs)
- USB Split Charging Cable
- Strømadapter
- Test lysværktøj
- Interchangeable Faceplates (Black, Blue, Pink)
- Håndledsrem til fjernbetjening
- Brugervejledning (dette dokument)

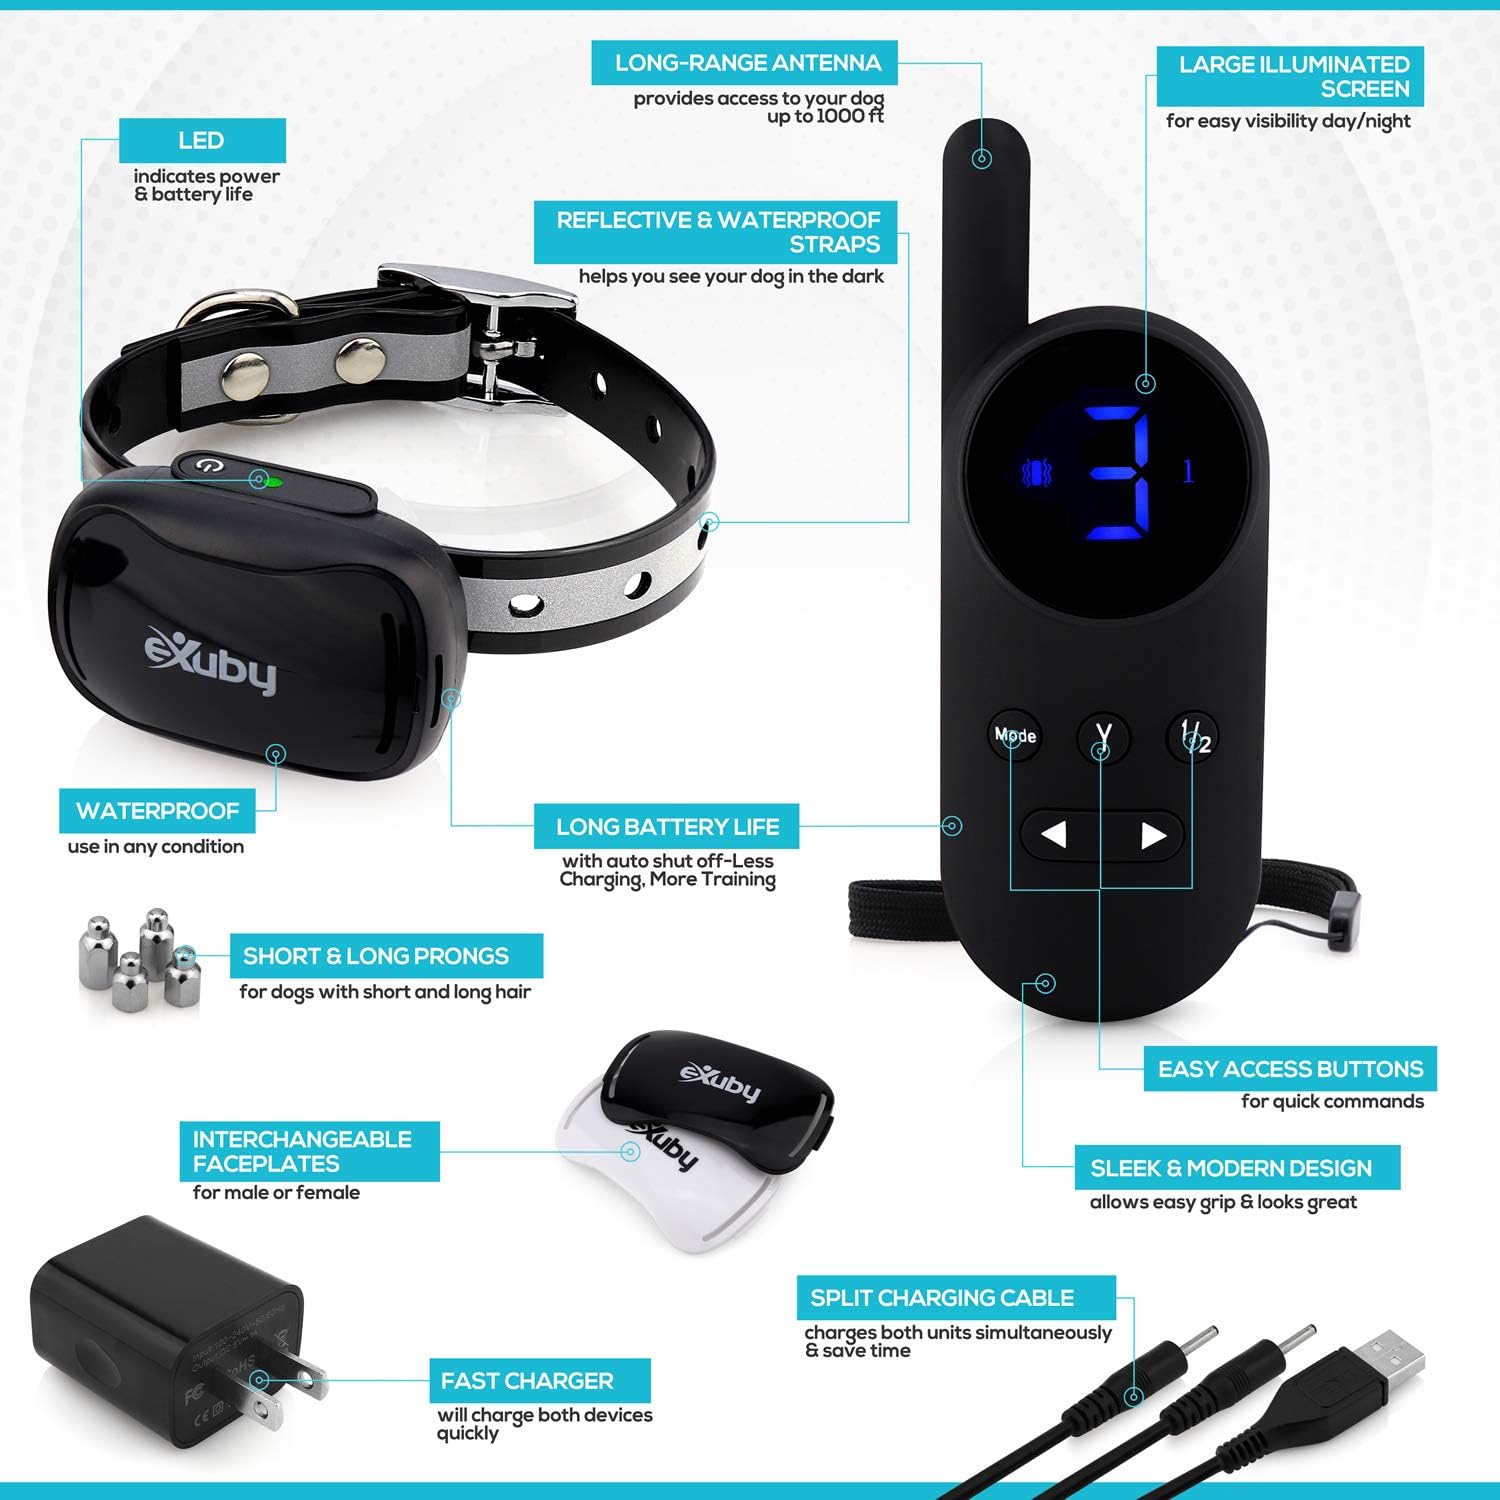
3. Komponenter overview
Halsbåndsmodtager
- Kontaktpunkter: Deliver static stimulation. Choose based on dog's fur length.
- Opladningsport: Til genopladning af modtagerens batteri.
- LED-indikator: Shows power status and battery life.
- Power knap: Tænder/slukker modtageren.
- Udskiftelig frontplade: Allows for personalization.
Fjernsender
- LCD-skærm: Shows mode, intensity level, and battery status.
- Mode knap: Cycles through Sound, Vibration, and Shock modes.
- Y-knap: Activates the selected correction mode.
- Op/Ned knapper: Adjusts intensity levels (1-9).
- 1/2 knap: Switches between controlling Collar 1 or Collar 2 (if applicable).
- Opladningsport: Til genopladning af fjernbetjeningens batteri.

4. Opsætning
4.1 Opladning af enhederne
Before first use, fully charge both the collar receiver and the remote transmitter. The devices use Lithium Ion batteries.
- Connect the USB split charging cable to the charging ports on both the receiver and the remote.
- Plug the USB cable into the power adapter and then into a standard wall outlet.
- The LED indicator on the receiver will glow red during charging and turn green when fully charged. The remote's battery icon on the LCD will show charging status.
- Opladning tager typisk 2-3 timer.
4.2 Fastgørelse af kontaktpunkter
Select the appropriate contact points based on your dog's fur length:
- Bruge short contact points for dogs with short fur.
- Bruge long contact points for dogs with thick or long fur.
Screw the chosen contact points firmly onto the receiver. You may also place the silicone conductive covers over the contact points for added comfort, especially if using static stimulation.
4.3 Montering af kraven
Korrekt pasform er afgørende for effektiv og sikker drift.
- Position the receiver on your dog's neck so that the contact points are underneath, making direct contact with the skin.
- The collar should be snug, but not too tight. You should be able to fit one finger comfortably between the collar strap and your dog's neck.
- If the collar is too loose, the stimulation may not be consistent. If it's too tight, it could cause skin irritation.

5. Betjeningsvejledning
5.1 Tænd/sluk
- Modtager: Press and hold the power button on the receiver until the LED indicator flashes. To turn off, press and hold the power button until the LED turns off.
- Fjern: Press any button to wake up the remote. It will automatically go into standby mode after a period of inactivity.
5.2 Parring af fjernbetjening og modtager
The devices are usually pre-paired from the factory. If re-pairing is needed:
- Sørg for, at begge enheder er fuldt opladede og slukkede.
- Tænd for fjernbetjeningen.
- Press and hold the power button on the receiver until the LED indicator flashes rapidly.
- Within 10 seconds, press the 'Y' button on the remote. The receiver's LED will stop flashing and remain solid, indicating successful pairing.
5.3 Selecting Modes and Intensity Levels
The remote offers three correction modes: Sound, Vibration, and Static Stimulation (Shock).
- Tryk på Mode button on the remote to cycle through the modes. The selected mode will be displayed on the LCD.
- Brug Op/Ned arrow buttons to adjust the intensity level for Vibration and Static Stimulation modes (levels 1-9). Sound mode has a fixed intensity.
- Tryk på Y button to deliver the selected correction.
5.4 Træningsretningslinjer
- Start lavt: Always begin with the lowest intensity level for vibration or static stimulation. Observe your dog's reaction and increase only if necessary. The goal is to get their attention, not to cause pain.
- Konsistens: Brug halsbåndet konsekvent til specifikke adfærdsmønstre, du ønsker at korrigere.
- Timing: Deliver the correction immediately as the unwanted behavior occurs. This helps your dog associate the correction with the action.
- Positiv forstærkning: Kombiner altid korrektioner med positiv forstærkning, når din hund udfører den ønskede adfærd.
- Korte sessioner: Hold træningssessionerne korte og positive.
6. Vedligeholdelse
6.1 Rengøring
- Rengør regelmæssigt halsbåndsremmen og modtageren med enamp klæde.
- Clean the contact points to ensure good conductivity.
- Ensure devices are dry before charging or storing.
6.2 Pleje af batterier
- Charge the devices when the battery indicator is low.
- For long-term storage, charge the batteries to about 50% and store in a cool, dry place. Recharge every few months to prevent deep discharge.
7. Fejlfinding
| Problem | Mulig årsag | Løsning |
|---|---|---|
| Halsbåndet reagerer ikke på fjernbetjeningen | Not paired; low battery; out of range | Re-pair devices; charge batteries; move closer to dog. |
| Ingen statisk stimulation | Contact points not touching skin; intensity too low; faulty contact points | Adjust collar fit; increase intensity; ensure contact points are clean and secure. Use test light. |
| Kort rækkevidde | Obstacles; interference; low battery | Move to an open area; avoid strong electromagnetic fields; charge batteries. |
| Hudirritation på hundens hals | Collar too tight; worn too long; allergic reaction | Loosen collar; remove collar for several hours daily; consult vet if irritation persists. |
8. Specifikationer
| Feature | Detalje |
|---|---|
| Produktdimensioner | 2 x 1 x 2 cm (modtager) |
| Varens vægt | 12 g (samlet pakke) |
| Batteritype | Lithium-ion (inkluderet) |
| Materiale | Termoplastisk polyurethan |
| Farve | Black (with interchangeable faceplates) |
| Målgruppe | Dogs (Toy Breeds, Small Breeds 5-15 lbs) |
| Intensitetsniveauer | 9 (Vibration & Shock) |
| Tilstande | Lyd, vibration, stød |

9. Garanti og support
eXuby products are designed for quality and durability. For specific warranty information or technical support, please refer to the warranty card included in your package or visit the official eXuby website. You can also contact eXuby customer service directly for assistance.
Visit the eXuby Store: eXuby Official Store
10. Officielle produktvideoer
Der blev ikke fundet nogen officielle produktvideoer fra sælgeren i de angivne data.