HoldPeak HP-890CN
HoldPeak HP-890CN Digital Multimeter User Manual
Model: HP-890CN
1. Introduktion
Thank you for choosing the HoldPeak HP-890CN Digital Multimeter. This device is designed for stable and reliable performance, featuring an anti-drop design and a clear 25mm high LCD display. It is capable of measuring various electrical parameters including DC/AC voltage, diode, resistance, capacitance, frequency, duty cycle, temperature, and hFE, along with a non-contact voltage (NCV) detection function. Please read this manual thoroughly before use to ensure safe and proper operation.
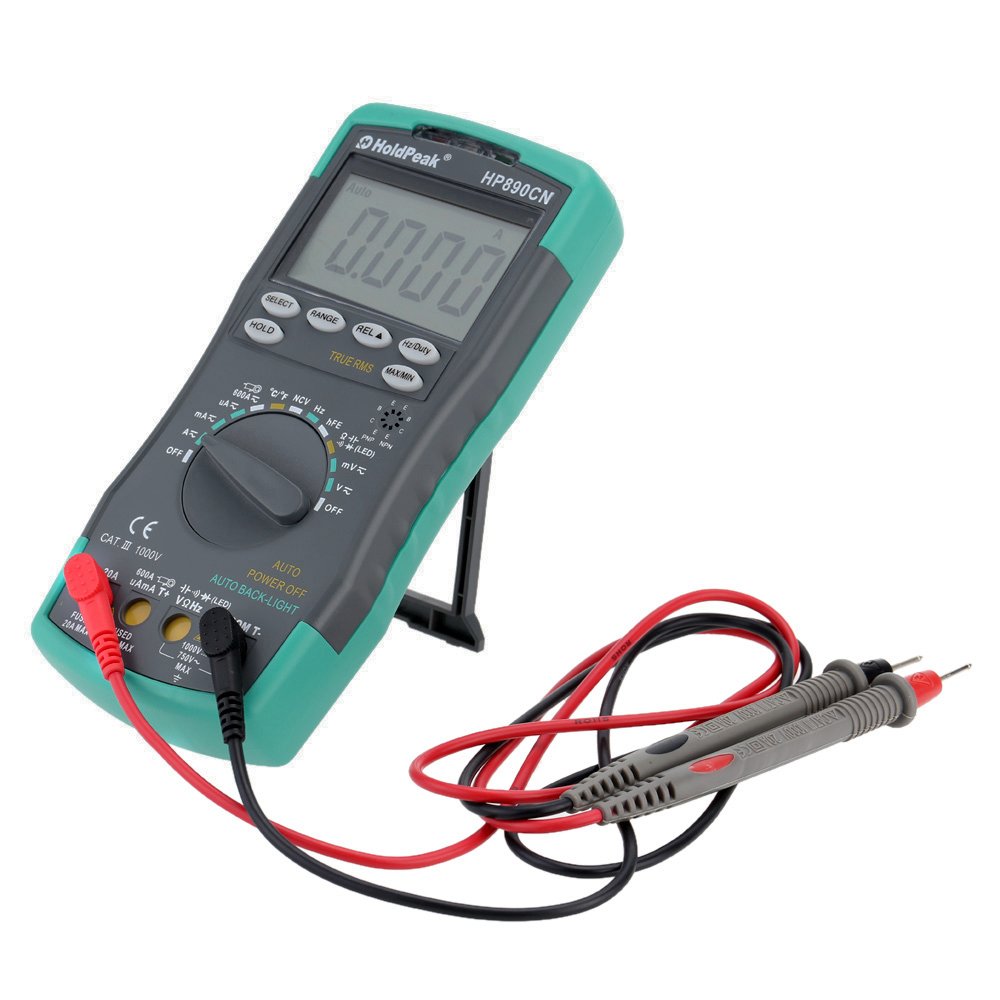
Figure 1: HoldPeak HP-890CN Digital Multimeter
2. Sikkerhedsoplysninger
WARNING: To avoid electrical shock or damage to the meter, please observe the following safety precautions:
- Always remove test leads from the circuit before opening the case or battery cover.
- Do not operate the meter with the case or battery cover open.
- To prevent damage or injury, ensure quick-acting fuses with the specified amp and volt ratings are installed.
- This device complies with IEC 1010-1 1000V CAT III, Pollution Degree 2 standards.
- Brug altid den korrekte funktion og det korrekte område til målinger.
- Anvend aldrig voltage eller strøm, der overstiger de maksimalt angivne grænser.
- Vær forsigtig, når du arbejder med vol.tagover 30V AC RMS, 42V peak eller 60V DC. Disse voluminertages udgør en stødfare.
- Hold fingrene bag probebarriererne under målingerne.

Figur 2: Bagside view of the multimeter showing safety warnings and battery compartment.
3. Produktet er slutview
The HoldPeak HP-890CN Digital Multimeter features a large LCD display and intuitive controls for ease of use. Below is a diagram illustrating the main components and their functions.

Figure 3: Labeled diagram of the HP-890CN Multimeter.
Nøglekomponenter:
- LCD-skærm: Shows measurement readings, units, and function indicators. Features smart backlight.
- Funktionskontakt: Rotary switch to select measurement functions (Voltagf.eks. strøm, modstand osv.).
- Indgangsstik:
- COM: Common input jack for the black test lead.
- VΩHz: Input til bdtage, resistance, frequency, capacitance, diode, and temperature measurements (red test lead).
- mAµA: Input for current measurements up to 600mA (red test lead).
- 20A: Indgang til strømmålinger op til 20A (rød testledning).
- Knapper:
- VÆLGE: Toggles between functions within a single rotary switch position (e.g., AC/DC, Diode/Continuity).
- RÆKKEVIDDE: Manually selects measurement range (auto-ranging is default).
- REL (Relative Value): Measures relative changes.
- Hz/Duty: Vælger frekvens- eller duty cycle-måling.
- HOLDE: Fryser den aktuelle displayaflæsning.
- TRUE RMS: Indicates True RMS measurement capability for AC.
- MAX / MIN: Registrerer maksimum- og minimumsaflæsninger.
- NCV Induction Area: For berøringsfri voltage afsløring.
- hFE Testing Interface: Stikkontakt til transistortest.
- Stativ: Integrated stand for convenient viewing (rotates 180 degrees).
4. Opsætning
4.1 Batteriinstallation
The multimeter requires either two 1.5V AAA batteries or one 9V 6F22 battery (not included). The specific battery type included with your product may vary. To install or replace batteries:
- Sørg for, at multimeteret er slukket, og at alle testledninger er frakoblet.
- Find batterirummet på bagsiden af måleren.
- Brug en skruetrækker til at løsne skruen, der fastgør batteridækslet.
- Fjern batteridækslet.
- Isæt de nye batterier, og overhold den korrekte polaritet (+ og -).
- Sæt batteridækslet på igen, og spænd skruen godt fast.

Figur 4: Intern view of the multimeter, showing the battery compartment.
4.2 Tilslutning af testledninger
Always connect the black test lead to the COM jack. Connect the red test lead to the appropriate input jack based on the measurement you intend to perform:
- For bindtage, Resistance, Capacitance, Frequency, Diode, and Temperature: Connect the red lead to the VΩHz stik.
- For Current up to 600mA: Connect the red lead to the mAµA stik.
- For Current up to 20A: Connect the red lead to the 20A stik.
5. Betjeningsvejledning
Before taking any measurements, ensure the test leads are correctly connected and the function switch is set to the desired measurement type.
5.1 Tænd/sluk
Rotate the function switch from the OFF position to any desired measurement function to turn the meter ON. Rotate it back to OFF to power it down. The meter features an auto power-off function to conserve battery life.
5.2 Måling af DC Voltage (V=)
- Set the function switch to the V= position.
- Tilslut den sorte testledning til COM-stikket og den røde testledning til VΩHz-stikket.
- Connect the test probes across the component or circuit to be measured, in parallel.
- Læs bindtage -værdi på LCD -displayet.
5.3 Måling af AC Voltage (V~)
- Sæt funktionskontakten i stilling V~.
- Tilslut den sorte testledning til COM-stikket og den røde testledning til VΩHz-stikket.
- Connect the test probes across the component or circuit to be measured, in parallel.
- Læs bindtage value on the LCD display. This meter provides True RMS readings for AC voltage.

Figur 5: Måling af AC-volumentage fra en stikkontakt.
5.4 Measuring DC/AC Current (A= / A~)
CAUTION: Always connect the meter in series with the circuit when measuring current. Ensure the circuit is de-energized before connecting the meter.
- Set the function switch to the A= or A~ position. Use the SELECT button to toggle between DC and AC if necessary.
- Tilslut den sorte testledning til COM-stikket.
- For strømstyrker op til 600 mA, tilslut den røde testledning til mAµA stik. For strømstyrker op til 20A, tilslut den røde testledning til 20A stik.
- Break the circuit and connect the test probes in series with the circuit.
- Tilslut strøm til kredsløbet, og aflæs strømværdien på LCD-displayet.
5.5 Måling af modstand (Ω)
- Indstil funktionskontakten til positionen Ω.
- Tilslut den sorte testledning til COM-stikket og den røde testledning til VΩHz-stikket.
- Connect the test probes across the component to be measured. Ensure the component is de-energized.
- Aflæs modstandsværdien på LCD-displayet.
5.6 Måling af kapacitans (F)
- Set the function switch to the capacitance (F) position.
- Tilslut den sorte testledning til COM-stikket og den røde testledning til VΩHz-stikket.
- Connect the test probes across the capacitor. Ensure the capacitor is fully discharged before measurement.
- Aflæs kapacitansværdien på LCD-displayet.
5.7 Measuring Frequency (Hz) / Duty Cycle (%)
- Set the function switch to the Hz/% position.
- Tilslut den sorte testledning til COM-stikket og den røde testledning til VΩHz-stikket.
- Tilslut testproberne på tværs af signalkilden.
- Press the Hz/Duty button to toggle between frequency and duty cycle measurements.
- Aflæs værdien på LCD-displayet.
5.8 Diodetest
- Set the function switch to the Diode/Continuity position. Press SELECT to choose Diode Test.
- Tilslut den sorte testledning til COM-stikket og den røde testledning til VΩHz-stikket.
- Forbind den røde probe til anoden og den sorte probe til katoden på dioden.
- Læs videre bindtage drop on the LCD display. Reverse the probes to check for open circuit (OL).
5.9 Kontinuitetstest
- Set the function switch to the Diode/Continuity position. Press SELECT to choose Continuity Test.
- Tilslut den sorte testledning til COM-stikket og den røde testledning til VΩHz-stikket.
- Tilslut testproberne på tværs af kredsløbet eller komponenten.
- Hvis modstanden er under cirka 50Ω, lyder summeren, hvilket indikerer kontinuitet.
5.10 Temperaturmåling (°C/°F)
- Sæt funktionskontakten i positionen °C/°F.
- Connect the K-type thermocouple probe to the VΩHz and COM jacks, observing polarity.
- Placer termoelementspidsen på eller i nærheden af det objekt, hvis temperatur skal måles.
- Read the temperature on the LCD display. Use the SELECT button to switch between Celsius and Fahrenheit.
5.11 hFE Test (Transistor Test)
- Indstil funktionskontakten til hFE-positionen.
- Insert the transistor's Emitter, Base, and Collector leads into the corresponding holes in the hFE socket, ensuring correct NPN or PNP type.
- Read the hFE value (DC current gain) on the LCD display.
5.12 Non-Contact Voltage (NCV) Detektion
- Set the function switch to the NCV position.
- Move the NCV induction area of the meter close to the conductor being tested.
- Hvis AC voltage is detected (90V to 1000V AC RMS), the NCV red indicator will light up, and the buzzer will sound. The intensity of the sound and light indicates the strength of the detected voltage.
5.13 Specialfunktioner
- HOLDE: Tryk for at fryse den aktuelle aflæsning på displayet. Tryk igen for at slippe.
- REL (Relative Value): Press to store the current reading as a reference. Subsequent measurements will show the difference from this reference.
- MAX / MIN: Press to enter MAX/MIN mode. The meter will display the maximum or minimum reading recorded since entering this mode. Press again to cycle between MAX, MIN, and current reading.
6. Vedligeholdelse
6.1 Rengøring
Tør måleren af med reklameamp cloth and mild detergent. Do not use abrasives or solvents. Keep the contacts of the input jacks clean.
6.2 Udskiftning af batteri
When the battery symbol appears on the LCD, the batteries need to be replaced. Refer to section 4.1 for battery installation instructions.
6.3 Udskiftning af sikringer
WARNING: To avoid electrical shock, disconnect the test leads before opening the case. Replace fuses only with quick-acting fuses of the specified type and rating.
The meter is protected by two fuses:
- F1: 600mA/250V fast-blow fuse for the mAµA input.
- F2: 20A/250V fast-blow fuse for the 20A input.
Sådan udskiftes en sikring:
- Turn the meter OFF and disconnect all test leads.
- Fjern batteridækslet og batterierne.
- Unscrew the screws holding the back case and carefully open the meter.
- Carefully remove the old fuse by gently prying it from its clips.
- Install a new fuse of the correct type and rating.
- Reassemble the meter, ensuring all screws are tightened.
7. Fejlfinding
- Random values in mV mode: It is normal for the display to show random values in mV mode when the input terminals are open (not connected to a circuit). Simply short the input terminals to zero the reading. This will not affect measurement results.
- Intet display eller svagt display: Kontroller batteriniveauet. Udskift batterierne, hvis de er lave.
- No reading in current mode: Check if the fuse is blown. Replace if necessary (refer to section 6.3). Ensure test leads are connected to the correct current input jack (mAµA or 20A) and in series with the circuit.
- "OL" displayed: Indicates an overload (measurement exceeds the selected range) or an open circuit.
8. Specifikationer
| Parameter | Specifikation |
|---|---|
| Mærke | HoldPeak |
| Model | HP-890CN |
| Farve | Gray + Blue-Green |
| Materiale | Plast |
| Max display | 6000 tæller |
| Rækkevidde kontrol | Auto rækkevidde |
| Skærmstørrelse | 60 × 35 mm |
| DC bindtage | 60mV/600mV/6V/60V/600V/1000V |
| AC Voltage (True RMS) | 60mV/600mV/6V/60V/600V/750V |
| DC-strøm | 600µA/6000µA/60mA/600mA/6A/20A |
| AC-strøm (ægte RMS) | 600µA/6000µA/60mA/600mA/6A/20A |
| Modstand | 600Ω/6KΩ/60KΩ/600KΩ/6MΩ/60MΩ |
| Kapacitans | 9.999nF/99.99nF/999.9nF/9.999µF/99.99µF/999.9µF/9.99mF/99.99mF |
| Frekvens | 9.999Hz/99.99Hz/999.9Hz/9.999KHz/99.99KHz/999.9KHz/9.999MHz |
| Duty Cycle | 0.1 % til 99.9 % |
| Temperatur | -20 ~ 1000 ° C / -4 ~ 2222 ° F |
| Diodetest | Ja |
| Kontinuitet Buzzer | Ja |
| Transistor hFE test | 0-1000 |
| NCV-detektion | 90V ~ 1000V AC rms |
| Strømforsyning | 2 * 1.5V AAA batteries / 1 * 9V 6F22 battery (not included) |
| Driftsmiljø | 0-40°C (32-104°F) |
| Opbevaringsmiljø | -20-60 ° C (-4-140 ° F) |
| Produktstørrelse (L×B×H) | Approx. 19 × 8.5 × 3.5 cm (7.67 × 3.35 × 1.37 inches) |
| Produktets vægt | 300 gram (10.58 ounce) |
| Fabrikant | MIS-E0833 |
| UPC | 783950206936, 791592905193 |
9. Pakkens indhold
Pakken indeholder følgende varer:
- 1 * HoldPeak HP-890CN Digital Multimeter
- 1 * Opbevaringspose
- 1 * Pair of Test Leads (Red and Black)
- 1 * K-Type Thermocouple Probe
- 1 * Engelsk brugervejledning

Figur 6: Multimeter og medfølgende tilbehør.

Figure 7: Included storage bag for the multimeter.
10. Garanti og support
For warranty information or technical support, please refer to the documentation provided with your purchase or contact the seller/manufacturer directly. Keep your purchase receipt as proof of purchase.