1. Introduktion
This manual provides essential information for the proper installation, operation, and maintenance of your Apevia CAPTAIN550 ATX Power Supply. The CAPTAIN550 is a 550W ATX power supply featuring a 120mm auto-thermally controlled fan and all black cables for a neat system build.
Please read this manual thoroughly before installation to ensure safe and efficient use of the product.
2. Sikkerhedsoplysninger
- Do not overload, abuse, or modify the power supply unit. Such actions can lead to damage, malfunction, or safety hazards.
- Ensure the power supply is disconnected from the main power outlet before performing any installation, maintenance, or troubleshooting.
- Denne enhed indeholder høje volumenertage components. Do not open the power supply casing. Overlad kun service til kvalificeret personale.
- Use of this unit for Bitcoin mining or similar intensive, continuous load applications is not suggested as it will shorten the life and may cause failures of the power supply. Use for mining purposes is not covered by warranty.
- Sørg for korrekt ventilation omkring strømforsyningen for at forhindre overophedning.
3. Pakkens indhold
Bekræft at alle varer er til stede i pakken:
- Apevia CAPTAIN550 ATX Power Supply Unit
- AC strømledning
- Monteringsskruer (4x)
- Dokumentation (denne manual)

Figure 3.1: Apevia CAPTAIN550 retail packaging.
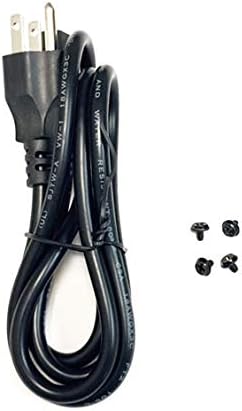
Figure 3.2: AC power cord and mounting screws included with the power supply.
4. Opsætning
4.1 Fysisk installation
- Ensure your computer case has an ATX power supply mounting bay. The CAPTAIN550 has standard ATX dimensions of 5.9" (L) x 5.5" (W) x 3.4" (H).
- Carefully slide the power supply into the designated bay in your computer case.
- Secure the power supply to the case using the four provided mounting screws.

Figur 4.1: Øverst view of the Apevia CAPTAIN550 Power Supply, showing the 120mm cooling fan.

Figur 4.2: Bagside view of the power supply, including the AC input and 115/230V switch.
4.2 bindtage Valg
The power supply features a 115/230V switch on the rear panel. Ensure this switch is set to the correct voltage for your region before connecting the power cord to a wall outlet. Incorrect voltage selection can damage the power supply and connected components.
4.3 Kabelforbindelser
Connect the power supply cables to the corresponding components in your computer system. All cables are black for improved aesthetics.
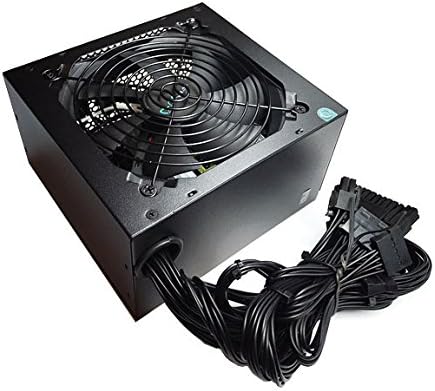
Figure 4.3: The Apevia CAPTAIN550 Power Supply with its attached black cables.
- 20/24pin Main Power Connector: Connect this to your motherboard. The 24pin connector can be split into a 20+4 configuration for motherboards requiring a 20pin connector.
- P8pin (P4+4pin) CPU Connector: Connect this to your motherboard's CPU power input. This 8pin connector can be split into a 4+4 configuration for motherboards requiring a 4pin power connector.
- 6/8pin PCI-express Connector: Connect this to your graphics card. This 8pin connector can be split into a 6+2 configuration for graphics cards requiring a 6pin power connector.
- SATA stik: Connect these to SATA devices such as hard drives, solid-state drives, and optical drives.
- Peripheral (Molex) Connectors: Connect these to older devices or case fans that use Molex power.

Figur 4.4: Overview of available connectors and their configurations.
5. Betjeningsvejledning
After all components are securely connected and the voltage switch is correctly set:
- Tilslut vekselstrømsledningen til strømforsyningen og derefter til en stikkontakt.
- Ensure the power switch on the rear of the power supply is in the 'ON' position.
- Tænd din computer ved hjælp af kabinettets tænd/sluk-knap.
Vigtig bemærkning: The power supply will not power on simply by connecting the power cord to both the power supply and wall outlet. All power supply cables must be properly connected to the PC components for the system to power on.
6. Vedligeholdelse
To ensure optimal performance and longevity of your Apevia CAPTAIN550 power supply:
- Regularly check for dust accumulation on the fan and ventilation grilles. Use compressed air to gently clean dust from these areas.
- Ensure adequate airflow within your computer case. Blocked vents can lead to overheating.
- Do not obstruct the power supply's fan or exhaust.
7. Fejlfinding
7.1 Strømforsyningen tænder ikke
- Verify that the AC power cord is securely connected to both the power supply and a functional wall outlet.
- Check that the 115/230V switch on the rear of the power supply is set to the correct voltage for din region.
- Ensure the power switch on the rear of the power supply is in the 'ON' position.
- Confirm that all power supply cables (20/24pin Main, CPU, PCI-e, SATA, Peripheral) are properly and securely connected to their respective components within the PC. A loose connection can prevent the system from powering on.
- If possible, test the power supply with a power supply tester or in another known working system to rule out other component failures.
8. Specifikationer

Figure 8.1: Side label displaying electrical specifications.
| DC Output Voltage | +3.3V | +5V | +12V | -12V | +5Vsb |
|---|---|---|---|---|---|
| Maks. Udgangsstrøm | 16A | 17A | 39A | 0.3A | 2.5A |
| kombineret kraft | 105W | 468W | 3.6W | 12.5W | |
| Samlet kraft | 550W | ||||
Generelle specifikationer
- Formfaktor: ATX
- Output Wattage: 550W
- Afkølingsmetode: Air (1x 120mm Auto-Thermally Controlled Fan)
- Input bindtage: 115 / 230V Omskiftelig
- Beskyttelser: Circuit, Over-Current, Over-Voltage, Over-Power, Under-Voltage, Over-Temperature Protections
- Dimensioner (LxBxH): 5.9 x 5.5 x 3.4 tommer
- Vægt: Cirka 2.9 pund
9. Garanti
The Apevia CAPTAIN550 Power Supply is covered by a manufacturer's warranty. Please refer to the warranty card included with your product or visit the official Apevia webhjemmeside for detaljerede garantivilkår.
Vigtig: Use of this power supply unit for Bitcoin mining or similar intensive, continuous load applications is not covered by the warranty, as such use can shorten the product's lifespan and cause failures.
10. Support
For technical assistance, product inquiries, or warranty claims, please contact Apevia customer support. You can find contact information on the official Apevia webwebstedet eller gennem dit produkts dokumentation.
Fabrikant: Apevia Corp
Webwebsted: www.apevia.com (Se venligst de seneste kontaktoplysninger)