
1. Introduktion
This manual provides detailed instructions for the installation, operation, and maintenance of the Fafeicy TM626 DIN Rail Mount AC220V Power Timer Switch. This digital timer is designed for precise time control of electrical appliances and systems, offering programmable on/off cycles for various applications.
The TM626 is suitable for controlling street lights, factory equipment, advertising signs, production machinery, radio and television equipment, stage lighting, and other power equipment that requires regular automated switching.
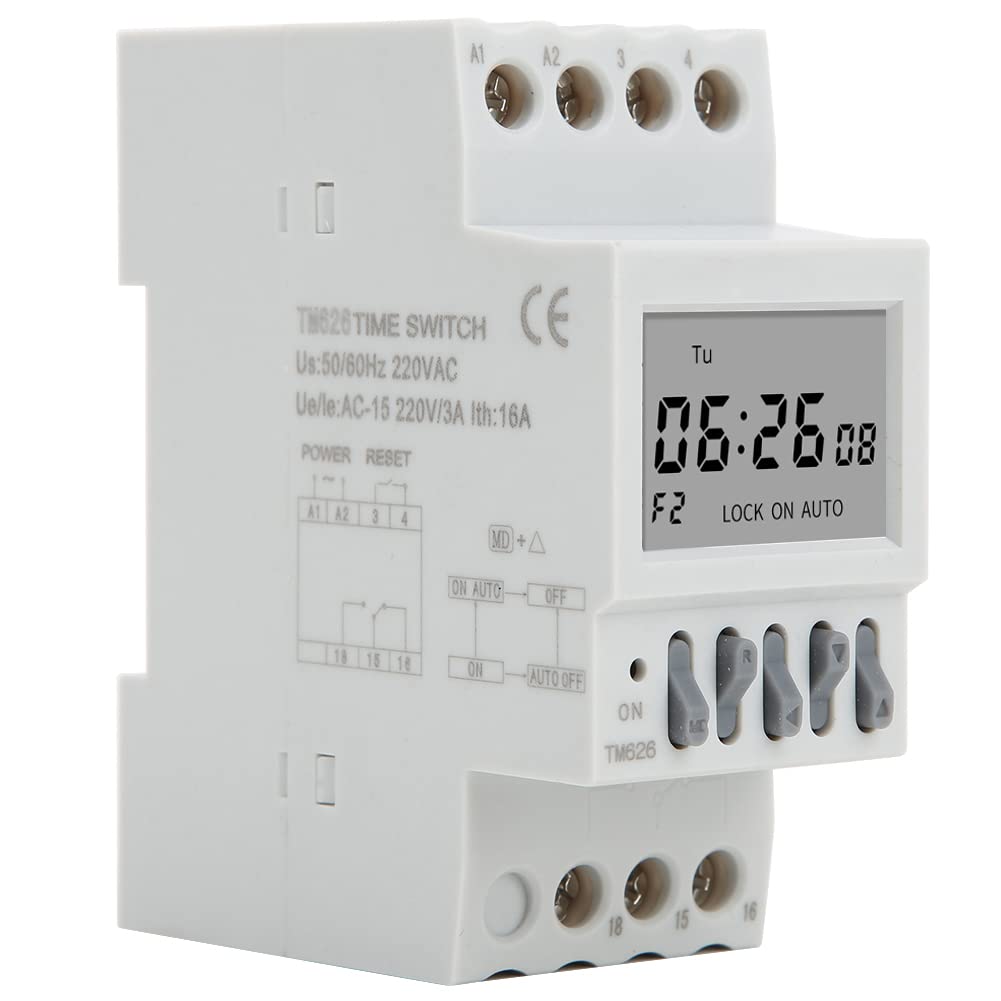
Billede 1.1: Vinklet view of the Fafeicy TM626 Power Timer Switch, showing the display and terminal connections.

Image 1.2: The TM626 timer switch is ideal for automating various applications, including street lighting, industrial equipment, and advertising displays.
2. Sikkerhedsoplysninger
Læs og forstå alle sikkerhedsinstruktioner, før du installerer eller bruger denne enhed. Manglende overholdelse af disse instruktioner kan resultere i elektrisk stød, brand eller alvorlig personskade.
- Sørg for, at strømforsyningen er afbrudt før installations- eller vedligeholdelsesarbejde.
- Installationen bør kun udføres af en kvalificeret elektriker.
- Overskrid ikke den angivne voltage (AC220V) and current (16A) ratings.
- Hold enheden væk fra vand og miljøer med høj luftfugtighed.
- Forsøg ikke at åbne eller reparere enheden selv. Kontakt kvalificeret personale for service.
3. Produktet er slutview
The Fafeicy TM626 is a compact digital timer switch designed for DIN rail mounting. It features a clear LCD display for time and program settings, along with intuitive control buttons.
3.1 Komponenter
- LCD-skærm: Shows current time, day, and programming status.
- Kontrolknapper: Used for setting time, programming, and manual override.
- Terminalblokke: For connecting power input and load output.
- DIN Rail Clips: For secure mounting on a standard DIN rail.

Billede 3.1: Forside view of the TM626 timer switch, highlighting the LCD display and control buttons.

Billede 3.2: Side view of the TM626, illustrating the integrated DIN rail mounting clips.
4. Specifikationer
| Feature | Specifikation |
|---|---|
| Mærke | Fafeicy |
| Modelnummer | TM626 (Fafeicy txusog0m3i) |
| Operation Voltage | AC220V (50/60Hz) |
| Nominel strøm | 16A |
| Skærmstørrelse | 1.6 tommer |
| Mekanisk liv | ≥ 30,000 gange |
| Elektrisk liv | ≥ 10,000 gange |
| Dimensioner (ca.) | Bredde: 35 mm (1.4 tommer), Højde: 82 mm (3.2 tommer), Dybde: 68 mm (2.7 tommer) |
| Montering | DIN-skinne |
| Oprindelsesland | Kina |

Image 4.1: Dimensional drawing of the TM626 timer switch, showing key measurements.

Image 4.2: The TM626 timer switch, illustrating its robust design for long mechanical and electrical life.
5. Opsætning og installation
Follow these steps for proper installation and initial setup of your TM626 timer switch.
5.1 Montering
- Ensure the main power supply is OFF before mounting.
- Locate a standard 35mm DIN rail within your electrical panel.
- Align the DIN rail clips on the back of the TM626 with the DIN rail.
- Press the timer firmly onto the rail until it clicks into place.
5.2 Ledningsføring
Refer to the wiring diagram on the device and below for correct connections. Incorrect wiring can damage the device or cause electrical hazards.

Billede 5.1: Side view of the TM626 showing the wiring terminals and a simplified internal diagram. Terminals A1 and A2 are for power input (AC220V). Terminals 15, 16, 18 are for load output (15: Common, 16: Normally Closed, 18: Normally Open).
- Connect the AC220V power supply to terminals A1 og A2.
- Connect the common wire of your load to terminal 15.
- For normally open operation (load turns ON when timer activates), connect the load's live wire to terminal 18.
- For normally closed operation (load turns OFF when timer activates), connect the load's live wire to terminal 16.
- Sørg for, at alle forbindelser er sikre og isolerede.
5.3 Indledende opstart
After wiring, restore power. The display should light up. If the display is blank, check power connections. The timer may require an initial charge if it has been stored for a long time; allow it to be powered for a few minutes.
6. Betjeningsvejledning
The TM626 timer switch allows you to set the current time and program multiple on/off cycles.
6.1 Indstilling af aktuel tid og dag
- Tryk på UR button (if available, or a similar button for time setting).
- Brug D+ (Day), H+ (Hour), and M+ (Minute) buttons to adjust the current day, hour, and minute.
- Trykke UR igen for at gemme og afslutte.
6.2 Programmering af tænd/sluk-cyklusser
The TM626 typically supports multiple ON/OFF programs. The exact number may vary, but common models support 8-16 programs.
- Tryk på PROG button. The display will show "1 ON".
- Bruge D+ to select the day(s) for this ON event (e.g., Mon-Fri, Sat-Sun, every day, specific days).
- Bruge H+ og M+ for at indstille den ønskede ON-tid.
- Trykke PROG igen. Displayet vil vise "1 OFF".
- Bruge D+, H+, og M+ to set the desired OFF time for the first program.
- Repeat steps 1-5 for additional ON/OFF programs (e.g., "2 ON", "2 OFF", etc.).
- Når du har indstillet alle de ønskede programmer, skal du trykke på UR button to exit programming mode and save settings.
6.3 Manuel tilsidesættelse
De MANUEL or ON/AUTO/OFF button allows you to manually override the programmed settings.
- Pressing this button cycles through modes: ON (altid tændt), AUTO (følger programmer), SLUKKET (altid slukket).
- Vælge AUTO for the timer to execute its programmed schedules.
6.4 Nulstil funktion
To clear all settings and return the timer to its factory default state, locate the small NULSTIL button (often recessed) and press it using a pointed object (e.g., a pen tip). This will erase all time and program settings.
7. Vedligeholdelse
The Fafeicy TM626 timer switch requires minimal maintenance to ensure long-term reliable operation.
- Rensning: Brug en blød, tør klud til at tørre enhedens yderside af. Brug ikke slibende rengøringsmidler eller opløsningsmidler.
- Inspektion: Kontroller regelmæssigt ledningsforbindelserne for tæthed og tegn på slid eller beskadigelse.
- Batteri-sikkerhedskopi: The device typically includes an internal battery for retaining settings during power outages. This battery is usually non-replaceable by the user and recharges when the device is powered.
8. Fejlfinding
If you encounter issues with your TM626 timer switch, refer to the following common problems and solutions:
| Problem | Mulig årsag | Løsning |
|---|---|---|
| Displayet er tomt. | Ingen strømforsyning; internt batteri afladet. | Check power connections to A1/A2. Allow device to be powered for several minutes to charge the internal battery. |
| Belastningen tænder/slukker ikke som programmeret. | Incorrect programming; timer in manual ON/OFF mode; incorrect wiring; faulty load. | Verify program settings. Ensure the timer is in AUTO mode. Check wiring connections (15, 16, 18). Test the load independently. |
| Tidspunktet er forkert. | Time not set correctly; power interruption (though internal battery should prevent this). | Reset and re-set the current time and day. Ensure the internal battery is charged. |
| Knapperne reagerer ikke. | Device malfunction; temporary software glitch. | Perform a full reset using the recessed RESET button. If the issue persists, contact support. |
9. Garanti og support
For warranty information or technical support, please refer to the documentation provided with your purchase or contact Fafeicy customer service through their official channels. Keep your purchase receipt as proof of purchase.
For generelle forespørgsler kan du besøge Fafeicy Brand Store.