
Indledning
This manual provides detailed instructions for the installation, operation, and maintenance of your Gamemax G503X Elysium Gaming PC Case. Please read this manual thoroughly before beginning installation to ensure proper setup and safe use of your product. Keep this manual for future reference.
Sikkerhedsoplysninger
- Frakobl altid strømforsyningen fra stikkontakten, før du installerer eller fjerner komponenter inde i pc-kabinettet.
- Håndter alle komponenter forsigtigt for at undgå skader fra statisk elektricitet. Overvej at bruge en antistatisk håndledsrem.
- Avoid placing the PC case in direct sunlight, near heat sources, or in areas with high humidity.
- Sørg for tilstrækkelig ventilation omkring kabinettet for at forhindre overophedning.
- Hold små dele og værktøj væk fra børn.
- Forsøg ikke at ændre kabinettet eller dets komponenter, da dette kan ugyldiggøre garantien og udgøre en sikkerhedsrisiko.
Pakkens indhold
Kontroller venligst indholdet af din pakke. Hvis der mangler eller er beskadigede dele, skal du kontakte din forhandler.
- Gamemax G503X Elysium Mid Tower PC Case
- Pre-installed 120mm RGB Fans (quantity as specified on packaging, typically 3)
- Accessory kit (screws, standoffs, cable ties, etc.)
- Brugervejledning (dette dokument)
Funktioner
- Mid Tower design
- Full transparent acrylic side window
- Support for ATX, Micro ATX, and Mini-ITX motherboards
- Front I/O: 1x USB 3.0, 2x USB 2.0, HD Audio (input/output)
- Integrated fan control (High/Off/Low)
- Ample space for cable management behind the motherboard tray
- Support for long graphics cards (up to 380mm)
- Multiple drive bays: 1x 5.25", 2x 3.5" HDD, 2x 2.5" SSD
- Pre-installed RGB fans for enhanced aesthetics and cooling
Opsætning og installation
1. Udpakning af kufferten
Carefully remove the case from its packaging. Inspect for any damage during shipping. Remove any protective films from the acrylic side panel.
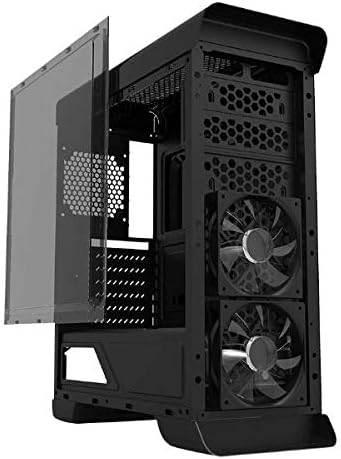
Billede: Side view of the Gamemax G503X Elysium case with the transparent acrylic panel detached, showing the internal structure and front fans.
2. Installation af bundkort
- Lay the case on its side.
- Install the necessary motherboard standoffs into the motherboard tray according to your motherboard's form factor (ATX, Micro ATX, Mini-ITX).
- Placer forsigtigt dit bundkort på afstandsstykkerne, og juster skruehullerne.
- Fastgør bundkortet med de medfølgende skruer.
3. Drevinstallation
3.1. 5.25" Drive (Optical Drive)
The case features one 5.25" drive bay. Remove the front panel cover, slide the drive into the bay, and secure it with screws or tool-less clips if available.
3.2. 3.5" HDD Drives
Install up to two 3.5" HDDs into the designated drive cages. These typically use trays or direct screw mounting. Ensure they are securely fastened.
3.3. 2.5" SSD Drives
Install up to two 2.5" SSDs onto the dedicated mounting points, usually located behind the motherboard tray or on the PSU shroud. Secure with screws.
4. Installation af CPU-køler
Install your CPU cooler according to its manufacturer's instructions. Ensure the cooler's height does not exceed the maximum supported height of 158mm for this case.
5. Installation af grafikkort (GPU)
- Remove the necessary PCI slot covers from the rear of the case (up to 7 slots available).
- Indsæt dit grafikkort i det relevante PCIe-slot på dit bundkort.
- Secure the graphics card with screws. The case supports graphics cards up to 380mm in length.

Billede: Bagside view of the Gamemax G503X Elysium case, highlighting the 7 PCI expansion slots and the rear fan mount.
6. Fan Installation and Configuration
The case comes with pre-installed RGB fans. Additional fan mounting options are available:
- Front: Up to 3x 120mm fans (2 pre-installed, 1 optional)
- Bag: 1x 120mm fan (optional, may be pre-installed)
- Top: Up to 2x 120mm fans (optional)
Connect all fan power cables to your motherboard or a fan controller. The case includes an integrated fan controller for speed adjustment.
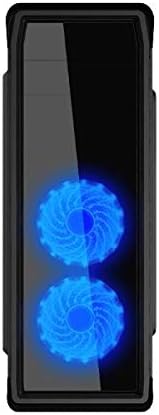
Billede: Forside view of the Gamemax G503X Elysium case, showcasing the two illuminated RGB fans visible through the front panel.
7. Kabelforvaltning
Utilize the space behind the motherboard tray and the provided cable tie points to route and secure cables. This improves airflow and aesthetics.
8. Connecting Front Panel I/O
Connect the following cables from the case's front panel to the corresponding headers on your motherboard:
- USB 3.0 header
- USB 2.0 headere
- HD Audio header (for headphone and microphone jacks)
- Power switch, Reset switch, Power LED, HDD LED headers
Betjening af sagen
Tænder
Once all components are installed and connected, close the side panel. Connect your monitor, keyboard, mouse, and power cable to the PC. Press the power button on the front panel to start your system.
Ventilator kontrol
The Gamemax G503X Elysium features an integrated fan controller on the top panel. Use this controller to adjust the speed of the connected case fans to High, Low, or Off, depending on your cooling needs and noise preference.
RGB belysning
The pre-installed fans feature RGB LEDs. The lighting effects are typically controlled via the motherboard's RGB software or a dedicated controller if included with the fans. Refer to your motherboard manual for RGB software instructions.
Opretholdelse
Rensning
Regular cleaning helps maintain optimal performance and extends the lifespan of your components. Use a can of compressed air to remove dust from inside the case, especially from fans and heatsinks. Wipe exterior surfaces with a soft, damp klæde. Undgå at bruge skrappe kemikalier eller slibende materialer.
Periodically check and clean any dust filters (if present) to ensure unrestricted airflow.
Fejlfinding
- Systemet tænder ikke: Ensure all power cables (motherboard, CPU, GPU, drives) are securely connected. Check that the power supply switch is in the 'ON' position. Verify front panel power switch connection to the motherboard.
- Ventilatorerne drejer ikke: Check fan power connections to the motherboard or fan controller. Ensure the fan controller is set to 'High' or 'Low', not 'Off'.
- Ingen displayudgang: Ensure your graphics card is properly seated and connected to the power supply. Verify that your monitor cable is connected to the graphics card, not the motherboard's integrated graphics port (unless using integrated graphics).
- Problemer med overophedning: Ensure all case fans are spinning correctly and oriented for proper airflow (intake/exhaust). Check CPU cooler installation and thermal paste application. Ensure the case is not obstructed.
For further assistance, consult your motherboard and component manuals or contact Gamemax support.
Specifikationer
| Feature | Specifikation |
|---|---|
| Sagstype | Mid Tower |
| Model | G503X Elysium |
| Farve | Sort |
| Sidepanel | Full Transparent Acrylic |
| Bundkort support | ATX, Micro ATX, Mini-ITX |
| Drive Bays | 1x 5.25", 2x 3.5" HDD, 2x 2.5" SSD |
| PCI -udvidelsespladser | 7 |
| Front I / O-porte | 1x USB 3.0, 2x USB 2.0, HD Audio (Input/Output) |
| Ventilator kontrol | Integrated (High/Off/Low) |
| Forudinstallerede ventilatorer | 3x 120mm RGB Fans (typically 2 front, 1 rear) |
| Optional Fan Support | Front: 3x 120mm; Rear: 1x 120mm; Top: 2x 120mm |
| Max CPU kølerhøjde | 158 mm |
| Max grafikkortlængde | 380 mm |
| Kabelstyringsplads | Yes (behind motherboard tray) |
| Materiale | Acrylic (side panel) |
| Varens vægt | 5.75 kg |
Garanti og support
Gamemax products come with a limited warranty. Please refer to the warranty information provided with your purchase or visit the official Gamemax website for details on warranty terms and conditions. For technical support or inquiries, please contact your retailer or Gamemax customer service.