
1. Introduktion
The IK Multimedia AXE I/O SOLO is a premium 2-in/3-out USB audio interface designed for guitarists and musicians. It offers high-resolution 24-bit, 96 kHz audio conversion, advanced guitar tone shaping features, and comes bundled with powerful software like AmpliTube 5 SE and TONEX SE. This manual provides detailed instructions for setting up, operating, and maintaining your AXE I/O SOLO.

Figur 1.1: Forfra vinklet view of the IK Multimedia AXE I/O SOLO USB Audio Interface.
2. Hvad er der i æsken
Upon unpacking your AXE I/O SOLO, please ensure all the following items are present:
- AXE I/O SOLO Audio Interface
- USB-A til USB-B-kabel
- Registration Card with Software Download Instructions
If any items are missing or damaged, please contact IK Multimedia support immediately.
3. Opsætning
3.1. Driver installation
- Registrer dit produkt: Visit the IK Multimedia website and register your AXE I/O SOLO using the provided serial number. This will grant access to software downloads and updates.
- Download drivere: From your IK Multimedia user area, download the latest drivers for your operating system (Windows or macOS).
- Installer drivere: Follow the on-screen instructions to install the drivers. It is recommended to restart your computer after installation.
3.2. Hardwareforbindelser
Connect your AXE I/O SOLO to your computer and other audio equipment as follows:
- USB-forbindelse: Connect the supplied USB cable from the AXE I/O SOLO's USB 2.0 port to an available USB port on your computer. The device is USB bus-powered.
- Instrument Input (Input 1): Connect your guitar or bass to the 1/4" TS input on the front panel.
- Microphone/Line Input (Input 2): Connect a microphone (XLR) or a line-level instrument (1/4" TRS) to the combo jack on the rear panel. Ensure 48V phantom power is enabled for condenser microphones.
- Line Outputs (1/L, 2/R): Connect your studio monitors or an external mixer to the 1/4" TRS Line Out jacks on the rear panel.
- Amp Produktion: Connect the 1/4" TS Amp Out jack on the front panel to your guitar amplifier's input for re-amping or direct monitoring through an amp.
- Hovedtelefoner: Connect your headphones to the 1/4" TRS Headphone jack on the front panel.
- MIDI ind/ud: Connect MIDI devices to the 5-pin DIN MIDI In and Out ports on the rear panel.
- Ekstern kontrol: Connect expression pedals or footswitches to the 1/4" TS Switch/Pedal 1 and 2 inputs on the rear panel for hands-free control of software parameters.
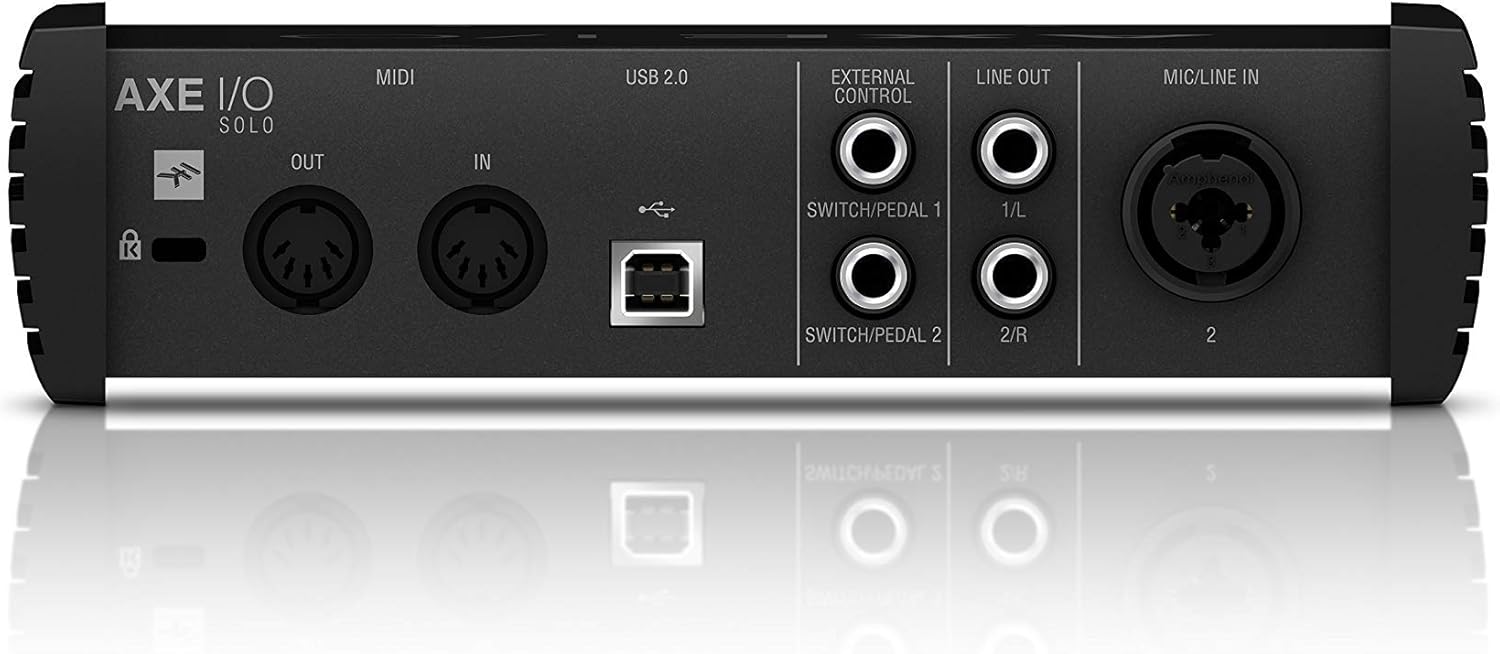
Figure 3.1: Rear panel showing USB, MIDI, External Control, Line Out, and Mic/Line In connections.
4. Betjeningsvejledning
4.1. Kontroller på frontpanelet

Figure 4.1: Front panel controls including Gain, Z-Tone, Monitor, Headphones, and Master knobs, along with input switches.
- GAIN (Input 1 & 2): Adjusts the input level for connected instruments or microphones. The LED meters indicate signal strength and clipping.
- Z-TONE (Input 1): This unique feature allows you to vary the impedance of the instrument input.
- SKARP: Higher impedance for a tighter, sharper sound.
- FREMHÆVET: Lower impedance for a thicker, bolder sound.
- PASSIVE/ACTIVE Switch (Input 1): Selects the appropriate input impedance for passive or active guitar pickups.
- PURE/JFET Switch (Input 1): Switches between a transparent PURE preamp and a Class A JFET input for a warmer, tube-like tone.
- 48V Button (Input 2): Activates +48V phantom power for condenser microphones. The LED illuminates when active.
- MONITOR-knap: Blends between the direct input signal (DIRECT) and the playback signal from your computer (DAW) for zero-latency monitoring.
- HEADPHONES Knob: Controls the output volume for the headphone jack.
- MASTER knap: Controls the overall output volume for the Line Outputs.
5. Softwareintegration
The AXE I/O SOLO includes a powerful software bundle to enhance your recording and tone-shaping experience.
5.1. AmpliTube 5 SE
AmpliTube 5 SE provides a comprehensive suite of virtual guitar and bass amplifiers, cabinets, stompboxes, and rack effects. It allows you to create detailed signal chains and achieve a wide range of tones.

Figure 5.1: AXE I/O SOLO in use with a guitar and a laptop running AmpliTube 5 SE.

Figur 5.2: Den AmpliTube 5 SE software interface, showing various virtual ampforstærkere og effekter.
5.2. TONEX SE
TONEX SE utilizes AI Machine Modeling technology to capture the sound of any amp, cabinet, or pedal and turn it into a Tone Model. You can play, practice, and record with thousands of Tone Models available.

Figure 5.3: The TONEX SE software interface, displaying various Tone Models and their settings.
5.3. Software Activation
After installing the drivers, follow the instructions provided with your registration card to download and activate AmpliTube 5 SE and TONEX SE from your IK Multimedia user account. Ensure your AXE I/O SOLO is connected during the activation process.
6. Vedligeholdelse
- Rensning: Brug en blød, tør klud til at rengøre enhedens yderside. Undgå slibende rengøringsmidler eller opløsningsmidler.
- Opbevaring: Store the AXE I/O SOLO in a cool, dry place away from direct sunlight and extreme temperatures when not in use.
- Kabelpleje: Always handle cables by the connector, not the wire, to prevent damage.
7. Fejlfinding
If you encounter issues with your AXE I/O SOLO, consider the following common solutions:
- Ingen lyd:
- Check all cable connections (USB, instrument, monitors, headphones).
- Ensure the AXE I/O SOLO is selected as the input/output device in your computer's sound settings and your DAW.
- Adjust GAIN, MONITOR, HEADPHONES, and MASTER knobs.
- Verify that the correct input mode (PASSIVE/ACTIVE, PURE/JFET) is selected for your instrument.
- Driverproblemer:
- Reinstall the latest drivers from the IK Multimedia webwebsted.
- Prøv at tilslutte til en anden USB-port på din computer.
- Sørg for, at dit operativsystem er opdateret.
- Software genkender ikke enhed:
- Ensure the AXE I/O SOLO drivers are correctly installed and the device is connected.
- Check your DAW's audio preferences to ensure the AXE I/O SOLO is selected as the audio device.
- Verify software activation status.
- Forvrænget lyd:
- Reduce the input GAIN to prevent clipping (check the CLIP LEDs).
- Ensure the correct input mode (PASSIVE/ACTIVE) is selected for your instrument.
For further assistance, refer to the official IK Multimedia support resources.
8. Specifikationer
| Feature | Detalje |
|---|---|
| Varens vægt | 2.2 pund (1000 gram) |
| Produktdimensioner | 7.68 x 7.68 x 2.09 tommer |
| Varemodelnummer | IP-INT-AXEIOSOLO-IN |
| Kompatible enheder | Personlig computer |
| Hardware-interface | USB |
| Operativsystem | Mac (also compatible with Windows) |
| Mærke | IK Multimedia |
| Forbindelsesteknologi | USB |
| Antal kanaler | 2 |
| Dato først tilgængelig | 12. marts 2020 |
9. Garanti og support
9.1. Garantioplysninger
The IK Multimedia AXE I/O SOLO is covered by a manufacturer's warranty. Please refer to the warranty card included with your product or visit the official IK Multimedia webwebstedet for detaljerede vilkår og betingelser vedrørende garantidækning og varighed.
9.2. Kundesupport
For technical support, product registration, software downloads, or any other inquiries, please visit the official IK Multimedia support page:
Du kan også finde den fulde brugermanual i PDF-format her: AXE I/O SOLO User Manual (PDF)