1. Introduktion
This manual provides essential information for the safe and effective installation, operation, and maintenance of your Walfront AS-10A-220V Automatic Outdoor Photocell Light Switch Sensor. This device is designed to automatically control outdoor lighting based on ambient light levels, offering convenience and energy efficiency. Please read this manual thoroughly before use and retain it for future reference.
2. Sikkerhedsoplysninger
ADVARSEL: Electrical shock hazard. Improper installation or use can result in serious injury or death. Always follow these safety guidelines:
- Installationen skal udføres af en kvalificeret elektriker i overensstemmelse med alle lokale og nationale el-forskrifter.
- Disconnect power at the circuit breaker or fuse box before installing or servicing the unit.
- Sørg for, at voltage supply matches the product's specified operating voltage (220V AC).
- Overskrid ikke den maksimale belastningskapacitet på 2200 W (10 A).
- This device is designed for outdoor use and is rainproof, but ensure all connections are properly sealed and protected from direct water ingress.
- Forsøg ikke at skille enheden ad eller ændre den. Der er ingen dele indeni, som brugeren kan servicere.
3. Produktet er slutview
The Walfront AS-10A-220V photocell light switch is an automatic control device designed for outdoor lighting applications. It features a photosensitive sensor that detects ambient light, turning connected lights on at dusk and off at dawn.
Nøglefunktioner:
- Automatisk kontrol: Automatically detects ambient light to control connected lighting.
- Sensitive and Reliable Performance: High sensitivity ensures accurate light detection and reliable operation.
- Præcis detektion: Offers a 10-meter detection range for effective light sensing.
- Outdoor Application: Rainproof design suitable for controlling outdoor street lights and other exterior luminaires.
- Høj effektkapacitet: Supports a load power of up to 2200W (10A).
- Anti-Interference Delay Circuit: Equipped with a delay circuit to prevent false switching due to momentary light changes.
Komponenter:
The unit consists of a compact plastic housing, a photosensitive sensor, and three color-coded wires for electrical connection, along with a metal mounting bracket.

Figur 3.1: Forside view of the Walfront AS-10A-220V photocell light switch with its wiring.

Figur 3.2: Nærbillede view highlighting the rainproof design, automatic photosensitive operation, high sensitivity, and the anti-interference delay circuit of the photocell switch.
4. Specifikationer
| Specifikation | Værdi |
|---|---|
| Fabrikant | Walfront |
| Varemodelnummer | AS-10A-220V |
| Materiale | Plast |
| Driftstilstand | TÆND SLUK |
| Nuværende vurdering | 10 A |
| Operation Voltage | 220 Volt AC |
| Indlæs strøm | 2200 W |
| Detektionsområde | 10 meter |
| Delayed Shutdown Time | 0.1 s |
| Kontakttype | Normalt åben |
| Connector Type | Plug-in |
| Terminaltype | Skrue |
| Switch Type | Fotoelektrisk afbryder |
| Oprindelsesland | Kina |
5. Opsætning og installation
Proper installation is crucial for the optimal performance and safety of the photocell switch. Ensure power is disconnected before proceeding.
Ledningsdiagram:
The photocell switch typically has three color-coded wires for connection:
- Rød ledning: Connects to the LOAD (output to the light fixture).
- Sort ledning: Connects to the LINE (incoming live/hot wire from power supply).
- Hvid ledning: Connects to NEUTRAL (common neutral wire).
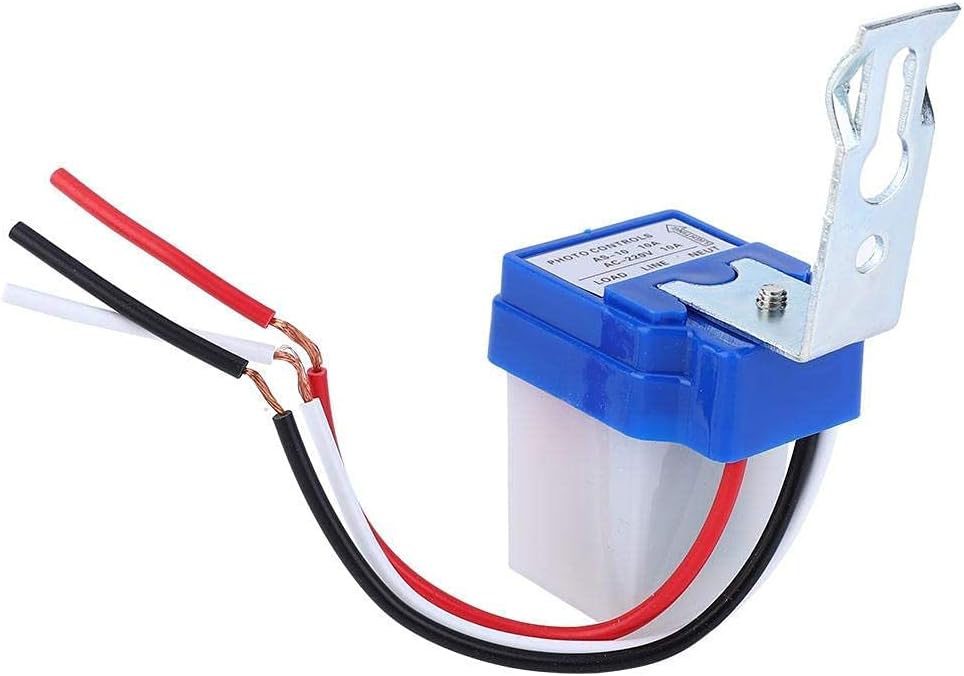
Figur 5.1: Detaljeret view of the wiring connections on the photocell switch, showing the red, black, and white wires.
Installationstrin:
- Afbryd strømmen: Turn off the power supply to the circuit at the main breaker or fuse box. Verify with a voltage tester.
- Monter kontakten: Choose a suitable outdoor location for mounting. The sensor should be exposed to natural light and not obstructed by eaves, trees, or other objects that could cast shadows or reflect artificial light onto it. Mount the switch using the provided metal bracket and appropriate screws. Ensure the sensor window faces the sky or the direction of natural light.
- Ledningsforbindelser:
- Tilslut sort ledning from the photocell switch to the incoming live/hot wire fra din strømforsyning.
- Tilslut hvid ledning from the photocell switch to the neutral ledning of your power supply and the neutral wire of your light fixture.
- Tilslut rød ledning from the photocell switch to the live/hot wire of your light fixture.
- Sikker ledningsføring: Route and secure all wiring to prevent damage and ensure compliance with local codes.
- Gendan strøm: Når alle forbindelser er sikre og verificerede, skal strømmen til kredsløbet genoprettes.

Figur 5.2: Eksample of a photocell switch installed in an outdoor environment, controlling a street light.
6. Betjeningsvejledning
The Walfront AS-10A-220V photocell light switch operates automatically based on ambient light conditions. There are no manual controls or adjustments required after installation.
- Automatisk tænding: When the ambient light level drops below a certain threshold (typically at dusk), the photocell sensor will detect the change and automatically turn on the connected light fixture.
- Automatisk fra: When the ambient light level rises above a certain threshold (typically at dawn), the photocell sensor will detect the change and automatically turn off the connected light fixture.
- Forsinkelsesfunktion: The integrated 0.1-second delay circuit helps prevent false switching due to momentary light fluctuations (e.g., car headlights, lightning flashes).
For optimal performance, ensure the sensor is not exposed to direct artificial light sources at night, as this could cause it to turn off prematurely.
7. Vedligeholdelse
The Walfront AS-10A-220V photocell light switch requires minimal maintenance. Regular checks can help ensure its longevity and proper function.
- Rensning: Periodically inspect the sensor window for dirt, dust, or debris. Gently clean the sensor surface with a soft, damp cloth to ensure accurate light detection. Do not use abrasive cleaners or solvents.
- Kontrol af obstruktion: Ensure that no new obstructions (e.g., growing foliage, new structures) are blocking the sensor's exposure to natural light.
- Ledningsinspektion: Annually, or if issues arise, visually inspect the wiring connections for any signs of wear, corrosion, or damage. Ensure all connections remain secure. Always disconnect power before inspection.
- Miljøfaktorer: While rainproof, extreme weather conditions can affect any outdoor electrical device. Ensure the unit is not subjected to prolonged submersion or direct high-pressure water jets.
8. Fejlfinding
If you experience issues with your photocell light switch, refer to the following troubleshooting guide:
| Problem | Mulig årsag | Løsning |
|---|---|---|
| Lyset forbliver tændt i løbet af dagen. | Sensoren er blokeret eller snavset. | Clean the sensor window. Remove any obstructions. |
| Sensor is not receiving enough natural light. | Relocate the sensor to an area with better exposure to natural light. | |
| Lyset tænder ikke om natten. | No power to the switch or light fixture. | Check circuit breaker/fuse. Verify wiring connections (ensure power is off first). |
| Sensor is exposed to artificial light at night. | Ensure no streetlights, porch lights, or other artificial light sources are shining directly onto the sensor. Relocate if necessary. | |
| Faulty light bulb or fixture. | Test the light fixture with a known working power source or bulb. | |
| Lyset flimrer eller tænder/slukker hurtigt. | Intermittent light source or reflection near sensor. | Identify and eliminate the intermittent light source. Ensure the sensor is not reflecting light from nearby surfaces. |
| Løs ledningsforbindelse. | Disconnect power and check all wiring connections for tightness. | |
| Kontakten reagerer ikke. | Enhedsfejl. | If all other troubleshooting steps fail, the unit may be faulty and require replacement. |
If you are unable to resolve the issue after following these steps, consult a qualified electrician.
9. Garanti og support
Walfront products are designed for reliability and performance. While specific warranty details are not provided in this manual, most products come with a standard manufacturer's warranty against defects in materials and workmanship.
For technical support, warranty claims, or further assistance, please refer to the retailer where you purchased the product or visit the official Walfront webwebsted for kontaktoplysninger.