
1. Introduktion
This manual provides essential information for the safe and effective use of your KeeYees 7-70V 30A PWM DC Motor Speed Controller. Please read these instructions carefully before installation and operation to ensure proper functionality and to prevent damage to the device or connected equipment.

Image 1.1: KeeYees 7-70V 30A PWM DC Motor Speed Controller. This image shows the compact design of the speed controller with its protective metal casing and control knob.
2. Sikkerhedsoplysninger
- Always ensure the power supply is disconnected before making any wiring connections to prevent electrical shock or damage to the controller.
- Kontroller, at input voltage is within the specified range of DC 7-70V. Exceeding this range can cause permanent damage.
- Ensure the motor's current draw does not exceed the controller's maximum output of 30A. Operating beyond this limit can lead to overheating and failure.
- The included 30A fuse provides overcurrent protection. Do not bypass or replace it with a fuse of a higher rating.
- Install the controller in a well-ventilated area to prevent overheating, especially during prolonged operation at high loads.
- Hold enheden væk fra fugt, støv og ætsende miljøer.
3. Produktet er slutview
The KeeYees DC Motor Speed Controller is designed to regulate the speed of DC motors using Pulse Width Modulation (PWM). It features a wide voltage input range and robust components for stable performance.
Nøglekomponenter:
- Hastighedskontrolknap: Adjusts motor speed from 0% to 100%. It also functions as an ON/OFF switch.
- Input Terminals (P+, P-): Til tilslutning af DC-strømforsyningen.
- Output Terminals (M+, M-): For connecting the DC motor.
- Motion/Stop/Brake Switch: Controls the motor's state (Run, Stop, or Brake).
- 30A sikring: Provides overcurrent protection for the circuit.
- High-Pressure Tube Drive & Capacitors: Internal components designed for stable and efficient operation.

Image 3.1: Internal components of the KeeYees DC Motor Speed Controller. This view highlights the 4 high-pressure tube drives, 3x 100V high-frequency low-resistance capacitors, the car dedicated fuse, and the motion/stop/brake switch.
4. Specifikationer
| Feature | Specifikation |
|---|---|
| Gældende bindtagRækkevidde | DC 7-70V |
| Maximum Drive Current | 30A |
| Control Power (Recommended) | 12V: within 300W 24V: within 400W 48V: within 450W 72V: within 500W |
| Duty Cycle Adjustable Range | 1% - 100% |
| PWM-frekvens | 12KHZ |
| Shell Size (L x W x H) | 85 mm x 59 mm x 34 mm (ca. 3.35 x 2.32 x 1.34 tommer) |
| Sikringstype | Klingesikring til biler |
| Sikringsvurdering | 30A |
| Potentiometer Cable Length | 15 cm (ca. 5.9 tommer) |
| Materiale | Copper (Primary) |
| Varens vægt | 191 g (ca. 0.42 lbs) |
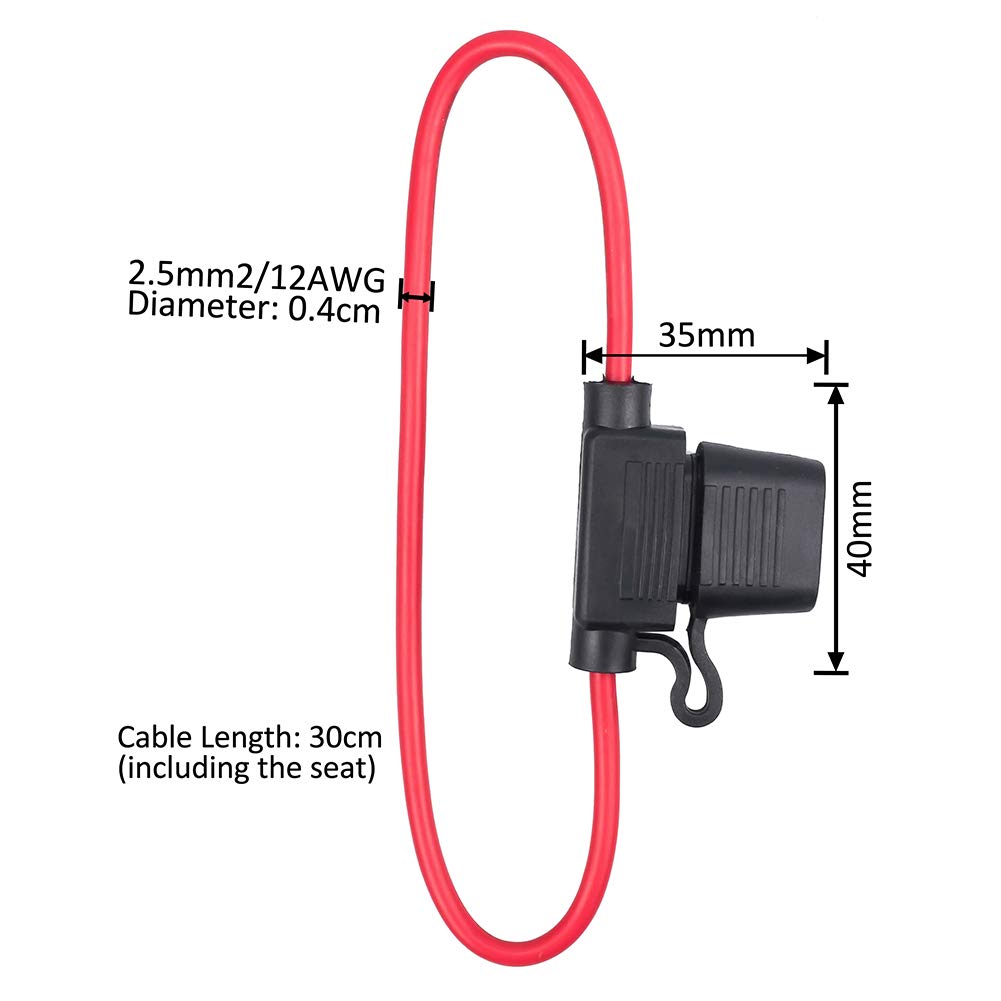
Image 4.1: Dimensions of the KeeYees DC Motor Speed Controller. The image shows the controller's length (90mm), width (59mm), and height (34mm).
5. Opsætning og installation
Follow these steps to correctly install and connect your motor speed controller:
- Forbered ledningsføring: Ensure all power is off. Use appropriate gauge wires for your power supply and motor, capable of handling up to 30A.
- Tilslut strømindgang: Connect the positive (+) terminal of your DC power supply (7-70V) to the 'P+' terminal on the controller. Connect the negative (-) terminal of your DC power supply to the 'P-' terminal on the controller.
- Tilslut motorudgang: Connect one motor lead to the 'M+' terminal and the other motor lead to the 'M-' terminal on the controller. If the motor rotates in the wrong direction, reverse these connections.
- Installer sikring: The included 30A fuse should be installed in the designated fuse holder within the circuit. This provides crucial protection against overcurrent.
- Position Brake/Run Switch: Ensure the Motion/Stop/Brake switch is in the 'Motion' (Run) position for normal operation.

Image 5.1: Input and Output Connections. This image clearly labels the 'Input Connect to DC Power Supply' terminals (P+, P-) and 'Output Connect to Motor' terminals (M+, M-).

Image 5.2: Wiring Diagram. This diagram illustrates how to connect the DC power source (7-70V DC) and the motor to the speed controller, including the inline fuse.

Image 5.3: 30A Fuse Dimensions. This image provides the dimensions of the included 30A fuse, including wire diameter (2.5mm2 / 12AWG), cable length (30cm total), and fuse holder dimensions (35mm x 40mm).
6. Betjeningsvejledning
Once the controller is correctly wired and powered on:
- Tænd: Turn the speed control knob clockwise from its fully counter-clockwise position to power on the unit. The power indicator light will illuminate.
- Juster hastighed: Rotate the speed control knob clockwise to increase the motor speed and counter-clockwise to decrease it. The speed can be adjusted from 0% to 100%.
- Use Motion/Stop/Brake Switch: This switch allows you to control the motor's state. Ensure it is in the 'Motion' position for speed control. The 'Stop' or 'Brake' positions will halt the motor.
- Sluk: Rotate the speed control knob fully counter-clockwise until it clicks off.
Potentiometer Separation:
The potentiometer (speed control knob) can be separated from the main unit via its flexible cable (approx. 15cm long) for remote mounting or flexible installation. This allows for greater versatility in your project setup.

Image 6.1: Potentiometer Separation. This image demonstrates that the speed control potentiometer can be detached from the main controller unit, connected by a flexible cable for remote placement.
7. Vedligeholdelse
- Udskiftning af sikring: If the controller stops functioning, check the 30A fuse. If it is blown, replace it with an automotive blade fuse of the same 30A rating. Do not use a fuse with a higher rating.
- Rensning: Hold controlleren ren og fri for støv og snavs. Brug en tør, blød klud til rengøring. Brug ikke flydende rengøringsmidler.
- Miljøforhold: Ensure the operating environment is within suitable temperature and humidity ranges. Avoid extreme conditions.
8. Fejlfinding
- Motoren kører ikke:
- Kontroller, om strømforsyningen er tilsluttet korrekt og leverer den angivne lydstyrke.tage (7-70V DC).
- Verify all wiring connections to the motor and power supply are secure.
- Ensure the speed control knob is turned on and rotated sufficiently to increase speed.
- Check the Motion/Stop/Brake switch is in the 'Motion' position.
- Inspect the 30A fuse. If it is blown, replace it.
- Motor Speed Not Adjusting:
- Ensure the potentiometer cable is securely connected if it has been separated.
- Verify the motor is not overloaded, which can prevent proper speed regulation.
- Overophedning af controller:
- Ensure the motor's power consumption (Watts) is within the recommended limits for your operating voltage (e.g., 12V: within 300W, 24V: within 400W).
- Provide adequate ventilation around the controller.
9. Garanti og support
For warranty information, technical support, or any inquiries regarding your KeeYees 7-70V 30A PWM DC Motor Speed Controller, please contact KeeYees customer service through the retailer where the product was purchased or refer to the official KeeYees webwebsted for kontaktoplysninger.