1. Introduktion og sikkerhedsoplysninger
Thank you for choosing the ANENG V8 Digital Multimeter. This device is designed for safe and accurate measurement of AC/DC voltage, AC/DC current, resistance, capacitance, frequency, temperature, diode, continuity, and battery testing. Please read this manual thoroughly before use to ensure proper operation and to prevent potential hazards.
1.1 Sikkerhedsforanstaltninger
- Sørg altid for, at multimeteret er i god stand før brug. Undersøg testledningerne for skader.
- Anvend ikke voltage or current that exceeds the maximum rated values for the multimeter.
- Udvis ekstrem forsigtighed, når du arbejder med voltagover 36V DC eller 25V AC RMS, da disse kan udgøre en fare for stød.
- Afbryd altid strømmen til kredsløbet og aflade alle højspændingsledninger.tage-kondensatorer før måling af modstand, kontinuitet, dioder eller kapacitans.
- Sørg for, at drejekontakten er i den korrekte position for den ønskede måling, før du tilslutter testledningerne til kredsløbet.
- Brug ikke multimeteret i eksplosive gas-, damp- eller støvede omgivelser.
- Udskift batterierne med det samme, når indikatoren for lavt batteri vises, for at sikre nøjagtige aflæsninger.
2. Produktet er slutview
2.1 Pakkens indhold
The ANENG V8 Digital Multimeter package typically includes the following items:
- ANENG V8 Digital Multimeter
- Testledninger (røde og sorte)
- Temperatursonde
- Bæretaske
- Brugermanual

Image: ANENG V8 Digital Multimeter with its standard accessories, including test leads, a temperature probe, and a protective carrying case.
2.2 Betjeningselementer og display
The multimeter features an 8000-count LCD backlight display for clear readings in various lighting conditions. Key controls include a rotary switch for function selection and buttons for range, data hold, and other features.

Billede: Detaljeret view of the multimeter's front panel, highlighting the LCD screen, the central rotary selector, and various control buttons.
3. Opsætning
3.1 Batteriinstallation
The ANENG V8 Digital Multimeter is powered by batteries. To install or replace batteries:
- Sørg for, at multimeteret er slukket, og frakobl alle testledninger.
- Find batteridækslet på bagsiden af enheden.
- Brug en skruetrækker til at løsne skruen/skruerne, der fastgør batteridækslet.
- Fjern dækslet.
- Insert new batteries, observing the correct polarity (+ and -) as indicated inside the compartment. The device typically uses AA batteries.
- Sæt batteridækslet på igen, og fastgør det med skruen/skruerne.
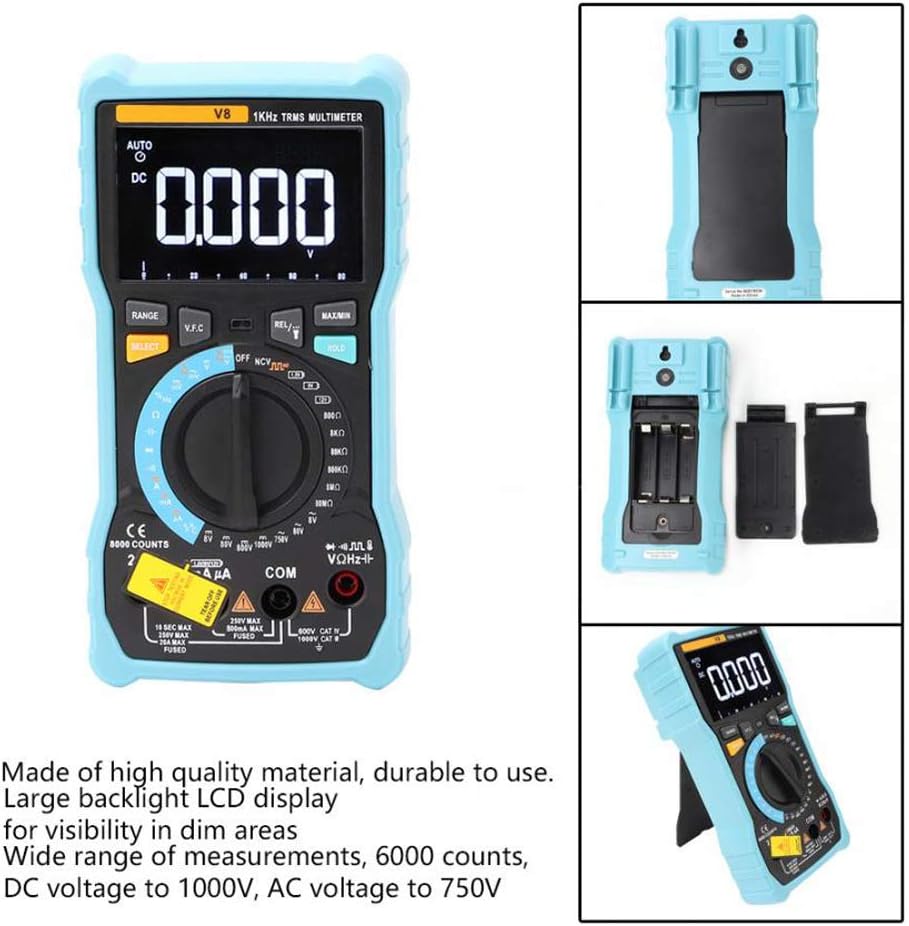
Billede: Bagsiden view of the multimeter with the battery compartment open, illustrating the correct placement for three AA batteries.
4. Betjeningsvejledning
Before any measurement, ensure the test leads are correctly inserted into the input jacks and the rotary switch is set to the appropriate function.
4.1 Measuring DC/AC Voltage
- Set the rotary switch to the 'V–' (DC Voltage) eller 'V~' (AC-volumen)tage) stilling.
- Connect the red test lead to the 'VΩmA' jack and the black test lead to the 'COM' jack.
- Tilslut testledningerne parallelt til det kredsløb eller den komponent, du ønsker at måle.
- Læs bindtage -værdi på displayet.
4.2 Measuring DC/AC Current
- Set the rotary switch to the 'A–' (DC Current) or 'A~' (AC Current) position. For milliampere (mA) eller mikroampere (µA) measurements, select the corresponding range.
- For current up to 800mA, connect the red test lead to the 'VΩmA' jack. For current up to 20A, connect the red test lead to the '20A' jack. Connect the black test lead to the 'COM' jack.
- Disconnect power to the circuit. Open the circuit where you want to measure current. Connect the multimeter in series with the circuit.
- Tilslut strøm til kredsløbet, og aflæs strømværdien på displayet.
4.3 Måling af modstand
- Set the rotary switch to the 'Ω' (Resistance) position.
- Connect the red test lead to the 'VΩmA' jack and the black test lead to the 'COM' jack.
- Ensure the circuit is de-energized and all capacitors are discharged. Connect the test leads across the component to be measured.
- Læs modstandsværdien på displayet.
4.4 NCV (kontaktfri volumen)tage) Registrering
- Indstil drejekontakten til 'NCV'-positionen.
- Move the top end of the multimeter near the conductor or outlet.
- The multimeter will emit an audible beep and the NCV indicator light will flash if AC voltage is detected, indicating the presence of live voltage uden fysisk kontakt.
4.5 Temperaturmåling
- Set the rotary switch to the '°C/°F' (Temperature) position.
- Connect the temperature probe to the 'VΩmA' and 'COM' jacks, observing polarity if applicable.
- Placer spidsen af temperatursonden på eller i nærheden af det objekt, hvis temperatur du vil måle.
- Aflæs temperaturværdien på displayet.
4.6 Andre funktioner
- Kapacitans: Set the rotary switch to the 'F' position. Connect leads across the discharged capacitor.
- Frekvens/arbejdscyklus: Set the rotary switch to the 'Hz/%' position. Connect leads to the signal source.
- Diode test: Set the rotary switch to the 'Diode' position. Connect leads across the diode.
- Kontinuitetstest: Set the rotary switch to the 'Continuity' position. Connect leads across the circuit. An audible beep indicates continuity.
- Batteritest: Set the rotary switch to the 'Battery' position. Connect leads to the battery terminals (1.5V, 9V, or 12V).
- Data Hold: Tryk på 'HOLD'-knappen for at fryse den aktuelle aflæsning på displayet. Tryk igen for at slippe.
- Baggrundslys/lommelygte: Press the backlight button to turn on/off the display backlight or flashlight.
- Automatisk sluk: Multimeteret slukker automatisk efter en periode med inaktivitet for at spare på batteriet.
5. Vedligeholdelse
5.1 Rengøring
Tør sagen af med annonceamp en klud og et mildt rengøringsmiddel. Brug ikke slibemidler eller opløsningsmidler. Hold indgangsterminalerne fri for snavs og fugt.
5.2 Udskiftning af sikringer
Hvis strømmålingsfunktionen fejler, skal sikringen muligvis udskiftes. Se specifikationerne for den korrekte sikringstype og -klassificering. Udskiftning af sikringer bør kun udføres af kvalificeret personale.
5.3 Opbevaring
When not in use for extended periods, remove the batteries to prevent leakage and store the multimeter in a dry, cool place.
6. Fejlfinding
- Ingen visning: Kontroller batteriinstallation og opladning. Udskift batterierne om nødvendigt.
- Forkerte aflæsninger: Ensure the rotary switch is set to the correct function and range. Check test lead connections. Verify battery charge.
- Strømmåling virker ikke: Check the fuse. Replace if blown (refer to fuse replacement section).
- NCV registreres ikke: Ensure the NCV function is selected and the multimeter is close enough to the AC voltage kilde.
7. Specifikationer
| Parameter | Værdi |
|---|---|
| Vise | 8000 trin LCD med baggrundsbelysning |
| DC bindtage (V) | 8.000V / 80.00V / 800.0V / 1000V |
| DC bindtage (mV) | 800mV |
| AC Voltage (V) | 8.000V / 80.00V / 750V |
| AC Voltage (mV) | 800mV |
| DC-strøm (A) | 8.000A / 20.00A |
| Jævnstrøm (mA) | 8.000mA / 80.00mA / 800.0mA |
| DC Current (µA) | 800µA / 8000µA |
| AC strøm (A) | 8.000A / 20.00A |
| AC-strøm (mA) | 8.000mA / 80.00mA / 800.0mA |
| AC Current (µA) | 800µA / 8000µA |
| Modstand | 800.0Ω / 8.000kΩ / 80.00kΩ / 800.0kΩ / 8.000MΩ / 80.00MΩ |
| Kapacitans | 9.999nF / 99.99nF / 999.9nF / 9.999µF / 99.99µF / 999.9µF / 9.999mF / 99.99mF |
| Frekvens | 9.999Hz / 99.99Hz / 999.9Hz / 9.999kHz / 99.99kHz / 999.9kHz / 9.999MHz |
| Duty Cycle | 1 % ~ 99 % |
| Temperaturområde | -20°C ~ 1000°C (-4°F ~ 1832°F) |
| Batteritest | 1.5V / 9V / 12V |
| Rangering | Auto / Manuel |
| Opdateringshastighed | 3 gange / sekund |
| Ægte RMS | Ja |
| Datahold | Ja |
| Baggrundslys/Lommelygte | Ja |
| Advarsel om lavt batteri | Ja |
| Automatisk sluk | Ja |
| Materiale | ABS / PVC |
| Strømkilde | Batteridrevet |
8. Garanti og support
This product is covered by a standard manufacturer's warranty against defects in materials and workmanship. Please refer to the warranty card included with your purchase for specific terms and conditions. For technical support or service inquiries, please contact your retailer or the manufacturer's customer service department.
9. Officielle produktvideoer
Der er ingen officielle produktvideoer fra sælgeren tilgængelige til indlejring på nuværende tidspunkt.