1. Introduktion
The Walfront UT219DS is a professional digital clamp meter designed for accurate and reliable electrical measurements. It is an essential tool for electrical maintenance personnel, HVAC technicians, and anyone requiring precise measurements of AC/DC current, AC/DC voltage, resistance, capacitance, frequency, temperature, and diode testing. This manual provides detailed instructions for the safe and effective use of your UT219DS clamp måler.
2. Sikkerhedsoplysninger
ADVARSEL: For at undgå elektrisk stød, brand eller personskade, læs venligst alle sikkerhedsoplysninger, før du bruger produktet.
- Overhold altid lokale og nationale sikkerhedsforskrifter.
- Brug ikke måleren, hvis den ser beskadiget ud, eller hvis testledningerne er beskadigede.
- Bekræft målerens funktion på et kendt volumentagkilden før brug.
- Påfør ikke mere end den nominelle voltage, som markeret på måleren, mellem terminalerne eller mellem en hvilken som helst terminal og jord.
- Vær forsigtig med voltagover 30V AC RMS, 42V peak eller 60V DC. Disse voluminertages udgør en stødfare.
- Hold fingrene bag fingerbeskytterne på testproberne under brug.
- Udskift batterierne, når indikatoren for lavt batteri vises for at sikre nøjagtige aflæsninger.
- Brug ikke måleren i eksplosive gas-, damp- eller støvede omgivelser.
- Sørg for, at drejekontakten er i den korrekte position for den ønskede måling, før du tilslutter til kredsløbet.
- When measuring current, ensure the circuit is de-energized before clamping the jaw around the conductor.
3. Produktet er slutview
The Walfront UT219DS Digital Clamp Meter is designed for robust performance and ease of use. It features a large LCD display, a durable clamp jaw, and a rotary dial for function selection.
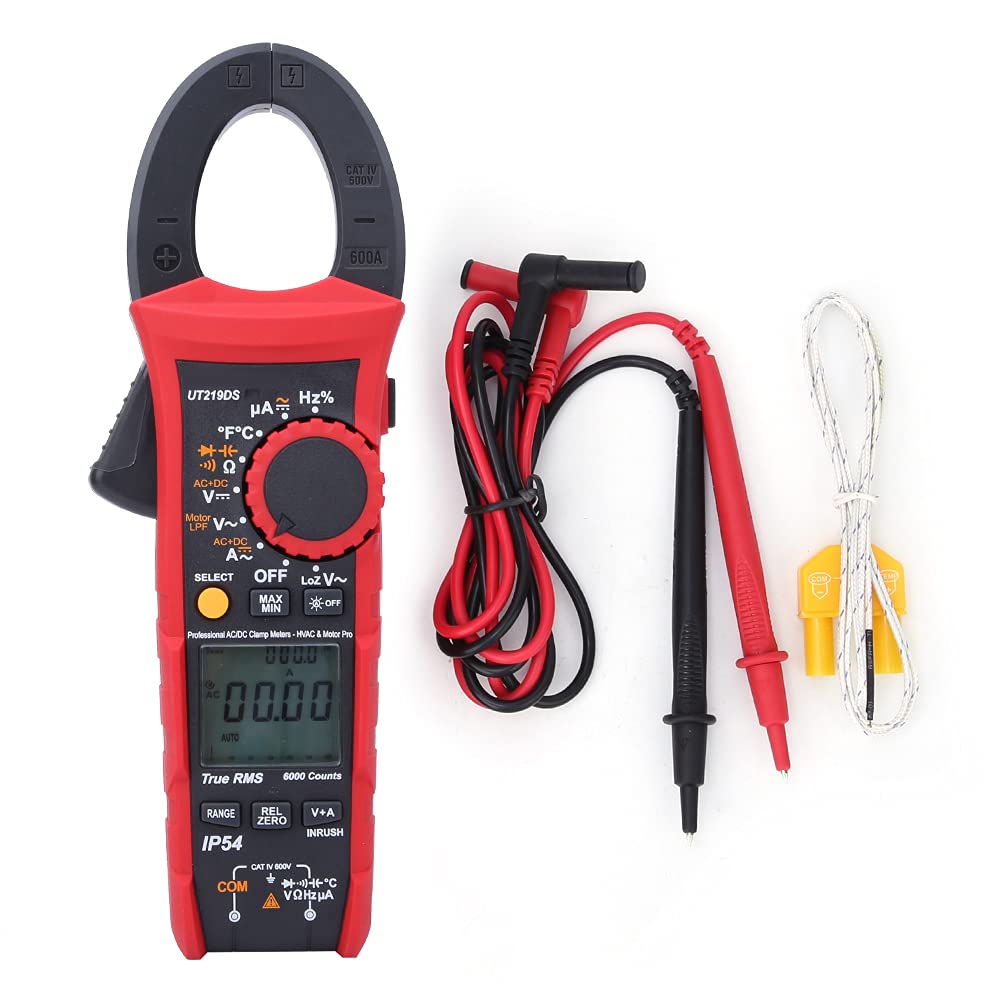
Figure 3.1: The Walfront UT219DS Digital Clamp Meter, including the main unit, red and black test leads, and a K-type temperature probe.
Nøglefunktioner:
- 6000 Counts LCD Display: Provides clear and precise readings.
- Ægte RMS-måling: Ensures accurate readings for non-sinusoidal waveforms.
- 33mm Jaw Opening: Allows for easy clamping around conductors without interrupting the circuit.
- IP54-klassificering: Yder beskyttelse mod støv og stænkvand.
- 2-Meter Drop Test: Designed for durability in demanding environments.
- Automatisk baggrundsbelysning: Forbedrer synlighed i svagt lys.
- Automatisk sluk: Sparer batterilevetid.
- Særlige funktioner: Includes LoZ voltage, Motor Phase Sequence, Low-Pass Filter (LPF), Inrush current, Data Hold, MAX/MIN, Relative Value, and Dual Display (V+A).

Figure 3.2: The ergonomic design of the UT219DS allows for comfortable single-hand operation.
Komponenter:
- Clamp Kæbe: Anvendes til berøringsfri AC/DC-strømmåling.
- Drejeskive: Selects measurement functions.
- LCD-skærm: Viser måleaflæsninger, enheder og funktionsindikatorer.
- Funktionsknapper: (SELECT, MAX/MIN, REL/ZERO, V+A, INRUSH) for additional features.
- Indgangsterminaler: For connecting test leads and temperature probe.
- Udløser: Åbner clamp kæbe.

Figur 3.3: Detaljeret view af clamp jaw mechanism and the input jacks for test leads and probes.
4. Opsætning
Batteri installation:
The UT219DS requires three (3) 1.5V AAA alkaline batteries for operation. Follow these steps to install or replace the batteries:
- Ensure the meter is powered off and disconnect all test leads from the meter and any circuit.
- Find batteridækslet på bagsiden af måleren.
- Brug en skruetrækker til at løsne skruen/skruerne, der fastgør batteridækslet.
- Fjern batteridækslet.
- Insert three new 1.5V AAA alkaline batteries, observing the correct polarity (+ and -) as indicated inside the compartment.
- Sæt batteridækslet på igen, og spænd skruen/skruerne forsvarligt.

Figur 4.1: Bagside view of the meter with the battery compartment open, illustrating the placement for three AAA batteries.
5. Betjeningsvejledning
Before taking any measurements, ensure the meter is set to the correct function and the test leads are properly connected.
5.1 Funktionsvalg
Turn the rotary dial to select the desired measurement function. The meter will automatically select the appropriate range for most functions (Auto Range). Press the VÆLGE button to toggle between different sub-functions within a single dial position (e.g., AC/DC voltage, modstand/kontinuitet/diode).
5.2 AC/DC strømmåling (Clamp Kæbe)
- Drej drejeknappen til A~ (AC-strøm) eller A= (DC-strøm) position.
- Tryk på aftrækkeren for at åbne clamp kæbe.
- Inkluder kun én leder af kredsløbet inden for clamp jaw. For AC current, ensure the conductor is centered. For DC current, observe polarity.
- Aflæs den aktuelle værdi på LCD-displayet.
5.3 AC/DC Voltage Måling
- Indsæt den røde testledning i VΩHz terminalen og den sorte testledning ind i KOM terminal.
- Drej drejeknappen til V~ (AC-volumentage) eller V= (DC bindtage) position. Use the VÆLGE button to switch between AC and DC if needed.
- Tilslut testproberne på tværs af det kredsløb eller den komponent, der skal måles.
- Læs bindtage -værdi på LCD -displayet.
5.4 Resistance, Continuity, Diode, and Capacitance Measurement
- Indsæt den røde testledning i VΩHz terminalen og den sorte testledning ind i KOM terminal.
- Drej drejeknappen til Ω (Resistance/Continuity/Diode/Capacitance) position.
- Tryk på VÆLGE button to cycle through Resistance (Ω), Continuity ()))), Diode (->|), and Capacitance (F) -funktioner.
- Connect the test probes across the component to be measured. For continuity, a beep indicates a continuous circuit. For diode, forward voltage drop is displayed. For capacitance, ensure the capacitor is discharged before measurement.
- Aflæs værdien på LCD-displayet.
5.5 Frequency/Duty Cycle Measurement (Hz%)
- Indsæt den røde testledning i VΩHz terminalen og den sorte testledning ind i KOM terminal.
- Drej drejeknappen til Hz % position.
- Connect the test probes across the circuit where frequency or duty cycle is to be measured.
- Read the frequency (Hz) or duty cycle (%) value on the LCD display.
5.6 Temperaturmåling
- Drej drejeknappen til ° C ° F position.
- Insert the K-type temperature probe into the input terminals, observing polarity.
- Placer spidsen af temperatursonden på det objekt eller i det miljø, der skal måles.
- Read the temperature value in Celsius or Fahrenheit on the LCD display. Use the VÆLGE button to switch between units.
5.7 LoZ Voltage Måling
The LoZ (Low Impedance) voltage measurement function provides a low input impedance to eliminate ghost voltages, ensuring more accurate readings in certain applications.
- Indsæt den røde testledning i VΩHz terminalen og den sorte testledning ind i KOM terminal.
- Drej drejeknappen til LoZ V~ position.
- Connect the test probes across the circuit to be measured.
- Read the LoZ voltage -værdi på LCD -displayet.
5.8 Motor Phase Sequence Measurement
This function helps identify the phase sequence of a three-phase motor or power supply.
- Insert the test leads into the appropriate terminals as indicated for voltage måling.
- Drej drejeknappen til Motor LPF V~ position.
- Follow the on-screen prompts or specific instructions for connecting the probes to the three phases.
- Displayet vil vise fasesekvensen.
5.9 Low-Pass Filter (LPF) Measurement
The LPF function filters out high-frequency noise, providing stable and accurate voltage and frequency measurements for variable frequency drives (VFDs) and other noisy environments.
- Insert the test leads into the appropriate terminals for voltage måling.
- Drej drejeknappen til Motor LPF V~ position.
- Connect the test probes across the circuit.
- The meter will display the filtered voltage eller frekvens.
5.10 Måling af indkoblingsstrøm
This function measures the initial surge of current when a motor or other inductive load starts up.
- Turn the rotary dial to an AC Current (A~) position.
- Tryk på INRUSH button. The meter will enter inrush measurement mode.
- Clamp the jaw around the single conductor of the motor or load.
- Start the motor/load. The meter will capture and display the peak inrush current.
5.11 Data Hold (H)
Tryk på H knappen for at fryse den aktuelle aflæsning på displayet. Tryk igen for at slippe den.
5.12 Maximum/Minimum (MAX/MIN)
Tryk på MAX/MIN button to record the maximum and minimum readings over time. Press again to cycle between MAX, MIN, and current reading. Hold to exit.
5.13 Relative Value (REL/ZERO)
Tryk på REL/NUL button to store the current reading as a reference value and display subsequent measurements as a deviation from this reference. This is useful for nulling out test lead resistance or comparing values. Hold to exit.
5.14 Dual Display (V+A)
In certain modes, the meter can display both voltage and current simultaneously. Press the V+A button to activate this feature, allowing for automatic monitoring of voltage in current mode.
6. Vedligeholdelse
6.1 Rengøring:
Tør måleren c afasing med annonceamp klud og mildt rengøringsmiddel. Brug ikke slibemidler eller opløsningsmidler. Sørg for, at måleren er helt tør før brug.
6.2 Batteriudskiftning:
Refer to Section 4. Setup for detailed instructions on battery replacement. Always replace all three batteries simultaneously with new 1.5V AAA alkaline batteries.
6.3 Opbevaring:
Hvis måleren ikke bruges i længere tid, skal batterierne fjernes for at forhindre lækage og beskadigelse. Opbevar måleren et køligt og tørt sted, væk fra direkte sollys og ekstreme temperaturer.

Figure 6.1: The included carrying case provides protection for the meter during storage and transport.
7. Fejlfinding
| Problem | Mulig årsag | Løsning |
|---|---|---|
| Måleren tænder ikke. | Døde eller forkert installerede batterier. | Kontroller batteripolariteten; udskift batterierne. |
| Ingen aflæsning eller 'OL' (Overbelastning) vises. | Forkert funktion valgt; åbent kredsløb; målingen overskrider området. | Select correct function; check circuit continuity; ensure measurement is within meter's range. |
| Upræcise aflæsninger. | Lavt batteri; dårlig forbindelse til testledninger; ekstern interferens. | Replace batteries; ensure secure connections; move away from strong electromagnetic fields. |
| Display shows 'Lo Batt'. | Lavt batteri voltage. | Udskift batterierne med det samme. |
8. Specifikationer
| Parameter | Specifikation |
|---|---|
| Model | UT219DS |
| Vis tæller | 6000 |
| Auto/manuel rækkevidde | Ja |
| Kæbeåbningens størrelse | 33 mm (1.3 tommer) |
| Ægte RMS | Ja |
| AC Current Frequency Response | 40Hz~400Hz |
| AC Voltage Frekvensrespons | 40Hz~1kHz |
| Motor Phase Sequence Measurement | Op til 600.0V |
| Low-Pass Filter Test | Yes (1 kHz and 3 dB attenuation) |
| Diodetest | 3V |
| Digital Conversion Rate | 5 gange / s |
| Analog Bar Conversion Rate | 20 gange / s |
| Analog søjlegraf | 31 segmenter |
| LCD-skærmtype | HTN Dual Display Interface |
| Automatisk sluk | Ja |
| Lav voltage Display | Ja |
| Data Hold (H) | Ja |
| Relativ værdi (REL) | Ja |
| Maximum/Minimum (MAX/MIN) | Ja |
| Double Display of Voltage + Current (V+A) | Ja |
| Function Selection (SELECT) | Ja |
| Automatisk baggrundsbelysning | Ja |
| Faldtestvurdering | 2 meter |
| IP-vurdering | IP54 |
| Indgangsimpedans | ≥10MΩ |
| Strømkilde | 3 x 1.5V AAA alkaliske batterier |
| LCD skærmstørrelse | 35 x 31 mm (1.4 x 1.2 tommer) |
| Varens vægt | 0.71 kilo |
| Certificeringer | CE, FCC, RoHS |
9. Garanti og support
For product support, technical assistance, or warranty inquiries, please contact Walfront customer service or visit the official Walfront store on Amazon:
Gem venligst din købskvittering af garantihensyn.