1. Introduktion
This manual provides detailed instructions for the safe and effective operation, setup, and maintenance of your Reboot RBM-1450 4-in-1 Multiprocess Welder. This versatile machine supports MIG (Gas/Gasless), Stick (MMA), and Lift TIG welding processes, making it suitable for a wide range of applications from home DIY projects to general repair work. It features IGBT inverter technology for stable arc performance and energy efficiency.

Figure 1.1: The Reboot RBM-1450 4-in-1 Multiprocess Welder, showcasing its compact design and integrated welding torch.
2. Sikkerhedsoplysninger
Welding can be dangerous. Always follow safety precautions to prevent injury or damage. Read and understand all safety warnings before operating the welder.
2.1 Generelle sikkerhedsforanstaltninger
- Elektrisk stød kan dræbe: Ensure proper grounding. Do not touch live electrical parts. Wear dry insulating gloves and protective clothing.
- Dampe og gasser kan være farlige: Hold hovedet væk fra dampene. Brug ventilation eller udsugning til at fjerne dampe fra indåndingszonen.
- Lysbuestråler kan brænde øjne og hud: Wear a welding helmet with a proper shade filter. Wear protective clothing to protect skin.
- Brand- og eksplosionsfare: Fjern alle brandfarlige materialer fra svejseområdet. Hav en brandslukker let tilgængelig.
- Varme dele kan forårsage alvorlige forbrændinger: Allow hot parts to cool before handling. Use insulated gloves and tongs.
- Afbryd altid strømmen: Before servicing or moving the unit, disconnect the input power.
- Brug i godt ventilerede områder: Sørg for tilstrækkelig luftgennemstrømning for at forhindre overophedning og dampdannelse.
3. Hvad er der i æsken
Upon unpacking, please verify that all components listed below are present and undamaged. If any items are missing or damaged, contact customer support immediately.

Figure 3.1: Diagram showing the contents included with the Reboot RBM-1450 welder, including the main unit, cables, and accessories.
- Reboot RBM-1450 Multiprocess Welder Unit
- MIG Torch (integrated)
- Jord Clamp with Cable (2M)
- Electrode Holder with Cable (2M)
- Brugermanual
- Flux Core Wire Spool (1KG)
- Gas Hose (3M)
- Slange Clamps
- Kontakt tip
- Ceramic Nozzles
- Brush with Chipping Hammer
4. Produktet er slutview and Control Panel Introduction
Familiarize yourself with the main components and controls of the RBM-1450 welder.
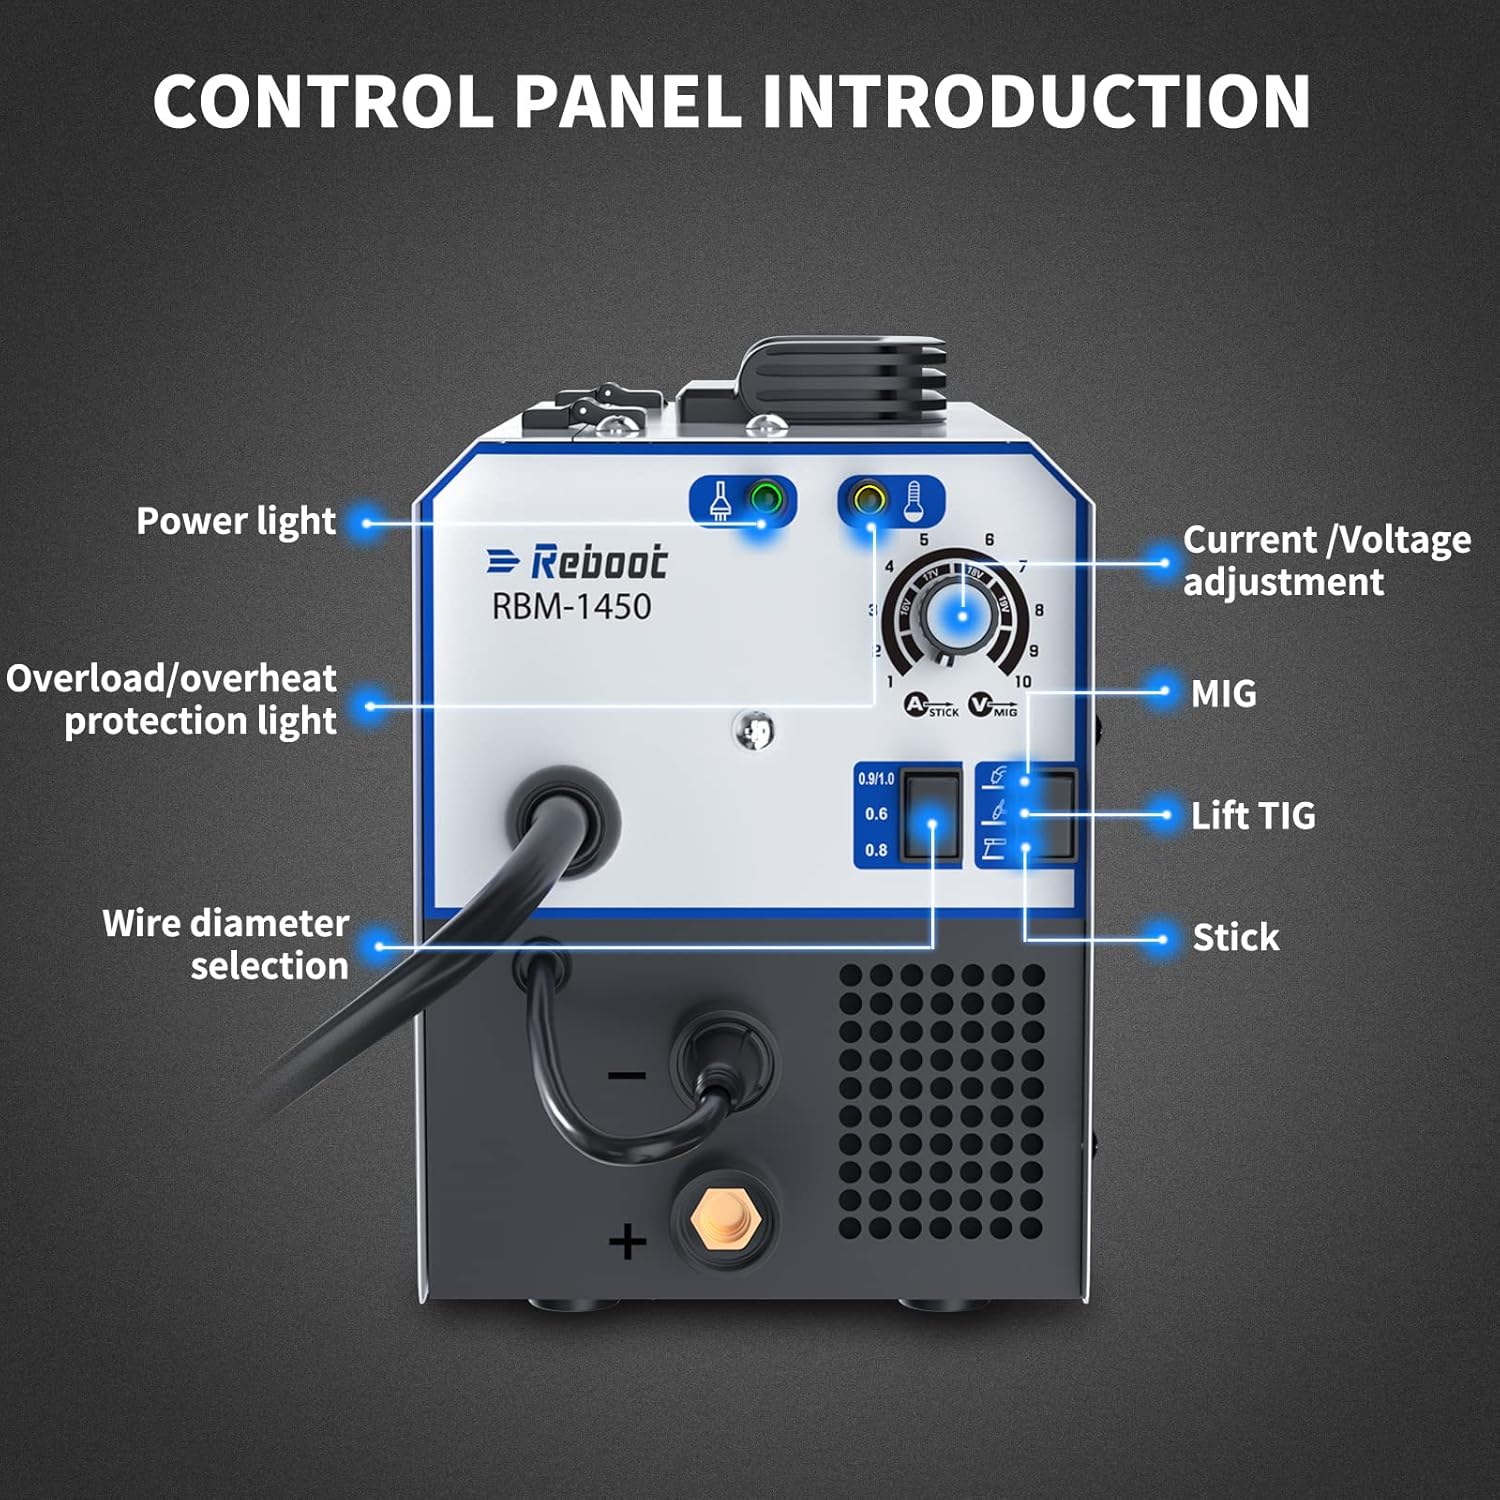
Figur 4.1: Detaljeret view of the control panel, indicating the function of each light, knob, and switch.
4.1 Betjeningselementer på frontpanelet
- Strømlys: Indicates when the machine is powered on.
- Overload/Overheat Protection Light: Illuminates if the machine is overloaded or overheats, indicating a temporary shutdown for protection.
- Nuværende/Voltage Justeringsknap: Used to set the welding current (for Stick/TIG) or voltage (for MIG).
- Process Selection Switch: Giver mulighed for valg mellem MIG-, Lift TIG- og elektrodesvejsetilstande.
- Wire Diameter Selection Switch: For MIG mode, select the appropriate wire diameter (0.6mm, 0.8mm, 0.9/1.0mm).
- Positive (+) og negative (-) terminaler: Til tilslutning af svejsekabler.
4.2 Bagpanelfunktioner

Figur 4.2: Bagside view of the welder, showing the main power switch, gas input, and power cord connection.
- Hovedafbryder: Tænder eller slukker for svejseren.
- Gas input: Connection point for the shielding gas hose (for MIG Gas welding).
- Strømledning: Integrated 220V power cord with US standard plug (NEMA 6-50P).
- Køleventilator: Ensures proper ventilation and prevents overheating.
5. Opsætning
5.1 Strømtilslutning
The Reboot RBM-1450 operates on a 220V AC power supply. Ensure your power source meets these requirements and that a 30A breaker is suggested for 220V operation.
- Connect the welder's power cord (220V 50A 6-50P plug) to a suitable 220V outlet.
- Ensure the main power switch on the rear of the unit is in the "OFF" position before connecting to power.
5.2 Wire Spool Installation (MIG Welding)

Figure 5.1: Illustration of how to install the wire spool inside the welder's wire feed compartment.
- Åbn dækslet til trådfremføringsrummet.
- Placer trådspolen på spoleholderen, og sørg for, at den roterer frit.
- Feed the welding wire through the guide tube and into the drive rollers.
- Close the drive roller tension arm and adjust the tension appropriately. The wire should feed smoothly without slipping or deforming.
- Close the wire feed compartment cover.
5.3 Tilslutning af svejsekabler
- For Stick (MMA) Welding:
- Connect the electrode holder cable to the positive (+) terminal.
- Tilslut jorden clamp kablet til den negative (-) terminal.
- Fastgør jorden clamp sikkert fastgjort til emnet eller svejsebordet.
- For Lift TIG Welding:
- Connect the TIG torch (if not integrated) to the negative (-) terminal.
- Tilslut jorden clamp kablet til den positive (+) pol.
- Fastgør jorden clamp sikkert fastgjort til emnet eller svejsebordet.
- Connect the gas hose from the TIG torch to the gas input on the rear panel, and then to your argon gas cylinder.
- For MIG Welding (Gas/Gasless):
- The MIG torch is integrated.
- For Gas MIG, connect the gas hose from the rear panel to your shielding gas cylinder (e.g., CO2 or Argon/CO2 mix).
- Tilslut jorden clamp cable to the appropriate terminal based on your wire type (check manual for specific polarity for flux core vs. solid wire). Typically, for flux core, the ground clamp connects to the positive (+) terminal, and for solid wire with gas, it connects to the negative (-) terminal.
- Fastgør jorden clamp sikkert fastgjort til emnet eller svejsebordet.
6. Betjening
The RBM-1450 offers multiple welding processes. Select the appropriate mode and settings for your application.
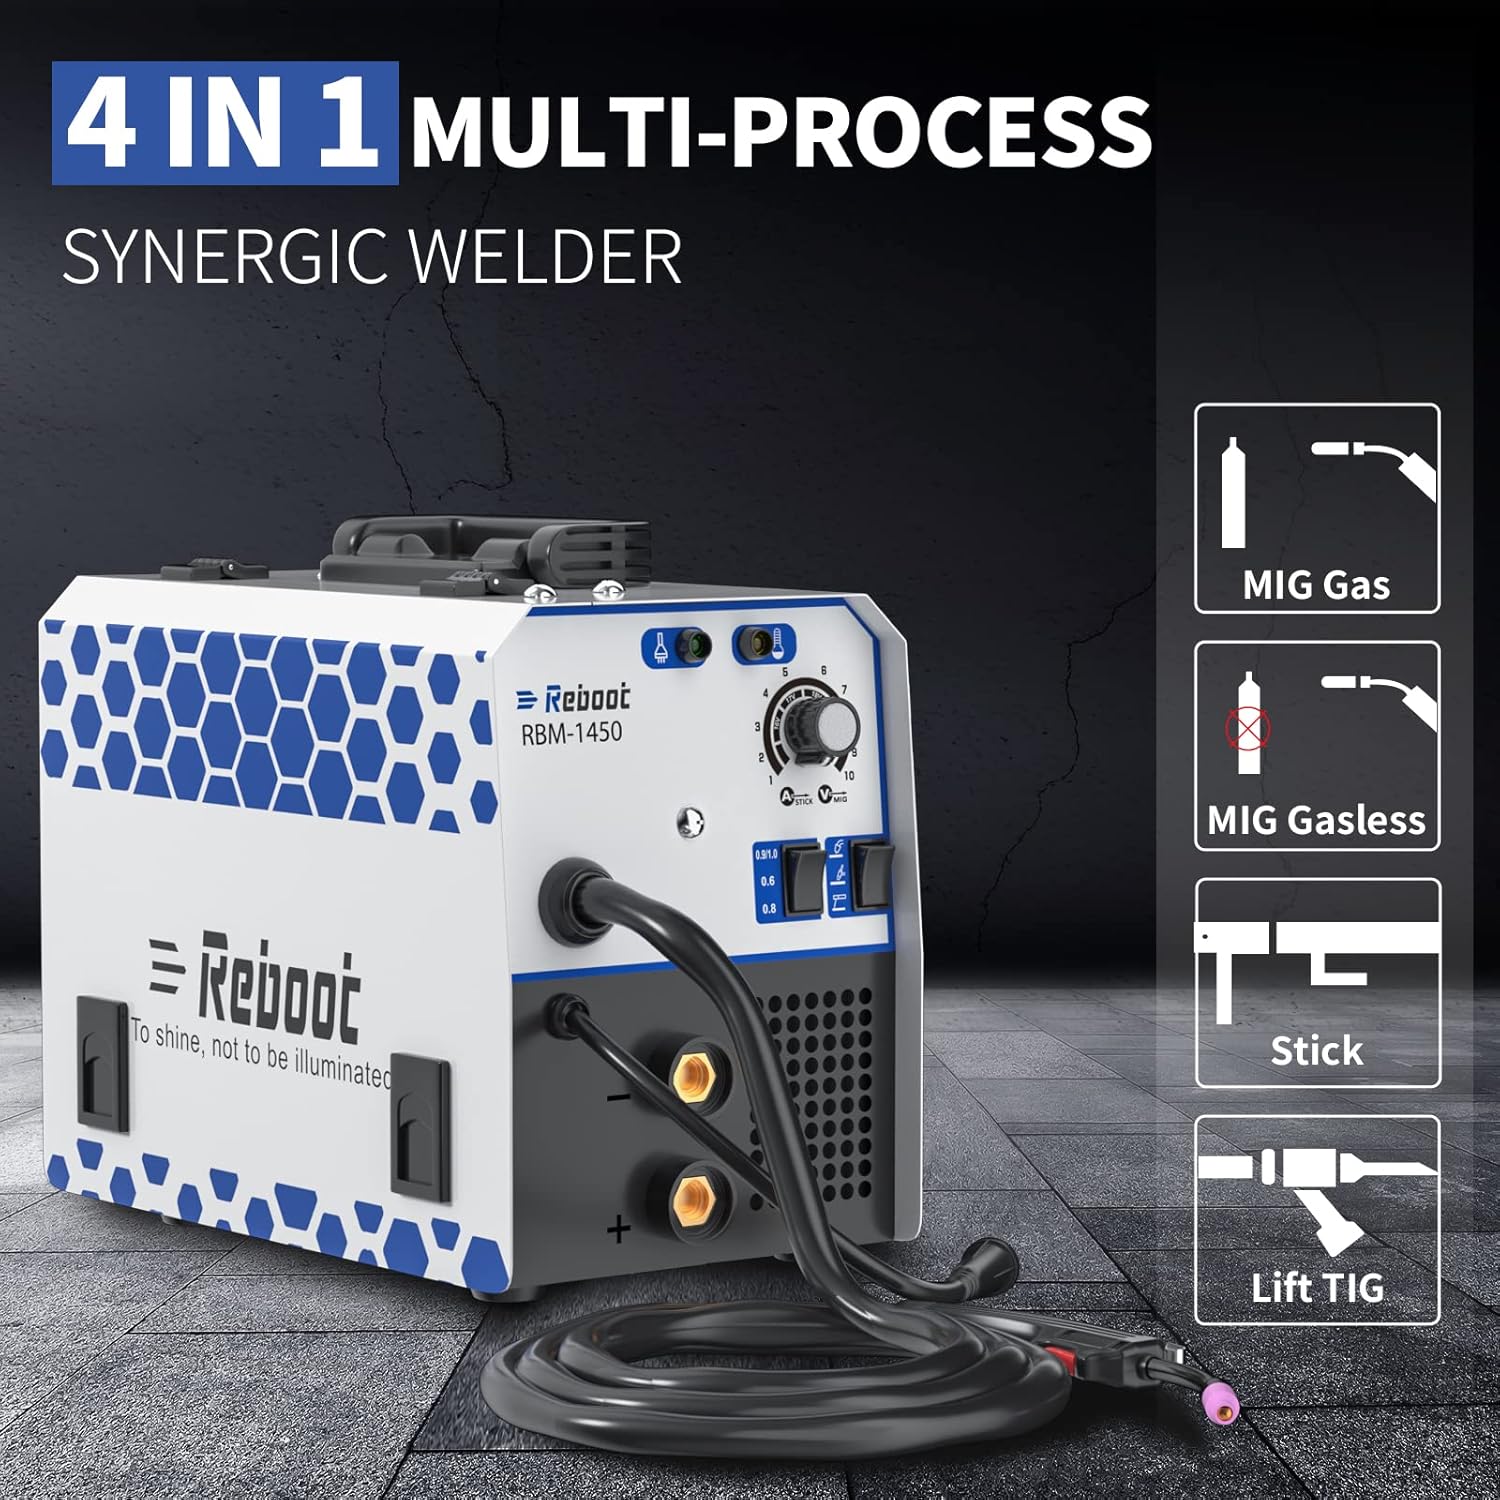
Figure 6.1: Visual representation of the four welding processes supported: MIG Gas, MIG Gasless, Stick, and Lift TIG.
6.1 Valg af svejseproces
Use the process selection switch on the front panel to choose between MIG, Lift TIG, or Stick welding.

Figure 6.2: Close-up of the control panel highlighting the current/voltage adjustment knob and wire diameter selection switch.
6.2 Justering af svejseparametre
- Nuværende/Voltage-knap: Rotate this knob to adjust the welding output. Higher numbers typically mean higher current/voltage.
- Wire Diameter Switch (MIG only): Select the setting that matches the diameter of the welding wire you are using (0.6mm, 0.8mm, or 0.9/1.0mm).
6.3 Welding Process Specifics
- Stick (MMA) Welding:
- Suitable for 2.5mm (3/32") 6013 and 7018 rods. Can also handle 3.2mm (1/8") 7018 rods on 220V.
- Set the current based on the electrode type and thickness of the material.
- MIG Welding (Gas/Gasless):
- For Gas MIG, ensure gas flow is set correctly at the regulator.
- For Gasless MIG, use flux-cored wire and ensure correct polarity.
- Juster voltage and wire feed speed (controlled synergically by the machine) for optimal arc.
- Løft TIG-svejsning:
- Requires a TIG torch and pure argon shielding gas.
- To initiate arc, touch the tungsten electrode to the workpiece and then lift slightly.
6.4 Kompatible materialer

Figur 6.3: Eksamples of metal types suitable for welding with this machine, including mild steel, cast iron, sheet metal, stainless steel, square pipe, and metal cage.
The RBM-1450 is designed to weld various materials, including stainless steel, alloy steel, carbon steel, copper, and copper alloy. It is not recommended for aluminum without specific accessories and settings not covered in this manual.
7. Vedligeholdelse
Regular maintenance ensures the longevity and optimal performance of your welder. Always disconnect power before performing any maintenance.
- Rensning: Periodically clean the inside of the machine using dry, compressed air to remove dust and metal particles. Ensure the air is dry to prevent moisture damage.
- Trådfremføringsmekanisme: Inspect the wire feed rollers for wear and cleanliness. Clean any debris from the grooves.
- Kabler og forbindelser: Check all welding cables, torch, and ground clamp for damage, fraying, or loose connections. Replace damaged parts immediately.
- Køleventilator: Sørg for, at køleblæseren er fri for blokeringer og fungerer korrekt.
- Kontaktdyser og -tips: Replace worn contact tips and clean or replace clogged nozzles on the MIG torch.
8. Fejlfinding
Dette afsnit indeholder løsninger på almindelige problemer, du kan støde på. Kontakt kundesupport, hvis du har problemer, der ikke er nævnt her.
| Problem | Mulig årsag | Løsning |
|---|---|---|
| Svejser tænder ikke. | Ingen strømforsyning; hovedafbryder slukket; defekt netledning. | Check power outlet and circuit breaker. Ensure main switch is ON. Inspect power cord for damage. |
| Ingen bue eller svag bue. | Poor ground connection; incorrect settings; worn consumables; wrong polarity. | Sørg for jordrensningamp is clean and securely attached. Adjust current/voltage. Replace contact tip/electrode. Verify correct polarity for welding process. |
| Overload/Overheat light is on. | Overskredet driftscyklus; utilstrækkelig ventilation. | Allow machine to cool down. Ensure cooling fan is clear and operating. Improve ventilation in welding area. |
| Problemer med trådfremføring (MIG). | Incorrect wire tension; clogged liner; wrong drive rollers; tangled wire. | Adjust wire tension. Clean or replace torch liner. Ensure correct drive rollers for wire size. Untangle wire spool. |
| Dårlig svejsekvalitet (porøsitet, sprøjt). | Incorrect gas flow (MIG); contaminated workpiece; wrong settings; improper technique. | Check gas cylinder and flow rate. Clean workpiece thoroughly. Adjust settings. Practice welding technique. |
9. Specifikationer
Key technical specifications for the Reboot RBM-1450 Multiprocess Welder.
| Feature | Detalje |
|---|---|
| Modelnummer | ARC1450D |
| Fabrikant | Reboot-US |
| Input bindtage | 220 Volt AC |
| Strømkilde | AC |
| Svejseprocesser | MIG (Gas/Gasless), Stick (MMA), Lift TIG |
| Driftscyklus (220V) | 140A @ 60 % |
| Varens vægt | 18.08 pund (ca. 8.2 kg) |
| Produktdimensioner | 16 x 10 x 8.5 tommer (ca. 40.6 x 25.4 x 21.6 cm) |
| Materiale | Rustfrit stål (hus) |
| Ledningslængde | 5 fod |
| Plug-format | B - US style with ground plug (NEMA 6-50P) |
| Suggested Breaker (220V) | 30A |
10. Garanti og support
Reboot provides comprehensive support for your product.
10.1 Garantioplysninger
Reboot supplies a 1 ÅRS GARANTI from the date of purchase. Faulty arc welders can be replaced within 30 days of purchase. This warranty covers manufacturing defects and workmanship under normal use.
10.2 Kundesupport
For any questions, technical assistance, or warranty claims, please contact Reboot customer service. We offer 7*24 hours online after-sales service. If you're not satisfied with your purchase, we'll refund you - no questions asked.
For the most up-to-date contact information, please visit the official Reboot webwebstedet eller se de kontaktoplysninger, der følger med din købsdokumentation.