
1. Introduktion
This manual provides detailed instructions for the installation, operation, and maintenance of your Suuwer S701 Non-Programmable Thermostat. This thermostat is designed for use with 1 Heat/1 Cool conventional single-stage heating and cooling systems. Please read this manual thoroughly before installation and operation to ensure proper function and safety.

Billede 1.1: Forside view of the Suuwer S701 Non-Programmable Thermostat, displaying room temperature and set temperature on a blue backlit screen.
2. Sikkerhedsoplysninger
- Sluk altid for strømmen til varme-/kølesystemet ved hovedsikringen eller afbryderpanelet, før du installerer eller servicerer termostaten.
- This thermostat operates on 24VAC power or 2 AAA batteries. Do not connect to line voltage (120-240V) systems.
- If you are inexperienced with electrical wiring, it is recommended to seek professional assistance for installation.
- Ensure all wiring connections are secure to prevent short circuits or damage to the system.
3. Pakkens indhold
Bekræft at alle varer er til stede i din pakke:
- Suuwer S701 Thermostat Unit
- Installationsmanual
- Kabeletiketter
- Monteringsskruer (2)
- Vægankre (2)

Image 3.1: Illustration of the Suuwer S701 thermostat and its included accessories.
4. Systemkompatibilitet
The Suuwer S701 thermostat is designed for specific HVAC systems. Please review the compatibility information carefully before installation.
4.1 Kompatible systemer
- Konventionel Single-Stage Heating & Cooling (with C-wire or without C-wire)
- Gas Fireplace (24 Volts)
- Gas / Oil / Electric Furnace (Heating only)
- Kun kedelstrålevarme
- Kun varmluftopvarmning i ovn
- Cooling Only (with C-wire or without C-wire)
Note: Verify your existing thermostat base is wired with 2 to 5 wires. Systems with 6 to 8 wires are generally not supported by this model.
4.2 Inkompatible systemer
- Multistage Heating & Cooling (e.g., 1H/2C, 2H/2C)
- HVAC Heat Pump Systems (e.g., 2H/1C, 4H/2C)
- PTACs (Packaged Terminal Air Conditioners)
- 3-wire Hydronic (Hot Water) Systems
- Dual Fuel/Hybrid Heating Systems
- Line Voltage Systems (120-240V electric baseboards heat)
- Mini Split Heat Pump Air Conditioners
- RV Air Conditioners (Mach and Roughneck series)
- Konvektorer
- Loftvarme i strålevarme
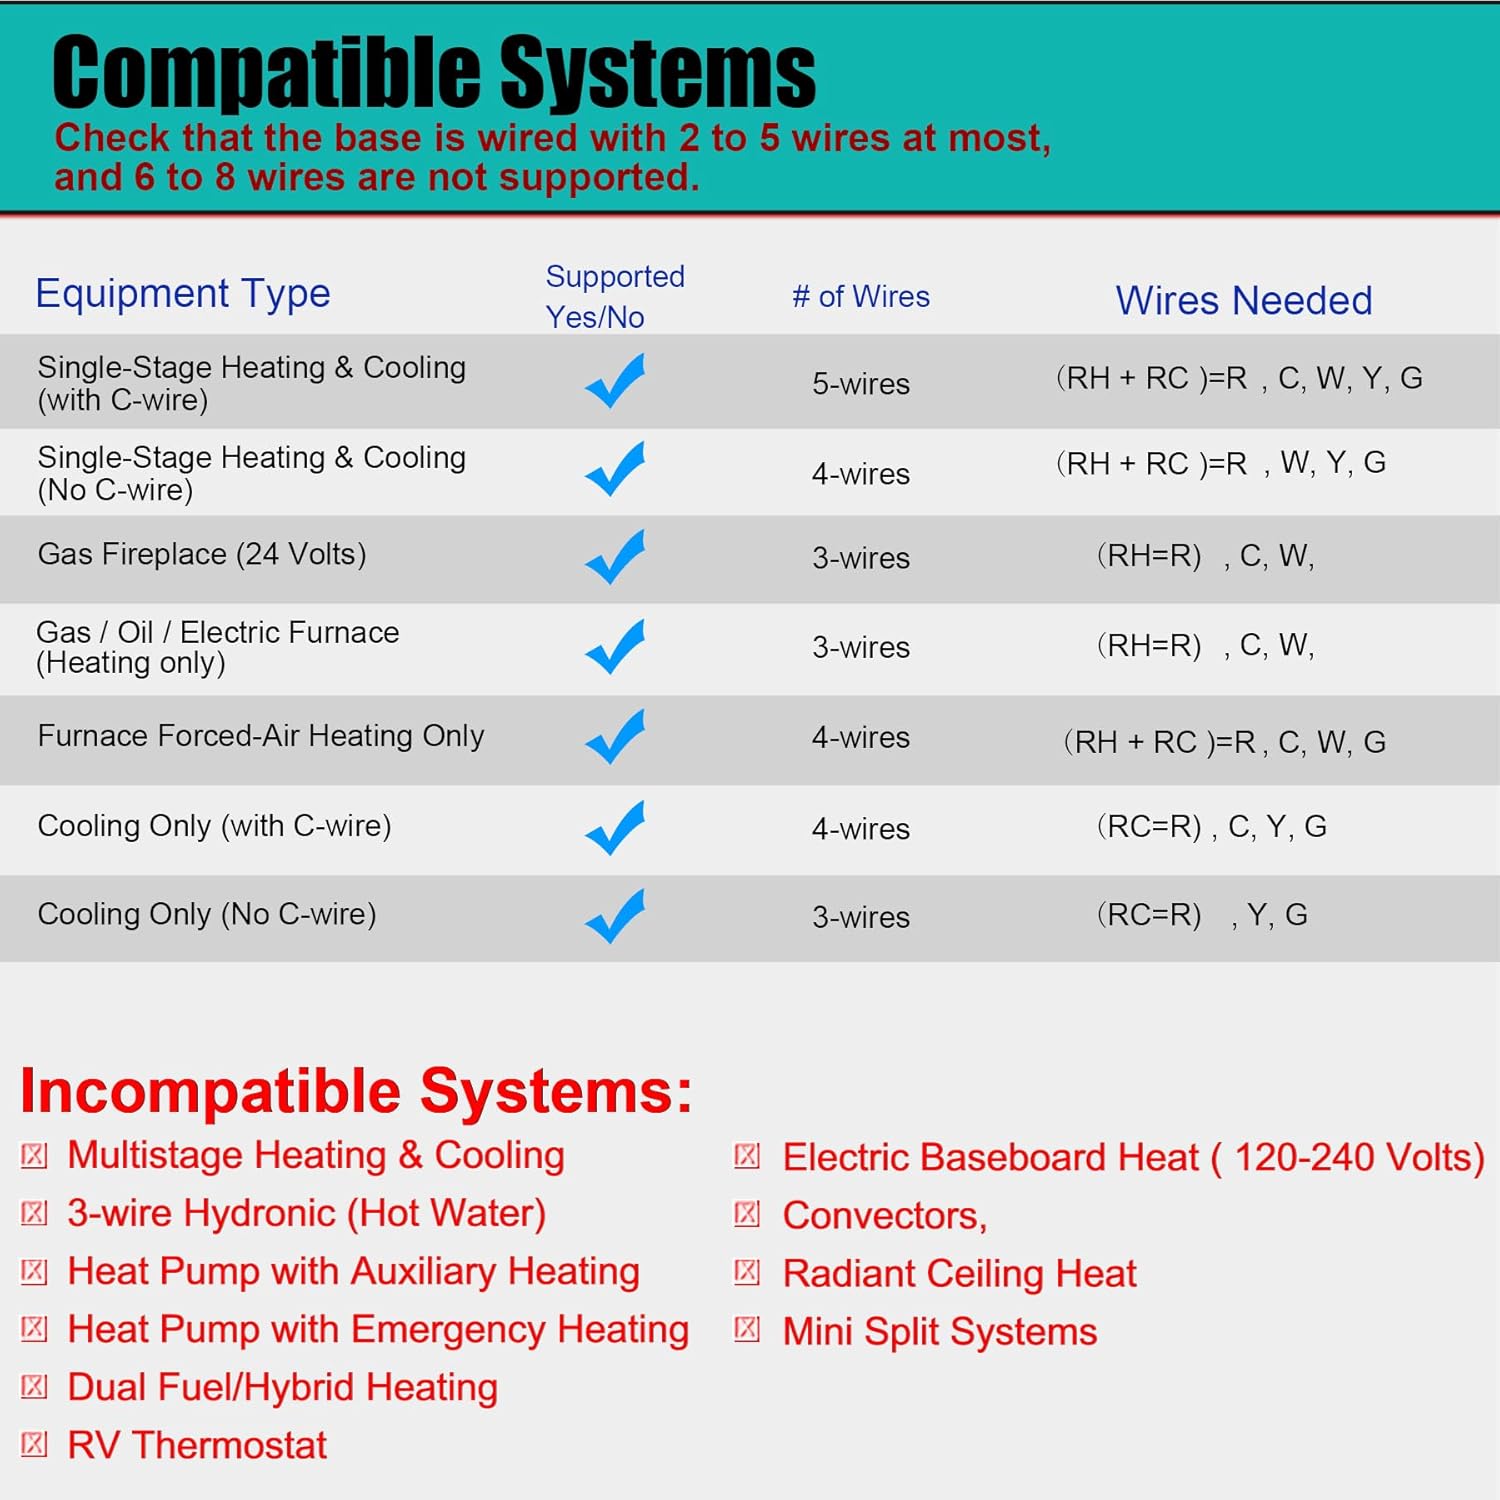
Image 4.1: Detailed compatibility chart for the Suuwer S701 thermostat.
5. Opsætning og installation
Follow these steps for proper installation. It is recommended to take a picture of your old thermostat's wiring before disconnecting any wires.
5.1 Afmontering af din gamle termostat
- Sluk for strømmen: Locate the circuit breaker or fuse box that controls your heating and cooling system and turn off the power.
- Fjern låget: Fjern forsigtigt dækslet på din gamle termostat.
- Fotoledninger: Take a clear picture of the wiring connections, noting which wire is connected to each terminal.
- Mærk ledninger: Use the provided cable labels to mark each wire according to its terminal designation (e.g., R, W, Y, G, C).
- Disconnect wires: Frakobl ledningerne fra de gamle termostatterminaler.
- Remove old base: Unscrew and remove the old thermostat's mounting base from the wall.
5.2 Montering af den nye termostat
- Positionsgrundlag: Hold the new Suuwer S701 thermostat base against the wall where you want to mount it.
- Mark screw holes: Mark the positions for the mounting screws. If possible, use existing screw holes.
- Bor huller: If new holes are needed, drill pilot holes and insert the wall anchors.
- Sikker base: Pull the wires through the opening in the thermostat base and secure the base to the wall using the provided screws.
5.3 Ledningsforbindelser
Connect the labeled wires to the corresponding terminals on the Suuwer S701 thermostat base. Refer to the wiring diagram below and your photograph for accuracy.
- R/RC: 24VAC power (often jumpered, see diagram)
- G: Indendørs blæser (blæser)
- Y: 1.-stage sejt
- W: 1.-stage varme
- C: Common wire (optional for battery-powered operation, but recommended for continuous backlight)

Image 5.1: Wiring diagram and system switch setting for the Suuwer S701 thermostat.
5.4 Setting the System Switch (GAS/ELEC)
On the back of the thermostat unit, locate the small switch labeled 'GAS' and 'ELEC'.
- Hvis du har en gas or oil furnace, sæt kontakten til GAS.
- Hvis du har en electric furnace, sæt kontakten til ELEC.
5.5 Installation af batterier
The thermostat can be powered by 24VAC or 2 AAA batteries. Batteries are required for operation if no C-wire is connected. Even with a C-wire, batteries provide backup power.
- Open the battery compartment on the front of the thermostat.
- Isæt to nye AAA alkaline-batterier, og sørg for at polariteten (+/-) vender korrekt.
- Luk batterirummet.
5.6 Attaching the Thermostat to the Base
Align the thermostat unit with the mounted base and gently push it into place until it clicks securely.
5.7 Gendannelse af strømforsyning
Once the thermostat is securely mounted and wired, turn the power back on at the main circuit breaker or fuse box.
6. Betjeningsvejledning
The Suuwer S701 is a non-programmable thermostat, offering straightforward manual control of your home's temperature.

Image 6.1: Display and controls of the Suuwer S701 thermostat.
6.1 Display overview
The large LCD with blue backlight shows the current room temperature and the set temperature. The backlight activates for 10 seconds when any button is pressed.
- Værelse: Viser den aktuelle omgivelsestemperatur.
- Indstillet til: Displays the desired temperature setting.
- Cool/Heat/Off: Indicates the current system mode.
- Fan ON/AUTO: Angiver den aktuelle ventilatortilstand.
6.2 Justering af temperatur
Brug + (Op) og - (Down) buttons on the right side of the thermostat to adjust the desired temperature setting. Each press changes the temperature by 1 degree Fahrenheit.
6.3 Valg af systemtilstand
Brug SYSTEM switch located at the bottom right of the thermostat to select the operating mode:
- FEDT NOK: Aktiverer kølesystemet, når rumtemperaturen stiger til over den indstillede temperatur.
- VARME: Aktiverer varmesystemet, når rumtemperaturen falder til under den indstillede temperatur.
- OFF: Slukker for både varme- og kølesystemer.
6.4 Valg af ventilatortilstand
Brug FAN switch located at the bottom left of the thermostat to select the fan operating mode:
- BIL: Ventilatoren kører kun, når varme- eller kølesystemet er aktivt i drift. Dette er den mest almindelige og energieffektive indstilling.
- PÅ: Ventilatoren kører kontinuerligt, uanset om varme- eller kølesystemet er aktivt.
6.5 Adjusting Temperature Swing (Cycle Rate)
The temperature swing, also known as cycle rate or differential, determines how much the temperature can vary from your setpoint before the system turns on. A smaller swing results in more frequent, shorter cycles, while a larger swing results in less frequent, longer cycles.
The swing is adjustable from 0.2°F to 2°F. The factory default is 0.5°F for both heating and cooling.

Image 6.2: Thermostat display showing the temperature swing setting.
To adjust the temperature swing:
- Tryk og hold på FAN button for approximately 3 seconds until the display changes to show the current swing setting.
- Brug + (Op) eller - (Down) buttons to adjust the swing value.
- Tryk på FAN button again to toggle between heating and cooling swing settings.
- The thermostat will automatically save the setting after a few seconds of inactivity.
7. Vedligeholdelse
7.1 Udskiftning af batteri
When the low battery indicator (a battery icon) appears on the display, it is time to replace the batteries. Replace with two new AAA alkaline batteries. Refer to Section 5.5 for battery installation steps.
7.2 Rengøring
Tør termostatens yderside af med en blød kludamp klæde. Brug ikke slibende rengøringsmidler eller opløsningsmidler.
8. Fejlfinding
Hvis du støder på problemer med din termostat, kan du se følgende almindelige problemer og løsninger:
| Problem | Mulig årsag | Løsning |
|---|---|---|
| Skærmen er tom | No power, dead batteries, or tripped circuit breaker. | Check batteries and replace if necessary. Ensure power is on at the circuit breaker. Verify wiring connections. |
| Varme-/kølesystemet reagerer ikke | Incorrect system mode, incorrect wiring, or system issue. | Ensure SYSTEM switch is set to HEAT or COOL. Verify wiring. Check if furnace/AC unit has power. |
| Temperaturaflæsningen virker unøjagtig | Thermostat location, or calibration needed. | Ensure thermostat is not in direct sunlight or near heat sources. The thermostat has a room temperature calibration adjustment for +/-1-degree F. Consult the full installation manual for advanced settings. |
| Low Battery Indicator (battery icon) | Batterierne er lave. | Replace with two new AAA alkaline batteries immediately. |
| Compressor short cycling (turning on/off too frequently) | Temperature swing set too low. | Adjust the temperature swing to a higher value (e.g., 1.0°F or 1.5°F). |
For mere detaljeret fejlfinding henvises til Fejlfindingsvejledning (PDF).
9. Specifikationer
- Model: S701
- Produktdimensioner: 0.98" D x 4.72" B x 3.86" H
- Varens vægt: 6.7 ounces (0.42 pund)
- Farve: Blå baggrundslys
- Materiale: Plast
- Skærmtype: LCD med blå baggrundsbelysning
- Skærmstørrelse: 4.5 tommer
- Kontroltype: Push Button / Button Control
- Monteringstype: Vægmontering
- Strømkilde: 24 Volts (AC) or 2 AAA Batteries
- Temperaturstyringsområde: 44°F til 90°F
- Room Temperature Display Range: 41°F til 95°F
- Temperatur nøjagtighed: +/-1°F
- Særlige funktioner: Non-Programmable, Separate Heating and Cooling Swing (0.2°F to 2°F), Low Battery Indicator, 5 Minute Compressor Delay Protection (Selectable ON or OFF)
- UPC: 709327753278
10. Garanti og support
10.1 Garantioplysninger
The Suuwer S701 Non-Programmable Thermostat comes with a 2 års bekymringsfri garanti fra købsdatoen. Denne garanti dækker materiale- og fabrikationsfejl ved normal brug. Gem venligst din købsbevis i tilfælde af garantikrav.
10.2 Kundesupport
For technical assistance, troubleshooting, or warranty inquiries, please contact Suuwer customer service. We offer 24-hour customer service to assist you.
Yderligere ressourcer: