
1. Introduktion
The Protmex PT625A is a handheld digital anemometer designed for measuring air velocity and airflow. This device is suitable for various applications, including environmental monitoring, HVAC system analysis, outdoor sports, and industrial use. It provides accurate and fast readings with multiple measurement units and data handling capabilities.
2. Produktet er slutview
2.1 Komponenter
- Air Velocity Flow Sensor: The fan blade assembly at the top of the device.
- Vise: LCD screen for showing measurement readings and indicators.
- Kontrolknapper: Power, Function, Unit, Max/Min/Avg, Data Hold, Record.
- Batterirum: Placeret på bagsiden til installation af batteri.
- Micro USB -port: For data connection (on some models, not explicitly stated for PT625A but mentioned in video).
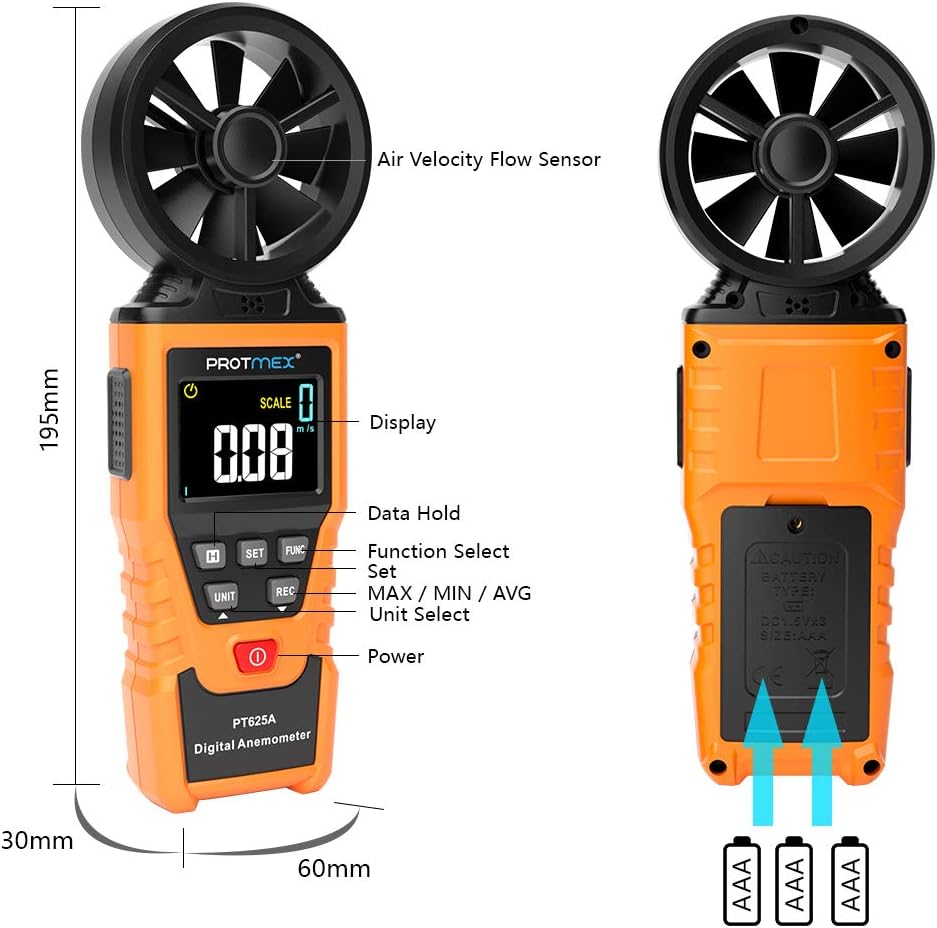
Figur 1: Forside view of the Protmex PT625A Anemometer with key components labeled, including the air velocity flow sensor, display, and control buttons.
2.2 Funktioner
- High accuracy for wind speed measurement (0.4~40 m/s).
- Multiple units for wind speed: m/s, km/h, ft/s, knots, mil/h, fp/m.
- Air volume measurement in CFM, CMM, CMS.
- 8-blade aviation wing fan for sensitive and accurate readings.
- MAX/MIN/AVG data display.
- Data Hold-funktion.
- Automatisk sluk.
- Indikator for lavt batteri.
- Air duct area setting for airflow calculation.
3. Opsætning
3.1 Batteriinstallation
- Find batterirummet på bagsiden af enheden.
- Brug en skruetrækker til at åbne batteridækslet.
- Insert the provided 9V battery, ensuring correct polarity (+/-).
- Sæt batterirummets dæksel på igen og fastgør det med skruen.

Figur 2: Tilbage view of the anemometer, indicating the battery compartment where a 9V battery is inserted. A screwdriver is required to open the compartment.
4. Betjeningsvejledning
4.1 Tænd/sluk
Tryk på Magt knap ( ) to turn the device on or off. The device features an auto power-off function to conserve battery life.
4.2 Measuring Air Velocity
- Turn on the anemometer.
- Point the air velocity flow sensor (fan) directly into the airflow you wish to measure. Ensure the airflow passes through the fan blades.
- The current air velocity reading will be displayed on the LCD screen.
- Tryk på ENHED button to cycle through different measurement units (m/s, km/h, ft/s, knots, mil/h, fp/m).

Figure 3: The anemometer being used to measure wind speed in an outdoor environment, demonstrating how to position the sensor into the airflow.
4.3 Airflow Measurement (CFM/CMM/CMS)
- Turn on the anemometer.
- Tryk på FUNK button to enter airflow measurement mode.
- Brug SÆT button to input the cross-sectional area of the air duct or channel. This is crucial for accurate airflow calculation.
- Once the area is set, point the sensor into the airflow. The device will display the airflow volume in CFM, CMM, or CMS.
- Tryk på ENHED button to select the desired airflow unit.

Figure 4: Illustration of the anemometer displaying airflow measurement after setting the air duct area. The screen shows both area input and calculated flow.
4.4 Data Hold, Max/Min/Avg, and Record Functions
- Data Hold: Tryk på HOLDE knappen for at fryse den aktuelle aflæsning på displayet. Tryk igen for at slippe.
- MAKS/MIN/GENNEMSNIT: Tryk på MAKS/MIN/GNS button to cycle through maximum, minimum, and average readings during a measurement session.
- Optage: Tryk på REC button to initiate data recording. (Note: Specific details on data storage and retrieval may be in the full manual or software).
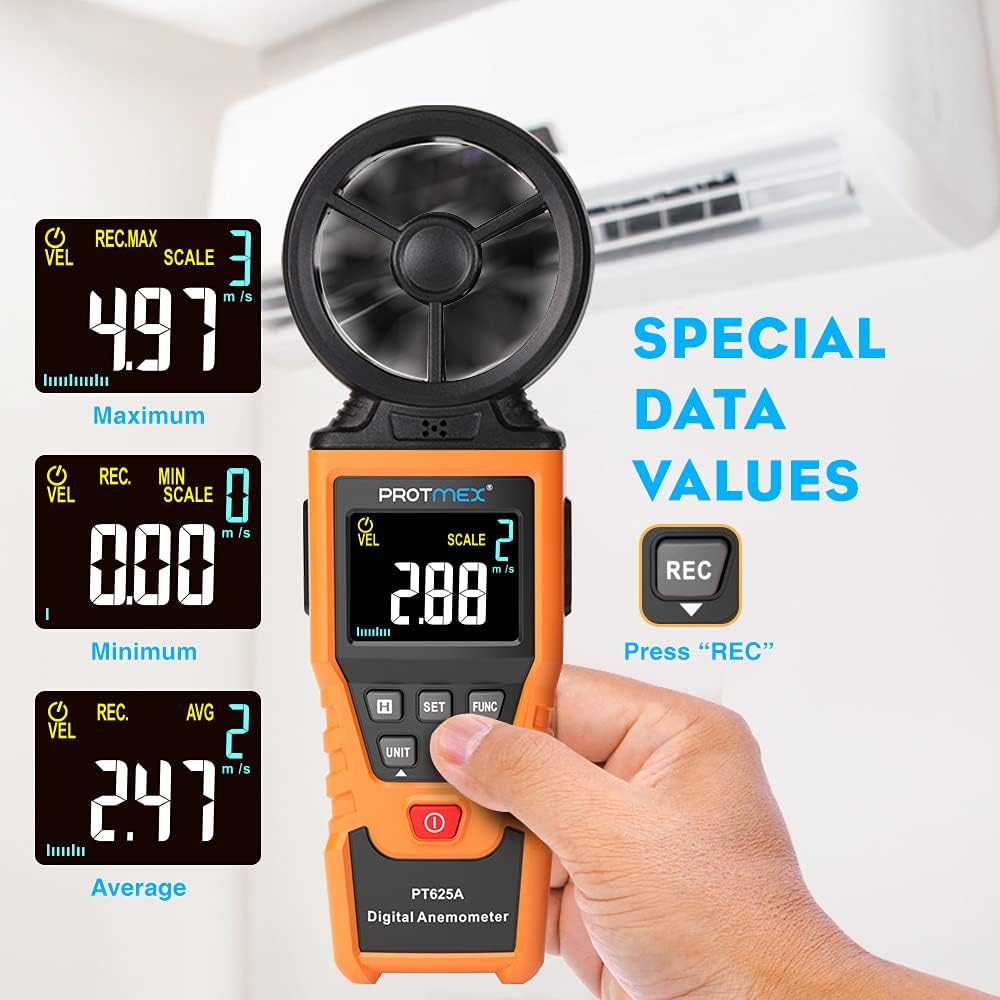
Figure 5: The anemometer's display showing maximum, minimum, and average wind velocity readings, accessible via the dedicated buttons.
5. Vedligeholdelse
- Hold enheden ren og tør. Tør af med en blød, tør klud.amp klæde. Brug ikke slibende rengøringsmidler eller opløsningsmidler.
- Ensure the fan blades are free from dust and debris to maintain measurement accuracy.
- Når det ikke er i brug i længere perioder, skal batteriet fjernes for at forhindre lækage.
- Store the anemometer in its protective case in a cool, dry place.
6. Fejlfinding
- Ingen skærm/enhed tænder ikke:
- Kontroller, om batteriet er installeret korrekt med den rigtige polaritet.
- Udskift batteriet, hvis det er lavt eller afladet.
- Upræcise læsninger:
- Ensure the fan blades are clean and spinning freely.
- Verify that the sensor is pointed directly into the airflow.
- Check if the correct measurement unit is selected.
- For airflow measurements, confirm the air duct area setting is accurate.
- Knapper reagerer ikke:
- Sluk enheden, og tænd den derefter igen.
- Udskift batteriet.
7. Specifikationer
| Parameter | Værdi |
|---|---|
| Vindhastighedsområde | 0.4~40 m/s |
| Vindhastighedsenheder | m/s, km/h, ft/s, knots, mil/h, fp/m |
| Air Volume Units | CFM, CMM, CMS |
| Sampling Tid | Approx. 0.5s/time |
| Maksimal visningsværdi | 9999 |
| Strømforsyning | 9V batteri |
| Dimensioner (L x B x H) | 8.85 x 4.52 x 1.77 tommer |
| Varens vægt | 10 ounce |
| Materiale | Gummi |

Figure 6: A detailed screen introduction showing various symbols and their descriptions, including MAX, MIN, AVG, VEL, FLOW, AREA, and different units of measurement.
8. Garanti og support
Protmex products are designed for quality and reliability. For any issues or support, please refer to the contact information provided with your purchase or visit the official Protmex website. The product is CE (LVE, EMC), RoHS approved.
Protmex offers 24/7 online friendly support. Your satisfaction is our priority.


