Indledning
This user manual provides comprehensive instructions for the Andoer HDV-201LM 1080P FHD Digital Video Camera. It covers setup, operation, maintenance, and troubleshooting to help you get the most out of your device. The Andoer HDV-201LM is a portable digital video camera designed for capturing high-quality photos and videos, making it ideal for preserving memories.
Pakkens indhold
Når du åbner pakken, skal du kontrollere, at alle følgende varer er inkluderet:
- 1 x Digital Video Camera
- 1 x kamerataske
- 2 x Rechargeable Batteries (one already in camera)
- 1 x USB-kabel
- 1 x AV-kabel
- 1 x fjernbetjening
- 1 x Brugermanual (engelsk)

Image: All items included in the Andoer HDV-201LM package, including the camera, batteries, cables, remote, and bag.
Opsætning
1. Batteriinstallation
The camera comes with two 3.7V 1500mAh rechargeable batteries. One battery is typically pre-installed. Before first use, ensure you remove any insulating film from the battery terminals.
- Open the battery compartment cover, usually located at the bottom or side of the camera.
- Isæt batteriet, og sørg for at polariteten vender korrekt som angivet i batterirummet.
- Luk batterirummets dæksel forsvarligt.
- Charge the battery fully before initial use using the provided USB cable.

Image: The Andoer HDV-201LM camera, two rechargeable batteries, and the remote control, illustrating the main components.
2. Installation af hukommelseskort
The camera requires an SD card (not included) for storing photos and videos. A Class 10 or higher SD card is highly recommended for optimal performance and smooth recording.
- Find SD-kortstikket, typisk i nærheden af batterirummet.
- Indsæt SD-kortet med metalkontakterne vendt i den rigtige retning, indtil det klikker på plads.
- For at fjerne det skal du forsigtigt skubbe kortet ind, indtil det springer ud.
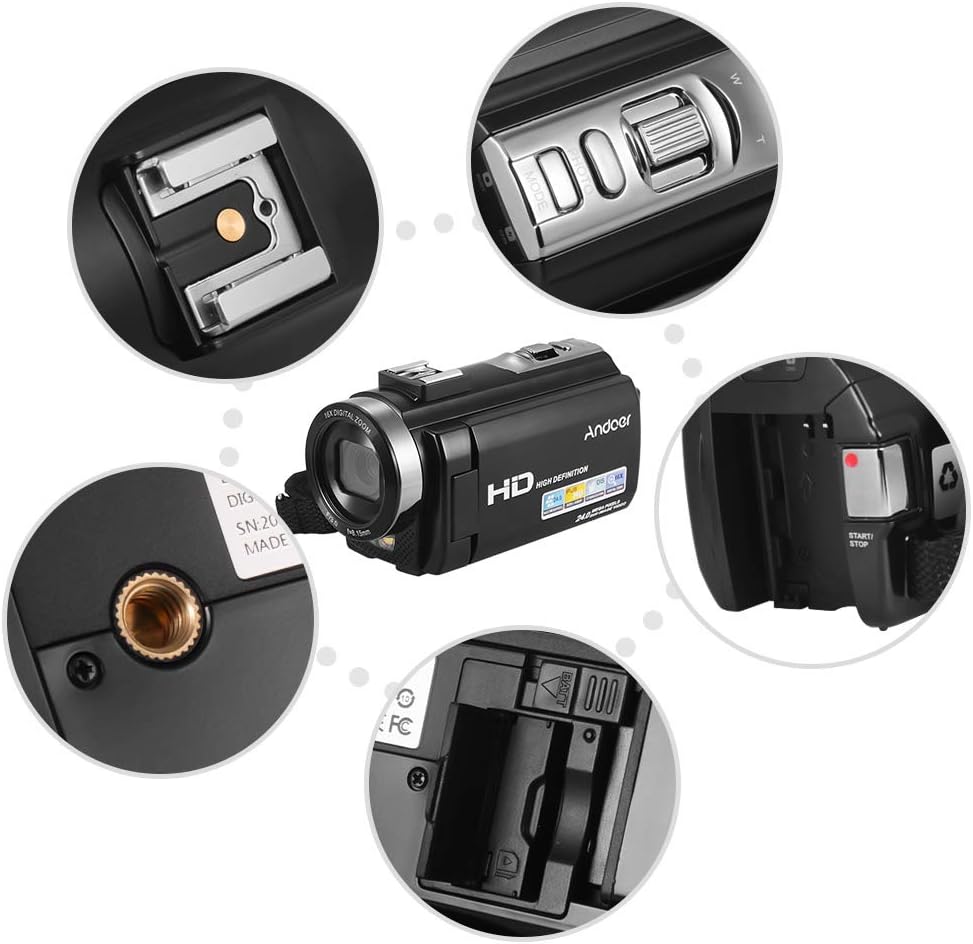
Billede: Nærbillede views of various camera components, including the SD card slot, hot shoe mount, and control buttons.
3. Montering af eksternt tilbehør
The camera features a hot shoe mount for connecting external accessories such as microphones or LED video lights (sold separately).
- Slide the accessory onto the hot shoe mount located on top of the camera.
- Secure the accessory if it has a locking mechanism.
- For external microphones, connect the audio cable to the camera's microphone input port.

Image: Illustration of the hot shoe mount on the Andoer HDV-201LM camera, showing how external microphones and LED lights can be attached.
Betjeningsvejledning
1. Tænd/sluk
- To power on, open the LCD screen or press the MAGT knap.
- To power off, close the LCD screen or press and hold the MAGT knap.
2. Optagelse af videoer
The camera supports 1080P FULL HD video recording.
- Tænd kameraet.
- Ensure the camera is in video recording mode (usually indicated by a video camera icon on the screen). If not, press the MODE knappen for at skifte.
- Tryk på START/STOP button to begin recording. The recording indicator will light up.
- Tryk på START/STOP knappen igen for at stoppe optagelsen.
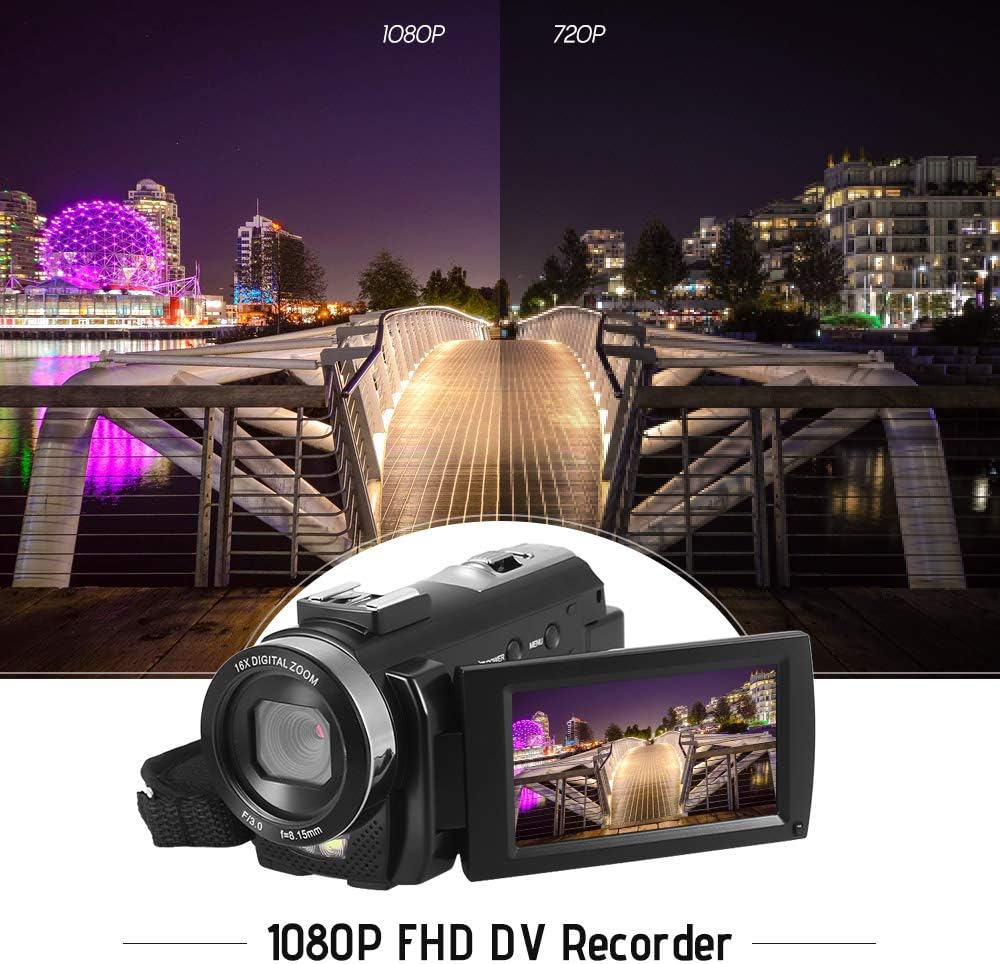
Image: Comparison of 1080P and 720P video quality, highlighting the 1080P FHD capability of the Andoer HDV-201LM camcorder.
3. Tage billeder
The camera can capture still images up to 24MP (interpolation).
- Tænd kameraet.
- Tryk på MODE button to switch to photo mode (indicated by a camera icon).
- Komponer dit billede ved hjælp af LCD-skærmen.
- Tryk på FOTO button (shutter button) to take a picture.
4. Brug af LCD-skærmen
The 3.0-inch TFT-LCD screen offers 270° rotation for flexible viewing vinkler.
- Rotate the screen to face forward for self-recording or to various angles for comfortable viewing.
- The screen displays recording status, battery level, mode, and other settings.

Image: The Andoer HDV-201LM camera with its rotatable LCD screen open, showing the camera's compact design.
5. Digital zoom
The camera features 16X digital zoom.
- Brug W (Bred) og T (Telefoto) buttons, typically located near the top of the camera, to zoom in or out.
- Note: Digital zoom may reduce image quality compared to optical zoom.

Image: Demonstrates the 16X digital zoom capability of the Andoer HDV-201LM, showing a zoomed-in view of a subject.
6. Menuindstillinger
Access the menu to adjust various camera settings:
- Tryk på MENU knappen for at åbne indstillingsmenuen.
- Brug navigationsknapperne (op/ned/venstre/højre) til at vælge muligheder.
- Tryk på OK knappen for at bekræfte et valg.
- Trykke MENU igen for at forlade.
Nøgleindstillinger inkluderer:
- Hvidbalance: Auto, Daylight, Cloudy, Fluorescent, Tungsten.
- Mode: Auto, Night, Portrait, Landscape, Backlight, Sport, Party, Beach, High Sensitivity.
- Eksponering: Adjust brightness from ±3.0EV.
- Selvudløser: Off, 2s, 5s, 10s.
- Automatisk slukning: OFF, 1min, 3min, 5min.
- Andre funktioner: Face detection, smile capture, beauty face, anti-shake.

Image: A user holding and operating the Andoer HDV-201LM camera, demonstrating its portability and ease of use.
7. Tilslutning til en computer (USB)
You can connect the camera to a computer to transfer files.
- Sørg for, at kameraet er tændt.
- Tilslut kameraet til din computer ved hjælp af det medfølgende USB-kabel.
- Kameraet vises som et flytbart diskdrev på din computer.
- You can now access and transfer your photos and videos.
Supported Operating Systems: Windows XP/Vista/7/8/10.

Billede: Nærbillede view of the USB and TV output ports on the Andoer HDV-201LM camera, indicating connectivity options.
8. Connecting to a TV (AV Output)
View your recordings directly on a television using the AV cable.
- Connect one end of the AV cable to the camera's AV output port.
- Connect the other end to the AV input ports on your television (yellow for video, white/red for audio).
- Select the correct AV input source on your TV.
TV Output Standards: NTSC/PAL.
9. Brug af fjernbetjeningen
Den medfølgende fjernbetjening giver mulighed for bekvem betjening på afstand.
- Ensure the remote control battery (1 x 3V CR2025) is installed correctly.
- Ret fjernbetjeningen mod kameraets IR-modtager.
- Use the buttons on the remote to control recording, playback, zoom, and menu navigation.
Opretholdelse
1. Rengøring af kameraet
- Brug en blød, tør klud til at rengøre kamerahuset.
- Brug en specialklud og -opløsning til rengøring af objektivet og LCD-skærmen. Undgå slibende materialer.
- Brug ikke stærke rengøringsmidler eller opløsningsmidler.
2. Batteripleje
- Opbevar batterierne på et køligt, tørt sted, når de ikke er i brug.
- Undgå at aflade batterier helt ofte for at forlænge deres levetid.
- Hvis kameraet ikke skal bruges i længere tid, skal du fjerne batteriet.
3. Opbevaring
- Store the camera in its camera bag to protect it from dust and scratches.
- Keep the camera away from extreme temperatures, humidity, and direct sunlight.
Fejlfinding
| Problem | Mulig årsag | Løsning |
|---|---|---|
| Kameraet tænder ikke. | Battery is dead or not inserted correctly. Insulating film on battery. | Charge the battery. Reinsert the battery correctly. Remove insulating film. |
| Kan ikke optage video/tage billeder. | No SD card or SD card full/corrupted. Incorrect mode. | Insert a valid SD card. Delete files or format SD card. Switch to correct mode. |
| Dårlig billed-/videokvalitet. | Lens is dirty. Low light conditions. Digital zoom used excessively. | Clean the lens. Use LED fill light. Avoid excessive digital zoom. |
| Fjernbetjening virker ikke. | Battery dead or incorrectly inserted. Obstruction between remote and camera. | Replace/reinsert remote battery. Ensure clear line of sight to IR receiver. |
| Kameraet fryser eller reagerer ikke. | Softwarefejl. | Fjern og sæt batteriet i igen for at nulstille kameraet. |
Specifikationer
| Feature | Detalje |
|---|---|
| Mærke | Andoer |
| Modelnummer | HDV-201LM |
| Sensor | 8MP CMOS Sensor, max. 24MP (interpolation) |
| Ekstern hukommelse | SD Card, max. 32G (Not included, Class 10+ recommended) |
| Kameraobjektiv | Ff (F/3.0 f=8.15mm) |
| Skærm | 3.0 Inch TFT-LCD (16:9), 270° rotation |
| Video Format & Resolution | AVI, 1920*1080P FULL HD/30fps, 1280*720 HD/30fps, VGA 640*480/30fps, QVGA 320*240/30fps |
| Image Format & Resolution | JPG, 5600*4200 (24MP Interpolation) / 5200*3900 (20MP Interpolation) / 4608*3456 (16MP Interpolation) / 4000*3000 (12MP Interpolation) / 3648*2736 (10MP Interpolation) / 3648*2048 HD (7M-Wide Interpolation) / 2592*1944 (5MP) / 2048*1536 (3MP) / 1920*1080 HD (2M-Wide) / 640*480 VGA |
| Hvidbalance | Auto/ Daylight/ Cloudy/ Fluorescent/ Tungsten |
| Mode | Auto/Night/Portrait/Landscape/Backlight/Sport/Party/Beach/High Sensitivity |
| Eksponering | ± 3.0 EV |
| Selvudløser | Off, 2s, 5s, 10s |
| Auto sluk | OFF/1min/ 3min/ 5min |
| USB-port | USB2.0 |
| Tv-udgang | NTSC / PAL |
| Operativsystemsupport | Windows XP/Vista/7/8/10 |
| Kamera strømforsyning | 1 * Battery 3.7V 1500mAh (included) |
| Fjernbetjenings batteri | 1 * 3V CR2025 Battery |
| Kamera størrelse | 13.5 * 5.5 * 6.5 cm / 5.3 * 2.2 * 2.6 tommer |
| Kameravægt | 273g / 9.6oz (With battery) |
Garanti og support
This product comes with standard manufacturer support. For extended coverage, consider the following options:
- 1 års udvidet garantiplan
- 2 Years Extended Warranty Plan
For technical support or warranty claims, please refer to the contact information provided with your purchase documentation or visit the official Andoer webwebsted.