Indledning
Denne manual indeholder instruktioner til sikker og effektiv betjening af din Suteck automatiske digitale yoghurtmaskine. Læs den grundigt inden første brug for at sikre korrekt funktion og apparatets levetid.
Sikkerhedsinstruktioner
- Læs alle instruktioner omhyggeligt, før du bruger apparatet.
- Yoghurtmaskinens hovedenhed må ikke nedsænkes i vand eller andre væsker.
- Hold apparatet utilgængeligt for børn og kæledyr.
- Brug kun yoghurtmaskinen på en stabil, flad og varmebestandig overflade.
- Tag altid stikket ud af stikkontakten, når det ikke er i brug, og før rengøring.
- Brug ikke apparatet, hvis netledningen eller stikket er beskadiget. Kontakt kundeservice for reparation.
- Dette apparat er kun beregnet til husholdningsbrug. Brug det ikke til kommercielle formål.
- Sørg for tilstrækkelig ventilation omkring enheden under drift.
Produktkomponenter
Suteck Yoghurtmaskinen indeholder følgende dele:
- Yoghurtmaskine hovedenhed (rustfrit stål design)
- Gennemsigtigt låg
- 8 glas (6 g hver)
- Brugervejledning (dette dokument)

Billede: Suteck Yoghurt Maker-hovedenheden med det gennemsigtige låg, der indeholder otte glas fyldt med forskellige yoghurter og frugttoppings. En skål yoghurt med jordbær og et separat glas yoghurt med bær vises også.
Opsætning
- Pak alle komponenter ud, og fjern al emballage.
- Vask glasbeholderne og det gennemsigtige låg med varmt sæbevand. Skyl grundigt og tør dem helt.
- Tør ydersiden af hovedenheden af med enamp klæde. Nedsænk ikke hovedenheden i vand.
- Placer yoghurtmaskinen på en ren, tør og stabil overflade, væk fra direkte varmekilder eller træk.

Billede: En visuel repræsentation af Suteck yoghurtmaskinen og dens individuelle komponenter, herunder bunden i rustfrit stål, det klare låg og otte glas.
Brugsanvisning: Tilberedning af yoghurt
- Tilbered yoghurtblandingen: Tilsæt yoghurtstarter eller en lille mængde naturel yoghurt (indeholdende levende aktive kulturer) til mælken. Bland grundigt, indtil det er godt blandet. Det specifikke forhold og typen af mælk kan variere afhængigt af den ønskede yoghurtkonsistens og instruktionerne for starterkulturen.
- Fyld krukkerne: Hæld den tilberedte mælkeblanding jævnt i de 8 rene glas. Fyld ikke for meget; lad der være et lille mellemrum øverst.
- Placer krukker i maskinen: Placer forsigtigt de fyldte glas (uden låg) i yoghurtmaskinens bund. Sørg for, at de sidder korrekt. Dæk yoghurtmaskinen med det gennemsigtige låg.
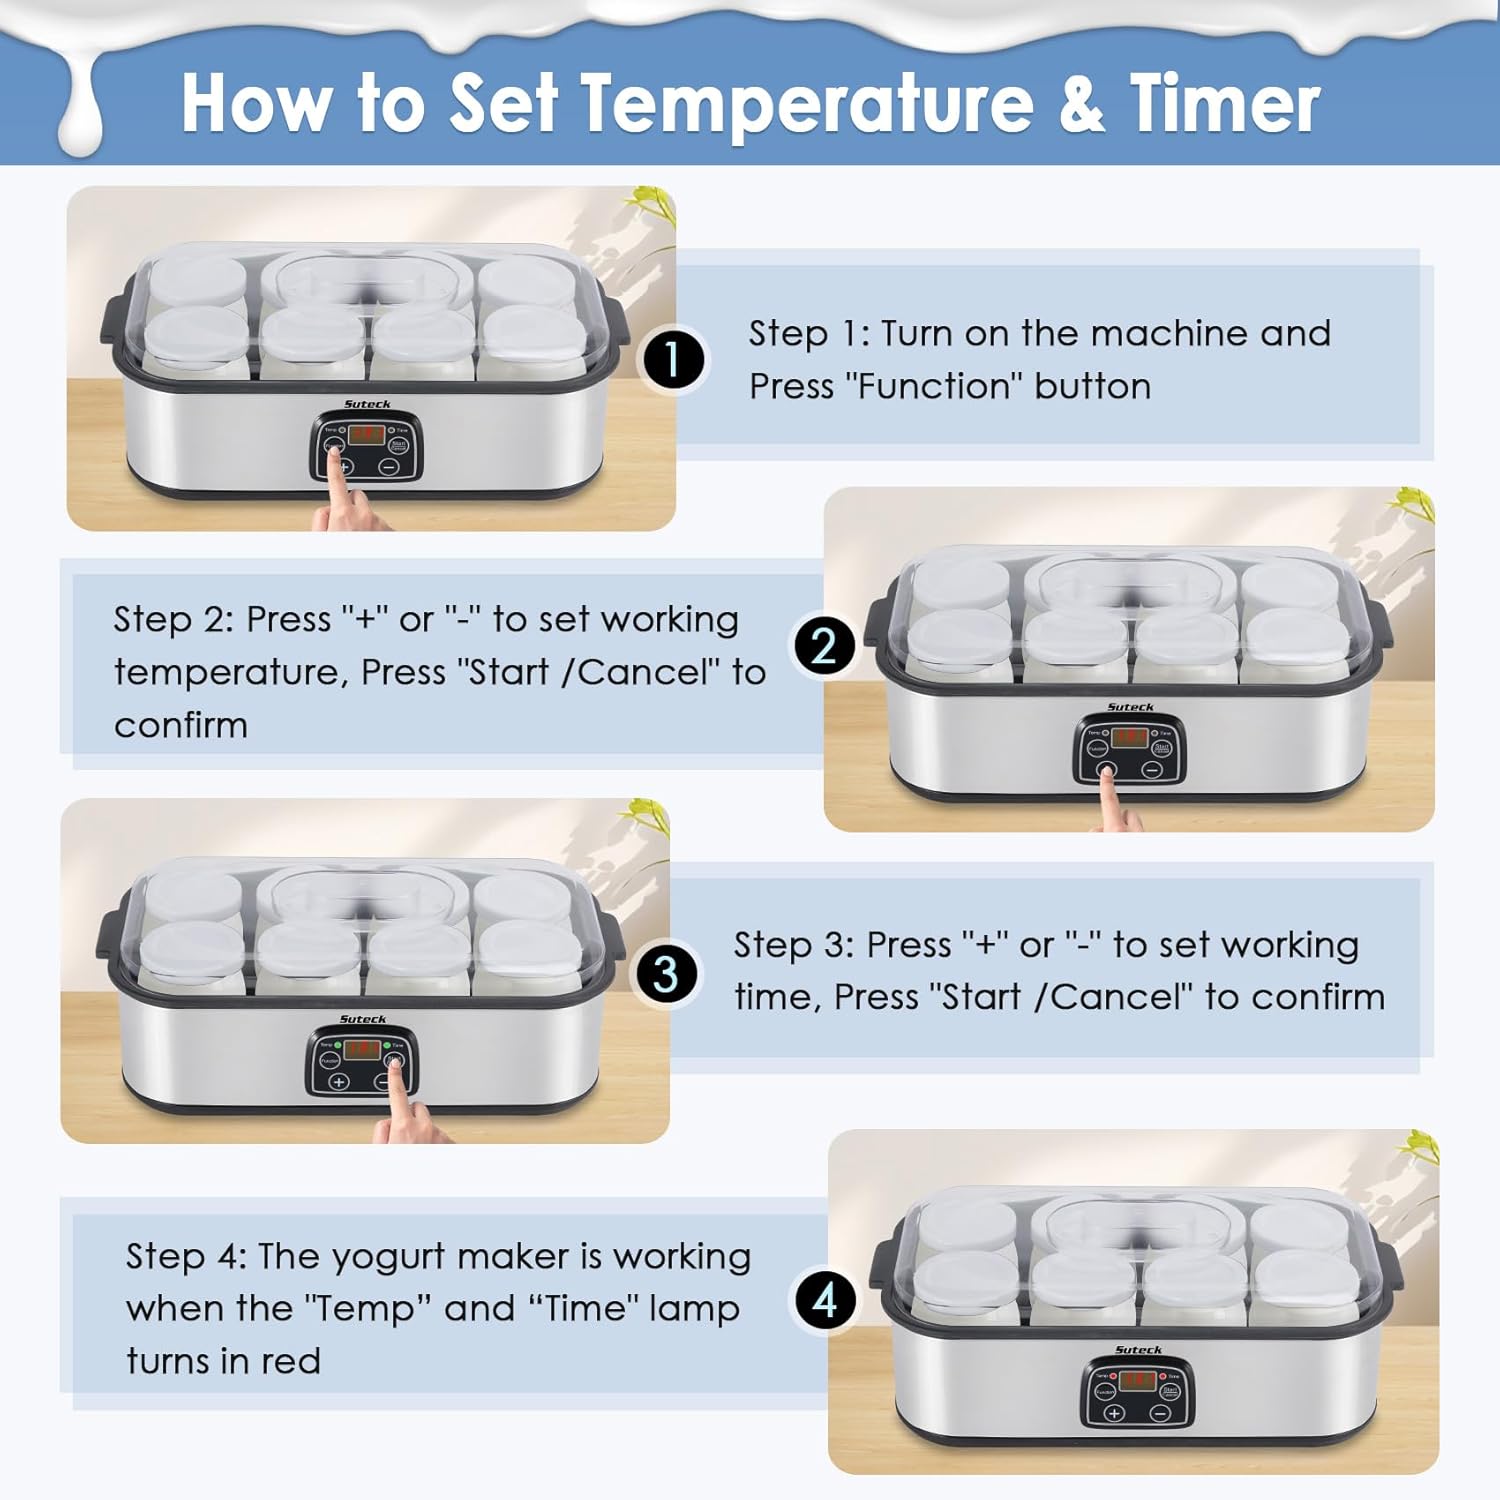
- Indstil temperatur og tid:
- Sæt stikket i apparatet. Displayet viser "---".
- Tryk på Fungere knappen. "Temp"-lampen blinker grønt, og "Time"-lampen lyser konstant grønt. En standardtemperatur (f.eks. 108°C) vises på displayet.
- Brug + og - knapperne til at justere den ønskede fermenteringstemperatur. Temperaturområdet er 20°C til 55°C (68°F til 131°F).
- Tryk på Start/Annuller knappen for at bekræfte temperaturindstillingen. "Temp"-lampen lyser konstant grønt, og "Time"-lampen blinker grønt.
- Brug + og - knapperne for at indstille den ønskede gæringstid. Tidsintervallet er 1 til 48 timer.
- Tryk på Start/Annuller knappen igen for at bekræfte tiden og starte gæringsprocessen.
- Indikatorlamperne "Temp" og "Time" lyser rødt, hvilket betyder, at yoghurtmaskinen er aktiv. Displayet viser nedtællingstimeren.
- Færdiggørelse: Når den indstillede fermenteringstid er udløbet, udsender yoghurtmaskinen et bip, og displayet viser "0". Indikatorlamperne "Temp" og "Time" lyser grønt.
- Køl ned og nyd: Tag forsigtigt glassene ud af yoghurtmaskinen. Sæt låg på glassene, og stil dem i køleskabet i mindst 4 timer før servering. Denne afkølingsperiode hjælper med at tykne yoghurten og stopper gæringsprocessen.

Billede: Trin 1 i yoghurtfremstilling, der viser en kande mælk og en ske, der tilsætter yoghurtpulver, med tomme glas i nærheden.

Billede: Trin 2 i yoghurtfremstilling, der illustrerer mælk, der hældes fra en kande ned i glas.

Billede: En trinvis visuel vejledning, der viser, hvordan man indstiller temperatur og tid på yoghurtmaskinens digitale kontrolpanel.

Billede: Trin 4 i yoghurtfremstilling, der viser en person, der nyder et glas hjemmelavet yoghurt med frugt.
Tips til de bedste resultater:
- For tykkere yoghurt kan du overveje at bruge sødmælk eller tilsætte en lille mængde mælkepulver til din blanding.
- Sørg for, at din starterkultur er frisk og aktiv for optimal gæring.
- Nogle brugere oplever, at det er svært at tilsætte varmt vand til basin omkring glassene kan bidrage til en mere jævn varmefordeling, selvom enheden er designet til ensartet opvarmning.
Vedligeholdelse og rengøring
- Tag stikket ud: Tag altid yoghurtmaskinen ud af stikkontakten, før du rengør nogen del af apparatet.
- Rengør krukker og låg: Glasskålene og det gennemsigtige låg tåler opvaskemaskine. Alternativt kan de vaskes i hånden med varmt sæbevand. Skyl grundigt og tør dem helt inden opbevaring eller næste brug.
- Rengør hovedenhed: Tør hovedenhedens yderside af med en blød, tør klud.amp klud. Brug ikke slibende rengøringsmidler, stærke kemikalier eller skuresvampe, da disse kan beskadige overfladen. Nedsænk aldrig hovedenheden i vand eller anden væske.
- Opbevaring: Sørg for, at alle dele er rene og helt tørre, inden apparatet opbevares. Opbevar det et køligt og tørt sted, væk fra direkte sollys.

Billede: To paneler, der illustrerer rengøringsmetoder: glaskrukker placeret i en opvaskemaskinekurv og en håndvask af et glaskrukke under rindende vand.
Fejlfinding
| Problem | Mulig årsag | Løsning |
|---|---|---|
| Yoghurten er for tynd/flydende. | Utilstrækkelig gæringstid, lav gæringstemperatur, inaktiv starterkultur eller letmælk. | Øg gæringstiden, sørg for korrekt temperaturindstilling, brug frisk og aktiv starter, eller prøv sødmælk/tilsæt mælkepulver til fremtidige portioner. |
| Yoghurten er for sur. | Gæret for længe eller ved for høj temperatur. | Reducer gæringstiden eller sænk temperaturen for efterfølgende portioner. |
| Apparatet tændes ikke. | Ikke tilsluttet korrekt, sluk for strømmentage, eller defekt stikkontakt. | Kontroller strømforbindelsen, sørg for at apparatet er tilsluttet korrekt, og test stikkontakten med en anden enhed. |
| Indstilling af temperatur/tid er vanskelig eller starter automatisk. | Kontrolpanelet kræver hurtig indtastning inden for en kort tidsramme (ca. 5 sekunder) for at forhindre automatisk start med standardindstillingerne. | Efter at have trykket på "Funktion", skal du hurtigt justere temperaturen med +/- knapperne og trykke på "Start/Annuller". Juster derefter hurtigt tiden med +/- knapperne og tryk på "Start/Annuller" igen for at bekræfte. Øv dig i sekvensen for at blive fortrolig med timingen. |
Specifikationer
- Mærke: Suteck
- Model: SNJ-159B
- Kapacitet: 8 glaskrukker à 6 g (i alt 48 g)
- Temperaturområde: 20°C - 55°C
- Timerområde: 1 - 48 timer
- Magt: 25W
- Materiale: Rustfrit stål, glas
- Produktdimensioner: Cirka 14.5 cm (længde) x 7.5 cm (højde) x 5.7 cm (bredde)
- Varens vægt: 4.4 pund
- Særlige funktioner: Automatisk slukning, digitalt display, konstant temperaturkontrol
Billede: Suteck yoghurtmaskine med fremhævede nøglespecifikationer, herunder dens omtrentlige dimensioner (14.5 tommer længde, 7.5 tommer højde) og kapacitet (8 x 6 oz glas).
Garanti og support
For garantioplysninger eller teknisk support vedrørende din Suteck yoghurtmaskine, henvises til den originale købsdokumentation eller kontakt Sutecks kundeservice direkte. Specifikke garantivilkår kan variere.
For yderligere assistance og produktinformation kan du besøge Suteck-butik på Amazon.