
1. Introduktion
This manual provides detailed instructions for the installation, operation, and maintenance of your ASRock B365 PRO4 ATX Motherboard. Please read this manual thoroughly before proceeding with installation to ensure correct setup and to prevent damage to the components.
The ASRock B365 PRO4 motherboard supports 9th and 8th Generation Intel Core Processors, offering a robust platform for personal computing. It features a Digi Power Design with an 8 Power Phase Design, ensuring stable power delivery to the CPU.
2. Sikkerhedsoplysninger
- Afbryd altid strømforsyningen, før du installerer eller fjerner komponenter.
- Brug en antistatisk håndledsrem for at forhindre elektrostatisk udladning (ESD) på følsomme komponenter.
- Hold bundkortet i kanterne for at undgå at berøre følsomme komponenter.
- Sørg for ordentlig ventilation i dit pc-kabinet for at forhindre overophedning.
- Hold bundkortet væk fra fugt og ekstreme temperaturer.
3. Opsætning og installation
3.1 Pakkens indhold
Bekræft at alle varer er til stede i pakken:
- ASRock B365 PRO4 Motherboard
- Hurtig installationsvejledning
- Support CD
- I / O-skjold
- 2 x SATA datakabler
- 3 x skruer til M.2-stik
- 1 x afstandsstykke til M.2-stik

Image: ASRock B365 PRO4 Motherboard and its included accessories, including the quick installation guide, support CD, I/O shield, SATA cables, and M.2 screws/standoff.
3.2 Bundkortlayout
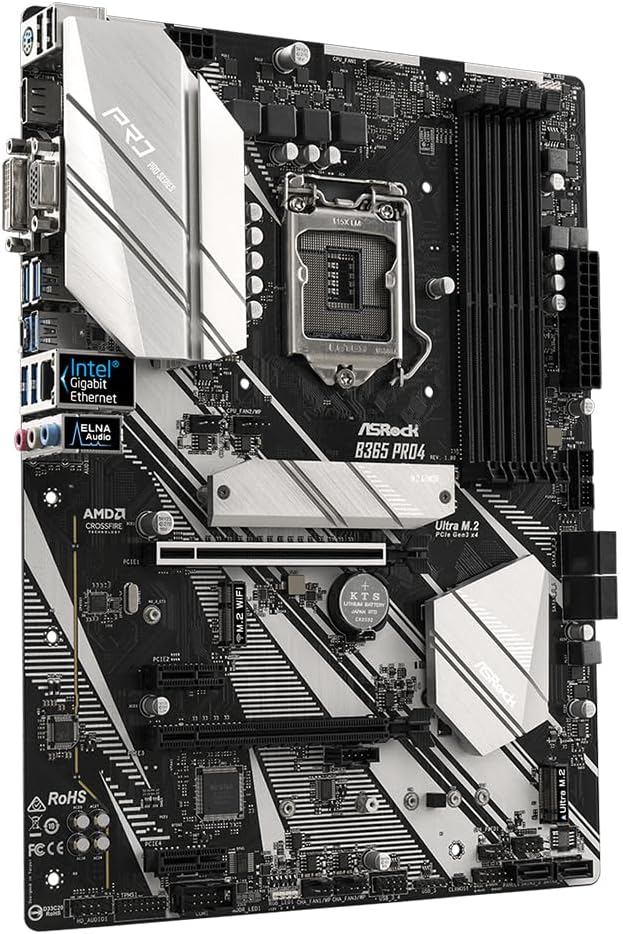
Gør dig bekendt med de vigtigste komponenter og stik på bundkortet.

Billede: Top-down view of the ASRock B365 PRO4 Motherboard, highlighting the CPU socket, RAM slots, PCIe slots, and M.2 slots.

Billede: Vinklet view of the ASRock B365 PRO4 Motherboard, showing the heatsinks and various connectors.
3.3 CPU-installation (LGA1151)
- Åbn CPU-sokkelhåndtaget, og løft belastningspladen.
- Juster omhyggeligt CPU'en med soklen, og sørg for, at den gyldne trekant på CPU'en matcher trekanten på soklen.
- Placer forsigtigt CPU'en i soklen uden at tvinge den.
- Luk lastpladen og fastgør den med håndtaget.
3.4 Installation af hukommelse (RAM)
The motherboard features 4 DDR4 DIMM slots, supporting dual-channel memory up to 64GB.
- Åbn klipsene i begge ender af DIMM-stikket.
- Juster hakket på RAM-modulet med nøglen i DIMM-stikket.
- Insert the RAM module firmly until the clips snap into place.
3.5 Installation af lagerenhed
The motherboard supports 6 SATA3 ports and 2 Ultra M.2 ports.
- SATA-drev: Connect SATA data cables to the SATA ports on the motherboard and to your storage devices (HDDs/SSDs). Connect power cables from your power supply to the devices.
- M.2 SSD'er: Locate the M.2 slots. Insert the M.2 SSD into the slot at an angle, then gently push it down and secure it with the provided screw and standoff.
3.6 Installation af udvidelseskort (PCIe)
The motherboard has 2 PCI-Express 3.0 x16 slots and 2 PCI-Express 3.0 x1 slots.
- Select an appropriate PCIe slot for your expansion card (e.g., graphics card).
- Fjern det tilsvarende metalbeslag fra dit pc-kabinet.
- Juster kortet med åbningen, og tryk godt ned, indtil det sidder korrekt.
- Fastgør kortet til pc-kabinettet med en skrue.
3.7 Connecting Peripherals to the I/O Panel
Det bageste I/O-panel har forskellige porte til tilslutning af eksterne enheder.
Billede: Nærbillede view of the ASRock B365 PRO4 Motherboard's rear I/O panel, showing ports for PS/2, USB 2.0, USB 3.1 Gen 1, VGA, DVI-D, HDMI, LAN, and audio jacks.
- USB-porte: Connect USB devices (keyboard, mouse, external drives) to the available USB 2.0 (5 ports) and USB 3.1 Gen 1 (8 ports, including 1 Type-C rear) ports.
- Videooutput: Connect your monitor to the VGA, DVI-D, or HDMI port.
- LAN-port: Tilslut et Ethernet-kabel for netværksadgang.
- Lydstik: Connect speakers, headphones, or microphones to the audio jacks.
- PS/2 port: Connect a PS/2 keyboard or mouse.
4. Betjeningsvejledning
4.1 Første opstart og BIOS-opsætning
- After assembling all components, connect the power supply and monitor.
- Tænd dit system. Tryk på Del or F2 under opstart for at åbne BIOS/UEFI-opsætningsprogrammet.
- Konfigurer opstartsrækkefølge, systemtid og andre nødvendige indstillinger. Gem ændringerne og afslut.
- Install your operating system from a bootable USB drive or optical media.
4.2 Driverinstallation
After installing the operating system, install the necessary drivers from the provided Support CD or download the latest versions from the ASRock webwebsted. Nøglefaktorer inkluderer:
- Chipsæt-drivere
- Audio Drivers (Realtek ALC892)
- LAN Drivers (Intel I219V Gigabit Ethernet)
- Grafikdrivere (til integreret grafik eller separat GPU)
5. Vedligeholdelse
- Fjernelse af støv: Regularly clean dust from the motherboard and case fans using compressed air. Ensure the system is powered off and unplugged before cleaning.
- BIOS-opdateringer: Tjek ASRock'en website periodically for BIOS updates. Updates can improve system stability and compatibility. Follow the instructions carefully when updating the BIOS.
- Kabelstyring: Sørg for, at kablerne er pænt ført for at forbedre luftstrømmen og forhindre interferens.
6. Fejlfinding
- Ingen strøm:
- Check all power connections, including the 24-pin ATX and 8-pin 12V CPU power connectors.
- Sørg for, at strømforsyningsafbryderen er i ON-positionen.
- Ingen visning:
- Verify that the monitor is connected to the correct video output (either integrated graphics or discrete GPU).
- Sæt grafikkortet og RAM-modulerne i igen.
- Systemustabilitet/nedbrud:
- Kontroller, at RAM-modulerne sidder korrekt.
- Sørg for, at CPU-køleren er korrekt installeret og har god kontakt.
- Opdater drivere og BIOS til de nyeste versioner.
- M.2 SSD ikke fundet:
- Sørg for, at M.2 SSD'en er korrekt isat og fastgjort.
- Check BIOS settings to ensure M.2 slots are enabled and configured correctly (SATA vs. PCIe mode).
7. Specifikationer
| Feature | Detalje |
|---|---|
| CPU socket | LGA 1151 |
| Kompatible processorer | 9./8. generations Intel Core-processorer (op til 95 W) |
| Chipsæt | Intel B365 |
| Hukommelse | 4 x DDR4 DIMM slots, Dual Channel, Non-ECC, Buffered, Max 64GB (2666/2400/2133 MHz) |
| Udvidelsesslots | 2 x PCIe 3.0 x16, 2 x PCIe 3.0 x1 |
| Understøttelse af flere grafikelementer | AMD Quad CrossFireX and CrossFire Technology |
| Opbevaring | 6 x SATA3 ports (RAID 0, 1, 5, 10), 2 x Ultra M.2 ports (PCIe Gen3 x4 & SATA3) |
| Lyd | Realtek ALC892 7.1-kanals HD-lyd |
| LAN | Intel I219V Gigabit Ethernet |
| USB-porte | 8 x USB 3.1 Gen1 (1 Type-C rear, 5 rear, 2 via header), 5 x USB 2.0 (2 rear, 3 via header) |
| Videoudgange | 1 x VGA, 1 x DVI-D, 1 x HDMI |
| Formfaktor | ATX (12.0 x 9.0 inch / 30.5 x 22.9 cm) |
8. Garanti og support
8.1 Garantioplysninger
The ASRock B365 PRO4 Motherboard comes with a 1 års begrænset garanti. This warranty covers defects in materials and workmanship under normal use. For specific terms and conditions, please refer to the warranty card included with your product or visit the official ASRock webwebsted.
Note: Damage caused by improper installation, misuse, unauthorized modifications, or natural disasters is not covered under warranty.
8.2 Teknisk support
For technical assistance, driver downloads, BIOS updates, or further troubleshooting, please visit the official ASRock support webwebsted:
Du kan også kontakte ASRocks kundeservice direkte via deres webhjemmeside for personlig support.