1. Introduktion
Tak for købetasing the Mr. Coffee BVMC-DVX41 12-Cup Programmable Coffeemaker. This manual provides important information for the safe and efficient operation of your new appliance. Please read these instructions thoroughly before first use and retain them for future reference.
2. Vigtige sikkerhedsforanstaltninger
Ved brug af elektriske apparater skal grundlæggende sikkerhedsforanstaltninger altid følges for at reducere risikoen for brand, elektrisk stød og/eller personskade, herunder følgende:
- Læs alle instruktioner, før du bruger dette apparat.
- Rør ikke ved varme overflader. Brug håndtag eller knopper.
- For at beskytte mod elektrisk stød må ledningen, stikket eller kaffemaskinen ikke placeres i vand eller andre væsker.
- Tæt opsyn er nødvendigt, når et apparat bruges af eller i nærheden af børn.
- Træk stikket ud af stikkontakten, når det ikke er i brug, og før rengøring. Lad det køle af, før du sætter dele på eller af, og før du rengør apparatet.
- Do not operate any appliance with a damaged cord or plug, or after the appliance malfunctions or has been damaged in any manner. Return appliance to an authorized service facility for examination, repair, or adjustment.
- Brug af tilbehør, der ikke er anbefalet af apparatets producent, kan resultere i brand, elektrisk stød eller personskade.
- Må ikke bruges udendørs.
- Lad ikke ledningen hænge ud over kanten af bordet eller bordpladen eller røre ved varme overflader.
- Må ikke placeres på eller i nærheden af en varm gas- eller elektrisk brænder eller i en opvarmet ovn.
- For at afbryde forbindelsen skal du slukke for en hvilken som helst knap og derefter tage stikket ud af stikkontakten.
- Brug ikke apparatet til andet end tilsigtet brug.
- Karaffen er kun beregnet til brug med dette apparat. Det må aldrig bruges på en rækkeplade.
- Stil ikke en varm karaffel på en våd eller kold overflade.
- Brug ikke en revnet kande eller en kande med et løst eller svækket håndtag.
- Rengør ikke kanden med rensemidler, ståluldspuder eller andre slibende materialer.
- Der kan opstå skoldning, hvis låget fjernes under bryggecyklussen.
3. Parts of Your Coffeemaker
Familiarize yourself with the components of your Mr. Coffee BVMC-DVX41 coffeemaker before operation.

Figur 1: Front view of the Mr. Coffee BVMC-DVX41 coffeemaker. This image shows the control panel with digital display, buttons for programming and brewing, the brew basket area, and the glass carafe on the warming plate.
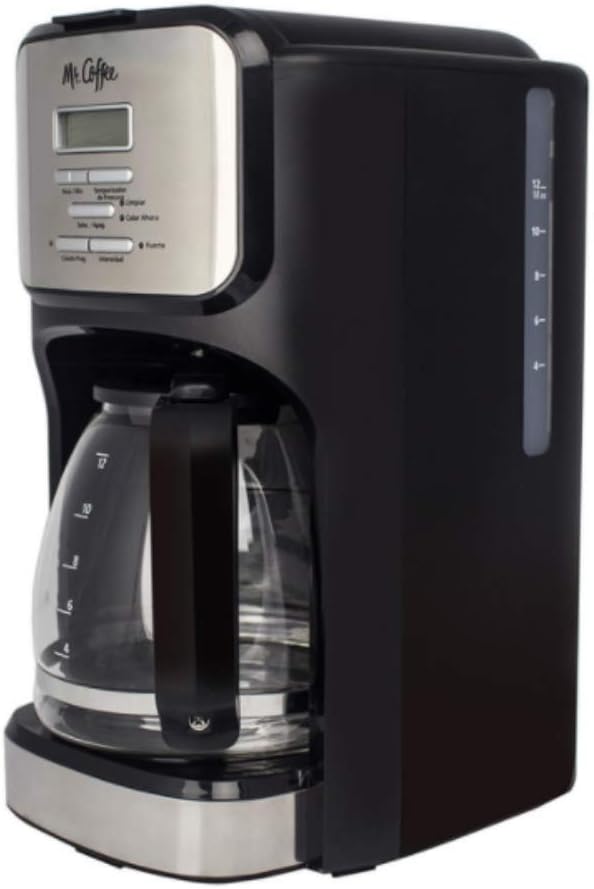
Figur 2: Side view of the Mr. Coffee BVMC-DVX41 coffeemaker. This image highlights the water reservoir with its clear water level indicator, allowing users to easily see how much water is added.
- Låg: Covers the water reservoir and brew basket.
- Vandreservoir: Holds water for brewing. Features a clear level indicator.
- Bryggekurv: Holds the coffee filter and ground coffee. Removable for easy cleaning.
- Kontrolpanel: Includes a digital clock/timer display and various function buttons.
- Glaskaraffel: 12-cup capacity carafe with handle and lid.
- Varmeplade: Holder brygget kaffe varm.
- Strømledning: Til tilslutning til en stikkontakt.
4. Opsætning og første brug
4.1 Før første brug
Before brewing your first pot of coffee, it is recommended to clean the coffeemaker to remove any dust or manufacturing residues.
- Wash the carafe and brew basket in warm, soapy water. Rinse thoroughly and dry.
- Fyld vandbeholderen op til 12-kopsmærket med frisk, koldt vand.
- Place an empty paper filter (basket-style) into the brew basket.
- Place the brew basket into its housing and close the lid.
- Stil den tomme karaffel på varmepladen.
- Sæt kaffemaskinen i en stikkontakt.
- Run a full brewing cycle with only water and the paper filter. Discard the water from the carafe and the used filter.
- Repeat this process once more for optimal cleaning.
4.2 Indstilling af uret
The coffeemaker features a programmable clock. Set the current time for accurate programming.
- Plug in the coffeemaker. The display will flash "12:00".
- Press the "HOUR" button repeatedly until the correct hour is displayed. Pay attention to the AM/PM indicator.
- Press the "MINUTE" button repeatedly until the correct minute is displayed.
- The clock is now set. If you do not press any button for 5 seconds, the time will be set automatically.
5. Betjeningsvejledning
5.1 Brygning af kaffe
- Ensure the coffeemaker is plugged in and the clock is set.
- Fill the water reservoir with fresh, cold water to your desired number of cups, using the water level indicator on the side. Do not exceed the 12-cup maximum fill line.
- Place a basket-style paper filter into the brew basket.
- Add the desired amount of ground coffee into the filter. A general guideline is one tablespoon of ground coffee per cup, but adjust to your taste.
- Slide the brew basket into its housing and close the lid securely.
- Place the empty carafe with its lid on the warming plate. Ensure it is seated correctly to activate the "Pause 'n Serve" feature.
- Press the "ON/OFF" button to start the brewing cycle. The indicator light will illuminate.
- Once brewing is complete, the coffeemaker will automatically switch to the "Keep Warm" mode. The warming plate will keep the coffee hot for approximately 2 hours before automatically shutting off.
5.2 Programmerbar brygning (Forsinket brygning)
Set your coffeemaker to brew automatically at a later time.
- Follow steps 1-6 from "5.1 Brewing Coffee".
- Press the "PROGRAM" button. The display will show "PROGRAM" and flash "12:00".
- Press the "HOUR" and "MINUTE" buttons to set the desired brew time. Remember to observe the AM/PM indicator.
- Once the desired time is set, press the "PROGRAM" button again to confirm. The "PROGRAM" indicator light will illuminate.
- The coffeemaker will now start brewing automatically at the programmed time.
- To cancel the programmed brew, press the "ON/OFF" button.
5.3 Pause 'n Serve Feature
This feature allows you to pour a cup of coffee before the entire brewing cycle is complete.
- Under brygningscyklussen kan du midlertidigt fjerne kanden fra varmepladen. Kaffestrømmen stopper automatisk.
- Pour your cup of coffee.
- Immediately return the carafe to the warming plate. If the carafe is not returned within 30 seconds, the brew basket may overflow.
6. Pleje og vedligeholdelse
6.1 Daglig rengøring
Regelmæssig rengøring hjælper med at opretholde din kaffemaskines ydeevne og levetid.
- Tag altid stikket ud af kaffemaskinen, og lad den køle helt af, inden du rengør den.
- Remove the brew basket and discard the used coffee filter and grounds.
- Wash the carafe and brew basket in warm, soapy water. These parts are not dishwasher safe. Rinse thoroughly.
- Tør ydersiden af kaffemaskinen af med en blød, tør klud.amp klæde. Brug ikke slibende rengøringsmidler eller skuresvampe.
- Kaffemaskinen må ikke nedsænkes i vand eller andre væsker.
6.2 Afkalkning (fjernelse af mineralaflejringer)
Mineral deposits (calcium and lime) can build up in your coffeemaker over time, affecting its performance. Descale your coffeemaker every 80 brew cycles or every 2-3 months, depending on water hardness.
- Pour 4 cups of undiluted white household vinegar into the water reservoir.
- Place an empty paper filter into the brew basket.
- Stil den tomme karaffel på varmepladen.
- Press the "ON/OFF" button to start a brewing cycle. Allow half of the vinegar solution to brew into the carafe, then press "ON/OFF" to turn off the coffeemaker.
- Lad kaffemaskinen trække i mindst 15 minutter, så eddiken kan rengøre de indvendige komponenter.
- After soaking, press "ON/OFF" again to complete the brewing cycle with the remaining vinegar solution.
- Discard the vinegar solution from the carafe and the used filter.
- Fill the water reservoir with fresh, cold water (12 cups) and run two full brewing cycles with only water to rinse out any remaining vinegar taste.
7. Fejlfindingsvejledning
Review the following common issues and their solutions before contacting customer service.
| Problem | Mulig årsag | Løsning |
|---|---|---|
| Kaffemaskinen tændes ikke. | Ikke tilsluttet; strømmen er slukkettage; defekt stikkontakt. | Ensure the coffeemaker is securely plugged into a working electrical outlet. Check your circuit breaker. |
| Kaffe brygges ikke. | Water reservoir empty; brew cycle not started; carafe not on warming plate. | Fill water reservoir. Press "ON/OFF" button. Ensure carafe is properly seated on the warming plate. |
| Kaffen smager svagt eller for stærkt. | Forkert forhold mellem kaffe og vand; kaffemalet for grov/fin. | Adjust the amount of ground coffee. Use a medium grind for drip coffeemakers. |
| Brygkurven flyder over. | Too much coffee grounds; filter not seated correctly; carafe removed too long during Pause 'n Serve; coffeemaker needs descaling. | Reduce coffee grounds. Ensure filter is properly seated. Return carafe quickly. Descale the coffeemaker. |
| Kaffe er ikke varm nok. | Warming plate not functioning; coffeemaker needs descaling. | Ensure the warming plate is on. Descale the coffeemaker to improve heating efficiency. |
8. Produktspecifikationer
- Modelnummer: BVMC-DVX41
- Mærke: Hr. kaffe
- Kapacitet: 12 kopper
- Kaffemaskine type: Dryp kaffemaskine
- Speciel funktion: Programmerbar
- Voltage: 120 volt
- Driftstilstand: Fuldautomatisk
- Inkluderede komponenter: Karaffel, Filter
- Produktdimensioner: 15 x 14 x 9 tommer (ca.)
- Varens vægt: 5.06 pund (omtrentligt)
- Udvendig finish: Metallisk
- Human Interface Input: Knapper
- Tåler opvaskemaskine: No (for main unit, carafe and brew basket are hand-wash only)
9. Garanti og kundesupport
For detailed warranty information, please refer to the warranty card included with your product packaging or visit the official Mr. Coffee website. If you experience any issues not covered in this manual, or require further assistance, please contact Mr. Coffee customer support.
Online support: Visit the official Mr. Coffee webwebsted for ofte stillede spørgsmål og supportressourcer.
Telefonsupport: Se din produktemballage eller den officielle webhjemmeside for aktuelle kontaktnumre.