1. Introduktion
The PROEL MQ6 is a compact 6-channel mixer designed for various sound reinforcement applications. It offers a high input density, essential features, and superior audio quality in a durable, ultra-rugged case. This manual provides detailed instructions for the proper setup, operation, and maintenance of your MQ6 mixer.
2. Sikkerhedsoplysninger
- Strømforsyning: Brug kun den angivne strømadapter. Sørg for, at lydstyrkentage matcher din lokale strømforsyning.
- Fugtighed: Do not expose the unit to rain or moisture. Avoid placing liquids near the mixer.
- Ventilation: Sørg for tilstrækkelig ventilation. Bloker ikke ventilationsåbningerne.
- Varme: Hold enheden væk fra varmekilder såsom radiatorer, varmeregistreringsapparater, komfurer eller andre apparater, der producerer varme.
- Service: Forsøg ikke selv at servicere dette produkt. Overlad al service til kvalificeret servicepersonale.
- Kabler: Beskyt netledninger mod at blive trådt på eller klemt, især ved stik, stikkontakter og det punkt, hvor de udgår fra apparatet.
- Rensning: Rengør kun med en tør klud.
3. Produktet er slutview
The PROEL MQ6 is a 6-channel compact mixer featuring 2 mono MIC/LINE inputs, 2 stereo LINE inputs, 3-band EQ on mono channels, 2-band EQ on stereo channels, and electronically balanced main outputs.

Figur 3.1: Øverst view of the PROEL MQ6 Compact 6-Channel Mixer, showing all controls and inputs.

Figur 3.2: Vinklet view of the PROEL MQ6 mixer, highlighting the compact design and control layout.
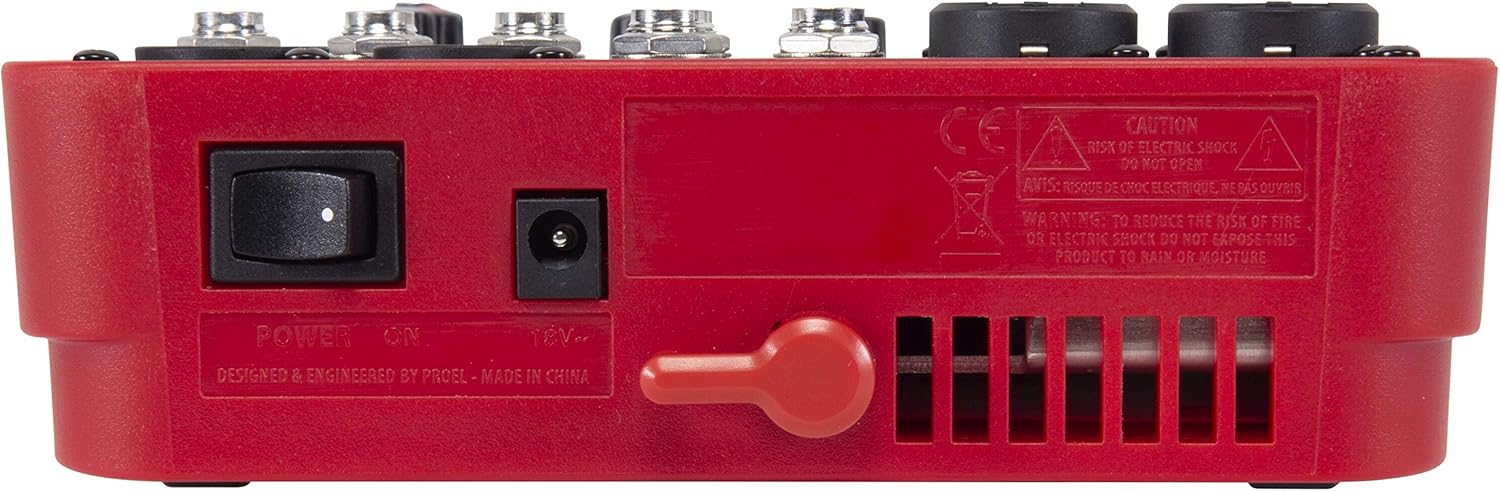
Figur 3.3: Bagside view of the PROEL MQ6 mixer, showing the power switch and DC input.
Produktegenskaber:
- 2 Mono MIC/LINE inputs with XLR/TRS combo jacks.
- 2 Stereo LINE inputs (3/4, 5/6) with TRS jacks.
- 3-Band EQ on mono channels for precise tone shaping.
- 2-Band EQ on stereo channels.
- Low-noise, high-headroom microphone preamps.
- Electronically balanced XLR MAIN MIX outputs.
- Phantom Power (+48V) for condenser microphones.
- Headphone output with dedicated level control.
PROEL MQ Series Overview Video
Denne video giver en overview of the PROEL MQ Series compact mixers. Please note that some features shown, such as digital effects, compressors, and USB connectivity, are available on other models within the MQ series (e.g., MQ6FX, MQ12USB, MQ16USB) and not on the MQ6 model specifically.
4. Opsætning
4.1 Udpakning og inspektion
Carefully unpack the mixer and check for any signs of damage. Ensure all components listed in the packaging are present. If any items are missing or damaged, contact your dealer immediately.
4.2 Strømtilslutning
- Sørg for, at mixerens tænd/sluk-knap er i OFF-positionen.
- Connect the provided power adapter to the DC input jack on the rear of the mixer.
- Sæt strømadapteren i en passende stikkontakt.
4.3 Indgangsforbindelser
The MQ6 features two types of input channels:
- Mono MIC/LINE Inputs (Channels 1-2): Use XLR cables for microphones or 1/4" TRS cables for line-level instruments (e.g., keyboards, guitars with preamps).
- Stereo LINE Inputs (Channels 3/4, 5/6): Use 1/4" TRS cables for stereo line-level sources. If connecting a mono source, use the L/MONO input.
4.4 Udgangsforbindelser
- MAIN MIX Outputs: Tilslut dine hovedhøjttalere eller strømforsyning amplifier to the XLR MAIN MIX L and R outputs. These outputs are electronically balanced.
- TELEFONER Udgang: Connect your headphones to the 1/4" PHONES jack for monitoring.
5. Betjeningsvejledning
5.1 Tænd/sluk
- Before powering on, ensure all channel GAIN and MIX level knobs are set to their minimum position.
- Turn on the mixer using the power switch on the rear panel.
- When powering off, first turn down all output levels, then switch off the mixer.
5.2-kanals kontroller (monokanaler 1-2)
- MIC/LINE Input: Combo jack for XLR microphones or 1/4" TRS line-level sources.
- LO CUT (75 Hz): Engages a high-pass filter at 75 Hz to remove unwanted low-frequency rumble.
- GEVINST: Adjusts the input sensitivity for the connected microphone or line source. Set this to achieve a strong signal without clipping (indicated by the PEAK LED).
- HI (12 kHz): Adjusts the high-frequency (treble) content of the channel.
- LAV (80 Hz): Adjusts the low-frequency (bass) content of the channel.
- PEAK LED: Lyser, når indgangssignalet er for højt, hvilket indikerer potentiel clipping. Reducer GAIN, hvis denne LED lyser ofte.
- Niveauknap: Controls the channel's contribution to the main mix.
5.3 Channel Controls (Stereo Channels 3/4, 5/6)
- L/MONO, R LINE Inputs: 1/4" TRS jacks for stereo line-level sources. Use L/MONO for mono sources.
- HI (12 kHz): Adjusts the high-frequency (treble) content of the channel.
- LAV (80 Hz): Adjusts the low-frequency (bass) content of the channel.
- Niveauknap: Controls the channel's contribution to the main mix.
5.4 Main Mix Section
- PHANTOM POWER ON/OFF: Activates +48V phantom power for condenser microphones connected to the XLR inputs. Ensure condenser microphones are connected before activating phantom power.
- Niveaumålere: Displays the output level of the main mix. Aim for levels around 0 dB to avoid clipping.
- MIX Level Knob: Controls the overall output volume of the main mix.
- PHONES niveauknap: Justerer lydstyrken for hovedtelefonudgangen.
6. Vedligeholdelse
- Rensning: Brug en blød, tør klud til at rengøre mixerens overflade. Brug ikke slibende rengøringsmidler, opløsningsmidler eller voks.
- Opbevaring: Når mixeren ikke er i brug i længere perioder, skal den opbevares tørt og støvfrit.
- Kabelpleje: Regularly inspect all cables for damage. Replace frayed or damaged cables to prevent electrical hazards and ensure optimal performance.
- Ventilation: Ensure the ventilation slots are clear of dust and debris to prevent overheating.
7. Fejlfinding
| Problem | Mulig årsag | Løsning |
|---|---|---|
| Ingen lydudgang |
|
|
| Forvrænget lyd |
|
|
| Intet mikrofonsignal |
|
|
| Brummen eller støj |
|
|
8. Specifikationer
| Feature | Detalje |
|---|---|
| Mærke | PROEL |
| Model | MQ6 |
| Antal kanaler | 6 |
| Lydindgange | 2 x MIC/LINE (XLR/TRS Combo), 2 x Stereo LINE (TRS) |
| Forbindelsesteknologi | XLR, TRS |
| EQ (Mono-kanaler) | 3-Band (HI, LOW, LO CUT) |
| EQ (stereokanaler) | 2-Band (HI, LOW) |
| Fantomkraft | +48V |
| Hovedudgange | XLR (Electronically Balanced) |
| Hovedtelefonudgang | 1/4" TRS |
9. Garanti
PROEL offers its customers a minimum of 24 (twenty-four) months warranty from the date of purchase for sound systems products. Please retain your proof of purchase for warranty claims. For detailed warranty terms and conditions, please refer to the official PROEL webwebsted eller kontakt deres kundesupport.
10. Support
For technical assistance, product inquiries, or service requests, please visit the official PROEL website or contact your authorized PROEL dealer. You may also find additional resources and FAQs on their support pages.