
Produkt overview
The tectake Balcony Greenhouse, Model 401862, is designed to provide an optimal environment for cultivating plants in compact spaces such as balconies, patios, or small gardens. Its robust construction and thoughtful features ensure plant protection and ease of use.
- Robust og holdbart design: Features a sturdy steel frame, engineered to withstand various weather conditions, offering a secure shelter for your plants against cold, rain, and frost.
- Ubesværet mobilitet: Equipped with durable plastic wheels, allowing you to easily reposition the greenhouse to capture optimal sunlight or reorganize your outdoor space.
- Optimized Growing Space: Includes three grid shelves, providing ample room to organize seedlings and potted plants. Each shelf promotes aeration and light exposure for healthy growth.
- Superior Element Protection: The UV-resistant PVC cover shields plants from harmful sun rays and adverse weather. A roll-up zippered opening offers convenient access while maintaining protection.
- Simplified Access and Maintenance: The roll-up front panel with a zipper allows for easy access to your plants, simplifying daily care and cultivation tasks.

Image: The tectake Balcony Greenhouse, fully assembled and stocked with various plants on its three shelves, demonstrating its compact and functional design.
Monteringsvejledning
Follow these steps to assemble your tectake Balcony Greenhouse. It is recommended to assemble the greenhouse on a flat, stable surface.
1. Udpakning og komponentidentifikation
- Pak forsigtigt alle komponenter ud af kassen.
- Verify that all parts are present according to the packing list (not provided in this manual, refer to your product packaging).
- Familiarize yourself with the different types of poles, connectors, and shelves.
2. Rammesamling
- Begin by connecting the base poles using the appropriate connectors to form the rectangular base frame.
- Attach the vertical poles to the base connectors.
- Continue building the frame upwards, connecting horizontal and vertical poles with the plastic connectors to form the structure for the shelves and the roof. Ensure all connections are firm.
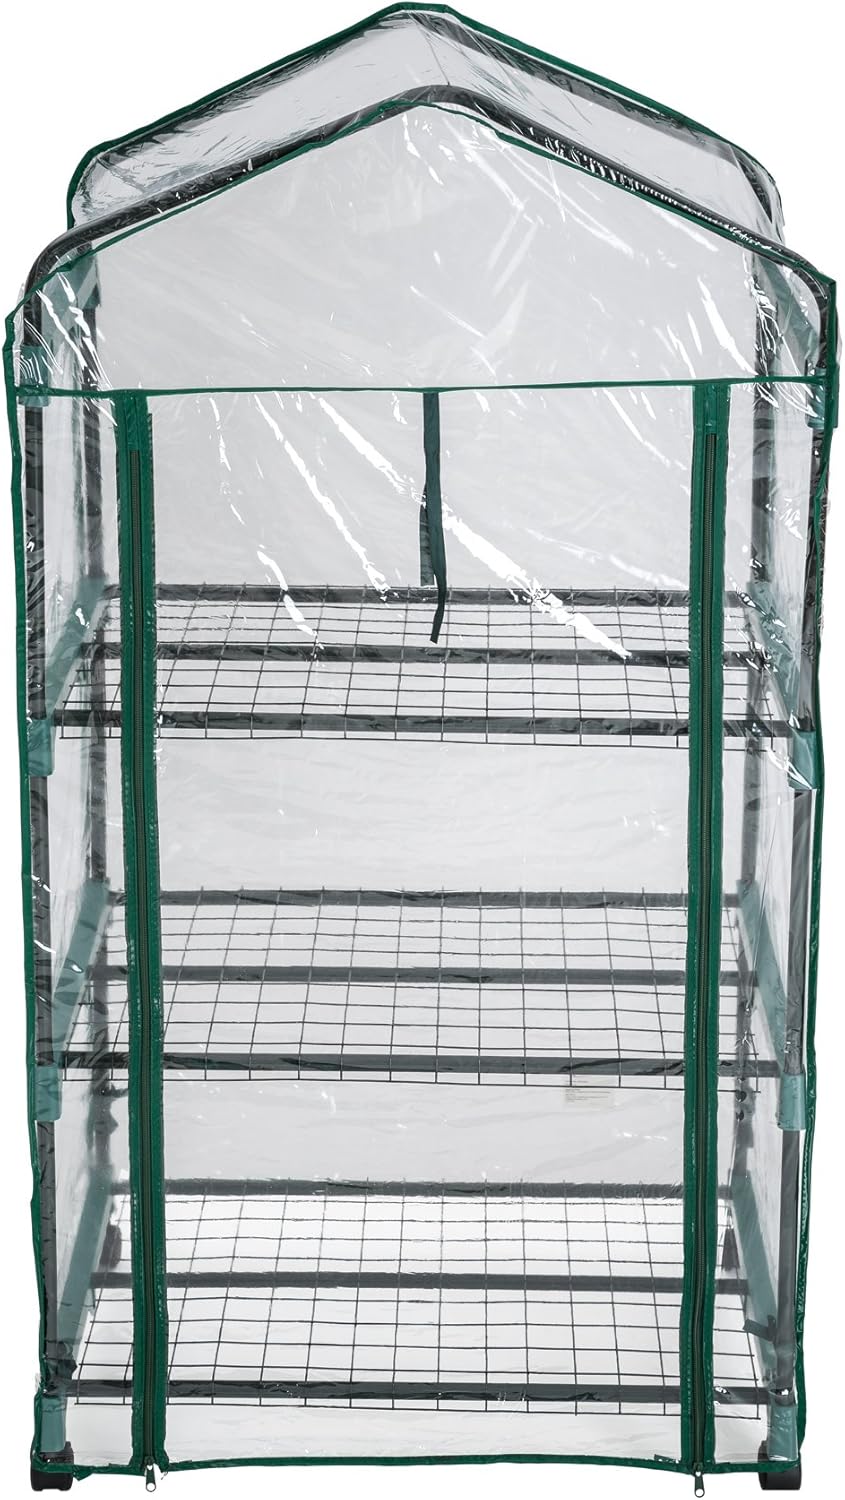
Image: Illustration of the greenhouse frame during assembly, highlighting the connection points of the metal poles and plastic connectors.
3. Hyldeinstallation
- Once the frame for a shelf level is complete, place a grid shelf onto the designated supports.
- Ensure the shelf sits securely and is level. Repeat for all three shelves.
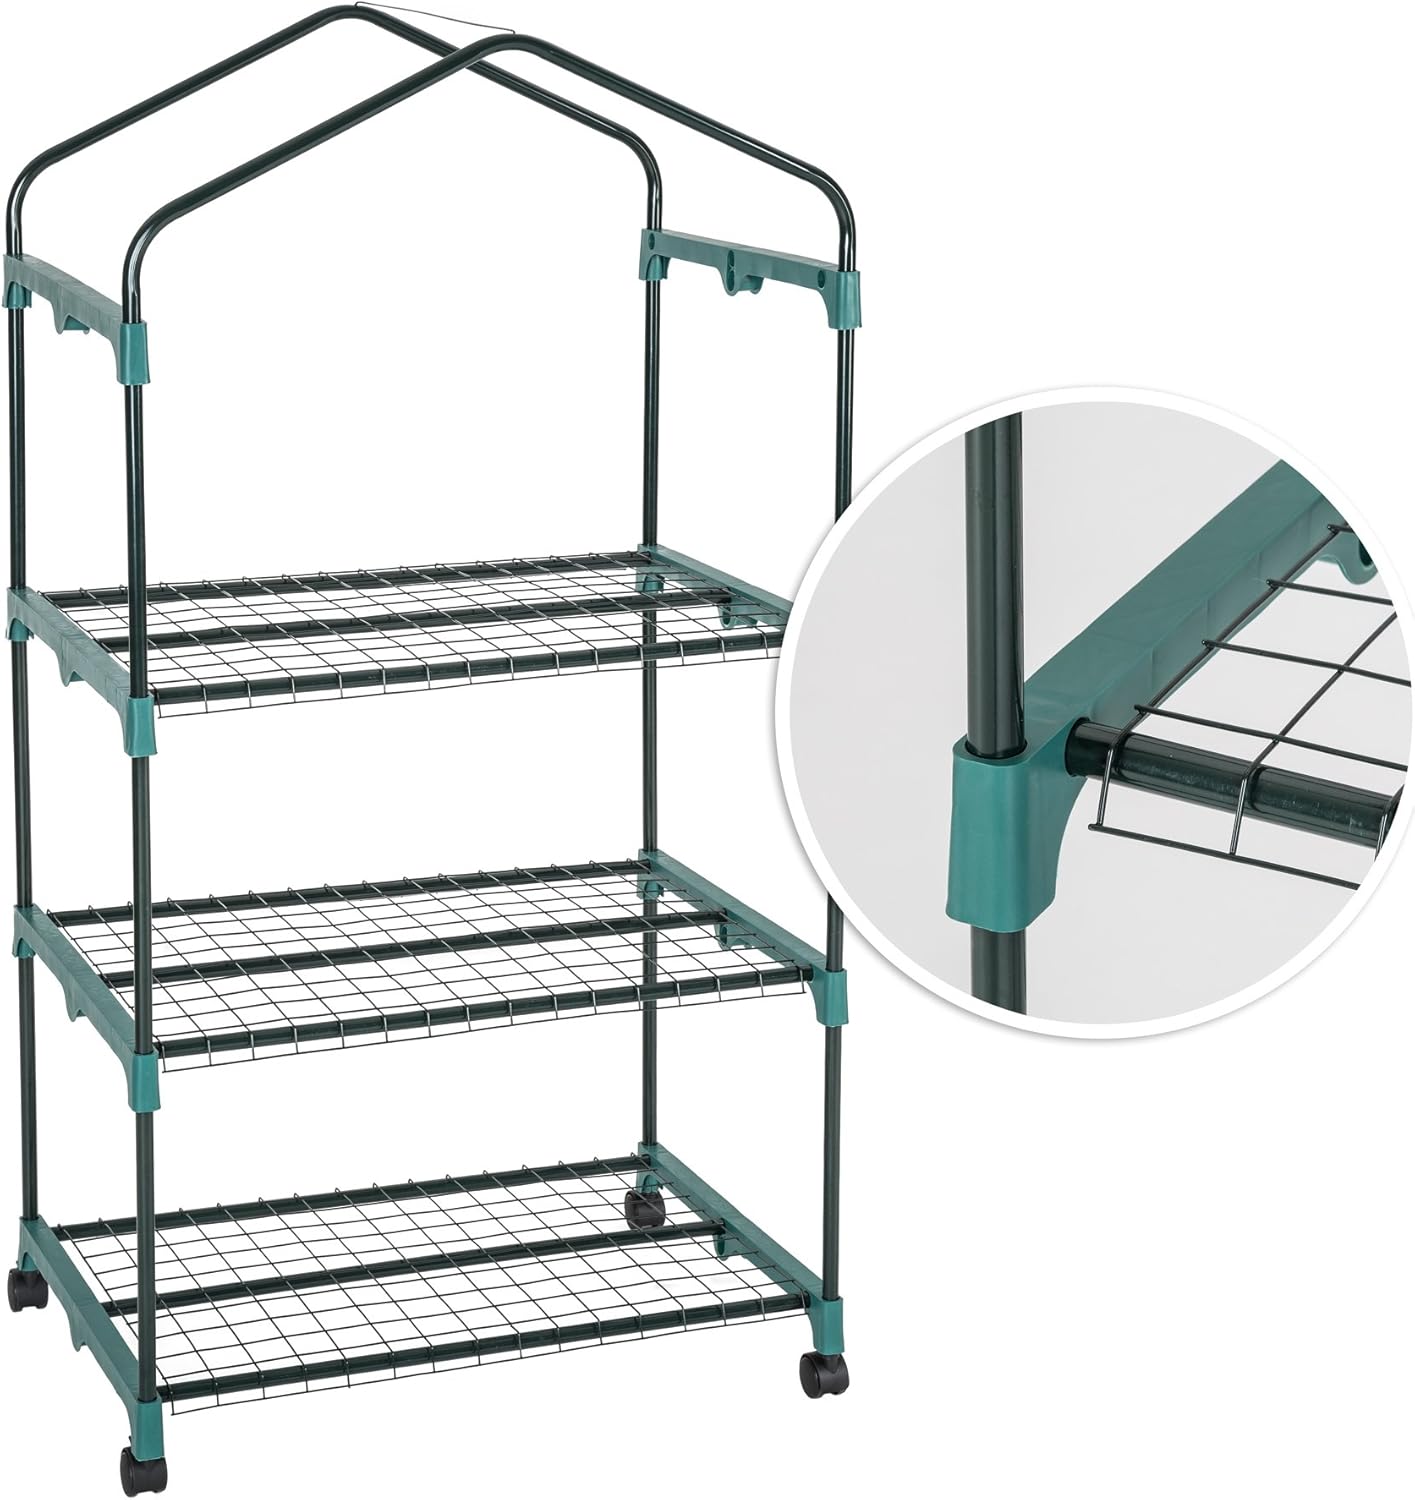
Billede: Et nærbillede view showing how a wire grid shelf is placed and secured onto the plastic connectors of the greenhouse frame.
4. Cover Placement and Wheel Attachment
- Carefully drape the PVC cover over the assembled frame, ensuring it fits snugly.
- Secure the cover to the frame using any provided ties or fasteners.
- Attach the wheels to the bottom of the base frame by inserting them into the designated slots. Ensure they are firmly in place for mobility.
Drift af dit drivhus
Proper operation ensures the best growing conditions for your plants.
Plant Placement
- Arrange plants on the shelves, considering their light requirements. Taller plants may be placed on lower shelves, while those needing more light can be on upper shelves.
- Avoid overcrowding to ensure adequate air circulation around each plant.

Billede: En detaljeret view of the greenhouse interior, showing various potted plants neatly arranged on the wire grid shelves, with the wheels visible at the base.
Ventilation and Humidity
- Use the roll-up zippered front opening to control ventilation and humidity levels.
- On warm days, partially or fully open the cover to prevent overheating and allow fresh air circulation.
- Close the cover during cooler periods or at night to retain warmth and humidity.
Vanding
- Water plants as needed, being mindful that the enclosed environment may reduce evaporation, requiring less frequent watering than outdoor plants.
- Ensure proper drainage from pots to prevent root rot.
Mobilitet
- Utilize the integrated wheels to easily move the greenhouse to different locations on your balcony or patio to optimize sunlight exposure throughout the day or season.
Vedligeholdelse og pleje
Regular maintenance will extend the life of your greenhouse and ensure optimal performance.
Rensning
- Wipe the PVC cover periodically with a damp cloth and mild soap to remove dirt and maintain light transparency. Avoid abrasive cleaners.
- Clean the wire shelves as needed to prevent mold or pest buildup.

Image: A composite image showing detailed features of the greenhouse: the rolled-up front cover secured by ties, a durable wheel for mobility, and a close-up of the robust zipper.
Dækpleje
- Inspect the PVC cover regularly for any signs of wear, tears, or damage. Small tears can often be repaired with clear repair tape.
- Ensure the zipper operates smoothly. If it becomes stiff, apply a small amount of zipper lubricant.
Sæsonopbevaring
- If not in use during certain seasons, the greenhouse can be disassembled and stored. Clean all components thoroughly before storage.
- Store the PVC cover in a cool, dry place away from direct sunlight to prevent material degradation.
Fejlfinding
Se dette afsnit for løsninger på almindelige problemer.
Greenhouse Instability
- Spørgsmål: The greenhouse feels wobbly or unstable after assembly.
- Løsning: Check all pole connections and ensure they are fully inserted into the plastic connectors. Verify that the greenhouse is placed on a level surface.
Vandophobning indeni
- Spørgsmål: Excessive condensation or water pooling inside the greenhouse.
- Løsning: Increase ventilation by partially opening the zippered front panel. Ensure pots have adequate drainage to prevent water from spilling onto shelves.
Lynlåsfejl
- Spørgsmål: The zipper is difficult to open or close.
- Løsning: Check for any fabric obstructions in the zipper teeth. Apply a small amount of zipper lubricant (e.g., silicone spray or wax) to the teeth.
Tekniske specifikationer
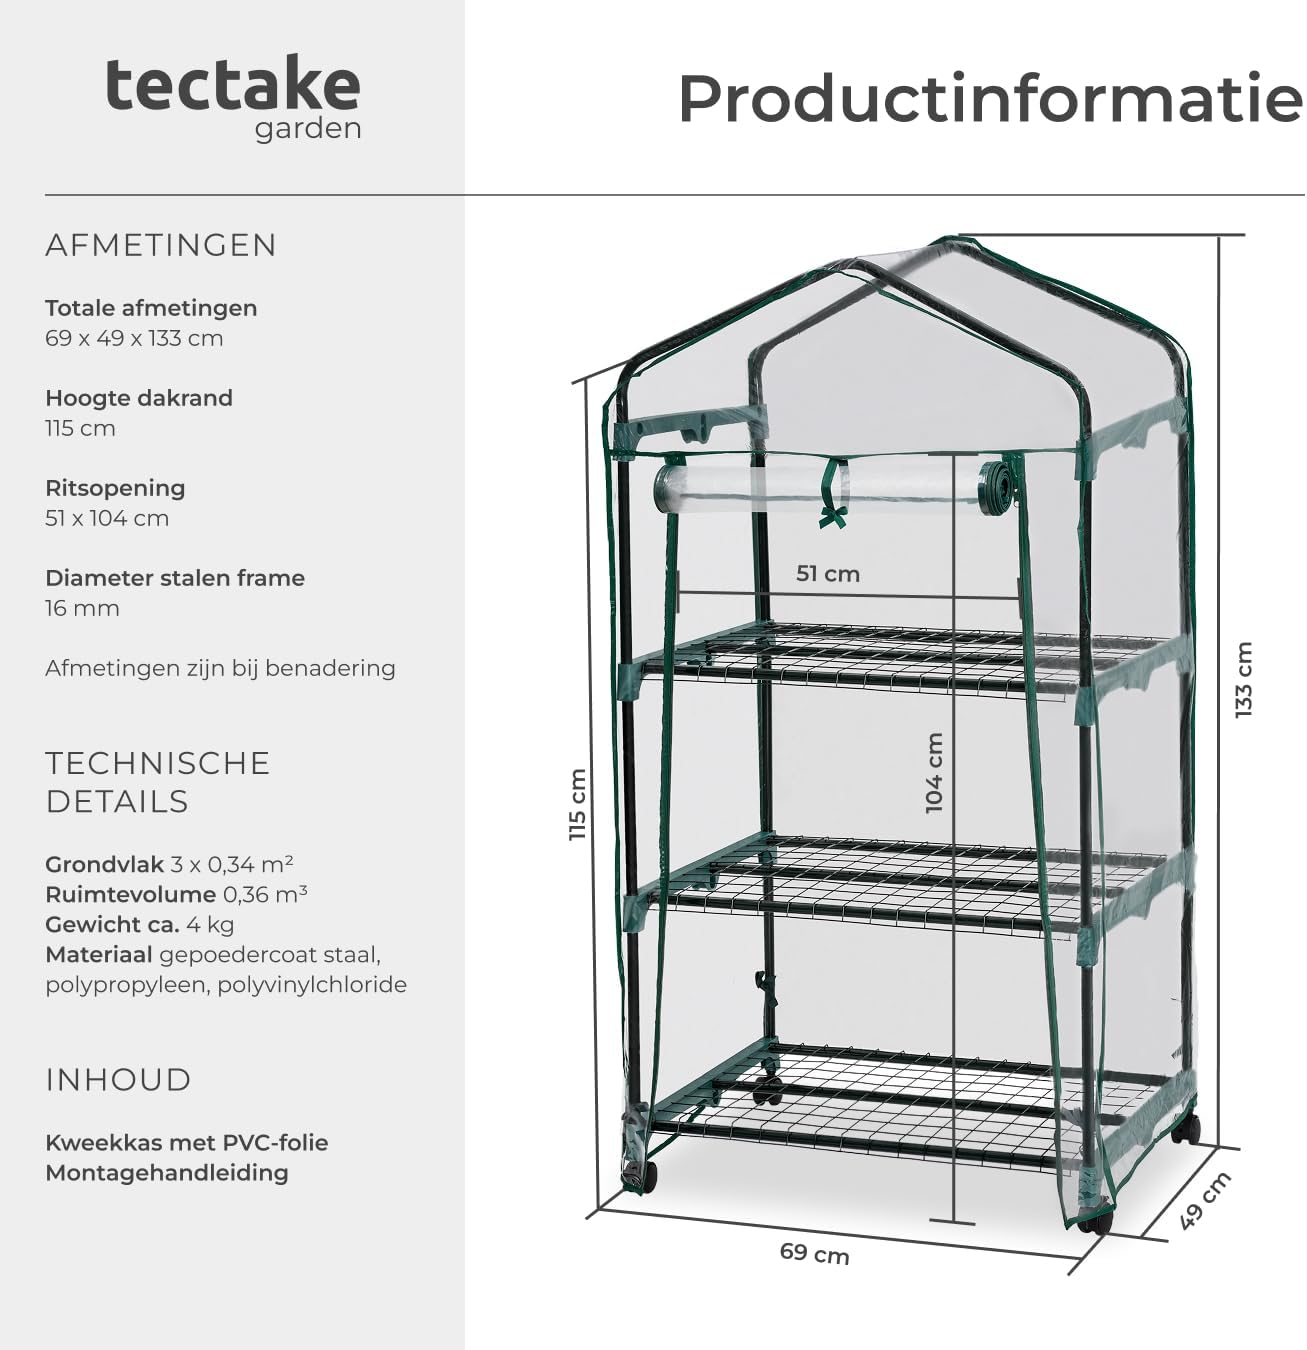
Image: A technical diagram illustrating the key dimensions of the tectake Balcony Greenhouse, including height, width, and depth.
| Feature | Detalje |
|---|---|
| Produktmål (L x B x H) | 69 x 49 x 133 cm |
| Varens vægt | 4.15 kg |
| Fabrikant | TecTake GmbH |
| Varemodelnummer | 401862 |
| Oprindelsesland | Kina |
| Farve | Green Frame / Clear Cover |
| Mærke | tectake |
| Dækmateriale | Polyvinylchlorid (PVC) |
| Rammemateriale | Legeret stål |
| Antal døre | 1 |
Garantioplysninger
For specific warranty details regarding your tectake Balcony Greenhouse, please refer to the warranty card included with your product or contact the manufacturer directly. Warranty terms typically cover manufacturing defects for a specified period from the date of purchase.
Kundesupport
If you have any questions, require assistance with assembly, or need to report a missing or damaged part, please contact tectake customer support. Contact information can typically be found on the product packaging, the manufacturer's official webhjemmeside eller gennem din forhandler.
Når du kontakter support, bedes du have dit modelnummer (401862) og købsoplysninger klar.