
1. Introduktion
Tak for købetasing the GooDee Mini Projector GD-DE-9. This manual provides essential information for setting up, operating, and maintaining your projector. Please read it thoroughly before use to ensure optimal performance and safety.
The GooDee GD-DE-9 is a portable LED projector designed for home entertainment, gaming, and presentations. It features a native resolution of 800x480p, supports up to 1080p input, and offers multiple connectivity options including HDMI, VGA, USB, AV, and SD card. Its advanced cooling system ensures quiet operation, and the integrated 2W speaker provides clear audio.

Figur 1.1: Forside view of the GooDee Mini Projector GD-DE-9.
2. Sikkerhedsoplysninger
For at forhindre brand, elektrisk stød eller personskade skal du overholde følgende sikkerhedsforanstaltninger:
- Åbn ikke projektoren casing. Overlad al service til kvalificeret servicepersonale.
- Udsæt ikke projektoren for regn eller fugt for at forhindre brand eller elektrisk stød.
- Sørg for tilstrækkelig ventilation. Bloker ikke ventilationsåbningerne.
- Brug kun den strømadapter, der følger med projektoren.
- Undgå at se direkte ind i projektorlinsen, når lamp er tændt.
- Placer projektoren på en stabil, plan overflade.
- Tag projektorens stik ud af stikkontakten under tordenvejr eller når den ikke bruges i længere perioder.
3. Pakkens indhold
Kontroller venligst, at alle varer er inkluderet i din pakke:
- GooDee Mini Projector GD-DE-9
- Strømadapter
- Fjernbetjening
- HDMI kabel
- AV-kabel
- Brugermanual
4. Produktet er slutview
4.1 Projektorkomponenter

Figur 4.1: Side view med input/output-porte.
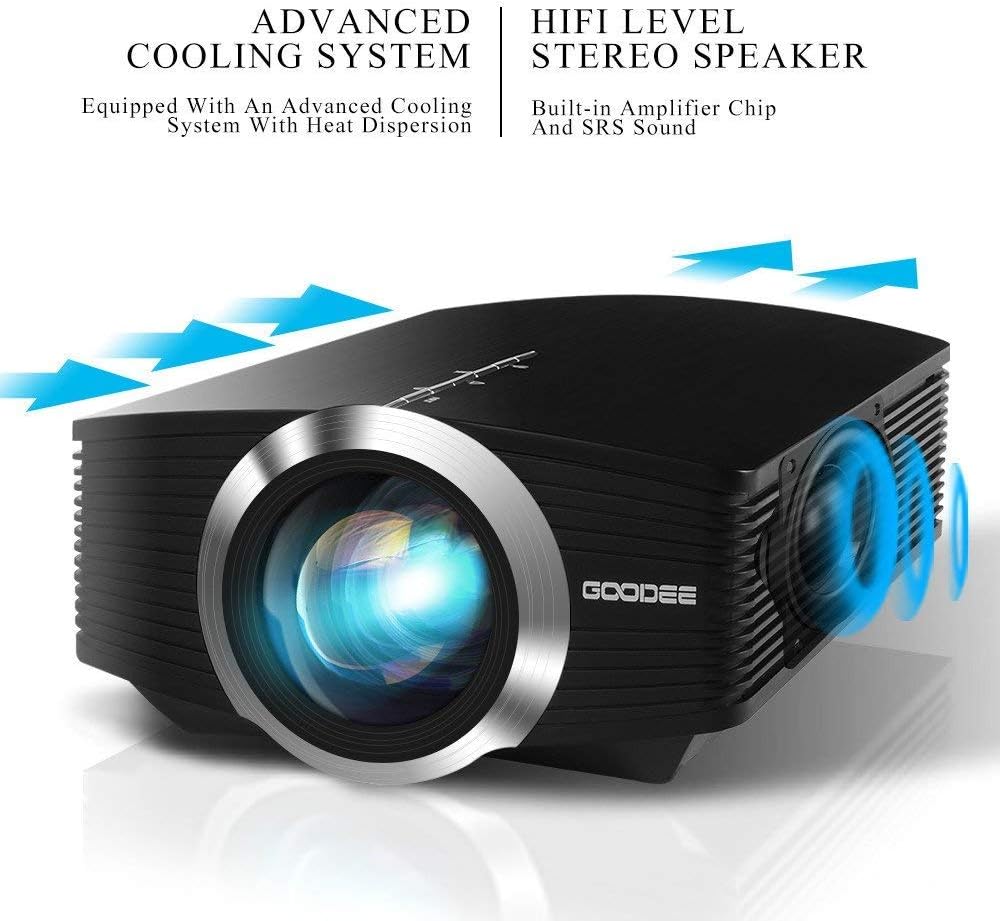
The projector features a direct light path optical technology for enhanced brightness and an advanced cooling system for quiet operation.

Figure 4.2: Advanced Cooling System and HIFI Stereo Speaker.
4.2 Fjernbetjening
The remote control allows you to operate the projector from a distance. Insert two AAA batteries (not included) into the remote control before use.

Figur 4.3: Fjernbetjening.
5. Opsætning
5.1 Placering og projektionsafstand
The image size is adjusted by changing the projection distance. For optimal viewing, a projection distance between 1.5 to 4 meters is recommended, yielding screen sizes from 50 to 130 inches. The best projection size is typically 80-100 inches at a distance of 6.6-8 feet.

Figure 5.1: Projection Distance and Screen Size Chart.
Figur 5.2: Eksample Projector Placement.
5.2 Strømtilslutning
Tilslut strømadapteren til projektorens strømindgang, og sæt derefter adapteren i en stikkontakt.
5.3 Tilslutning af inputenheder
The projector supports various input sources including HDMI, VGA, USB, AV, and SD card. It can connect to PCs, laptops, DVD players, PS3/4, Xbox ONE, and smartphones/tablets (via MHL cable and adapter, not included).

Figure 5.3: Multimedia Connection Diagram.
To connect a smartphone or tablet, ensure your device supports MHL functionality. You will need an MHL cable and a suitable adapter (not included).

Figure 5.4: Connecting Smartphones/Tablets.
5.4 Focus Adjustment and Keystone Correction
Adjust the focus ring on the projector lens until the image is clear. Use the keystone correction feature to adjust the image if it appears trapezoidal. The projector supports a ±15° keystone correction.
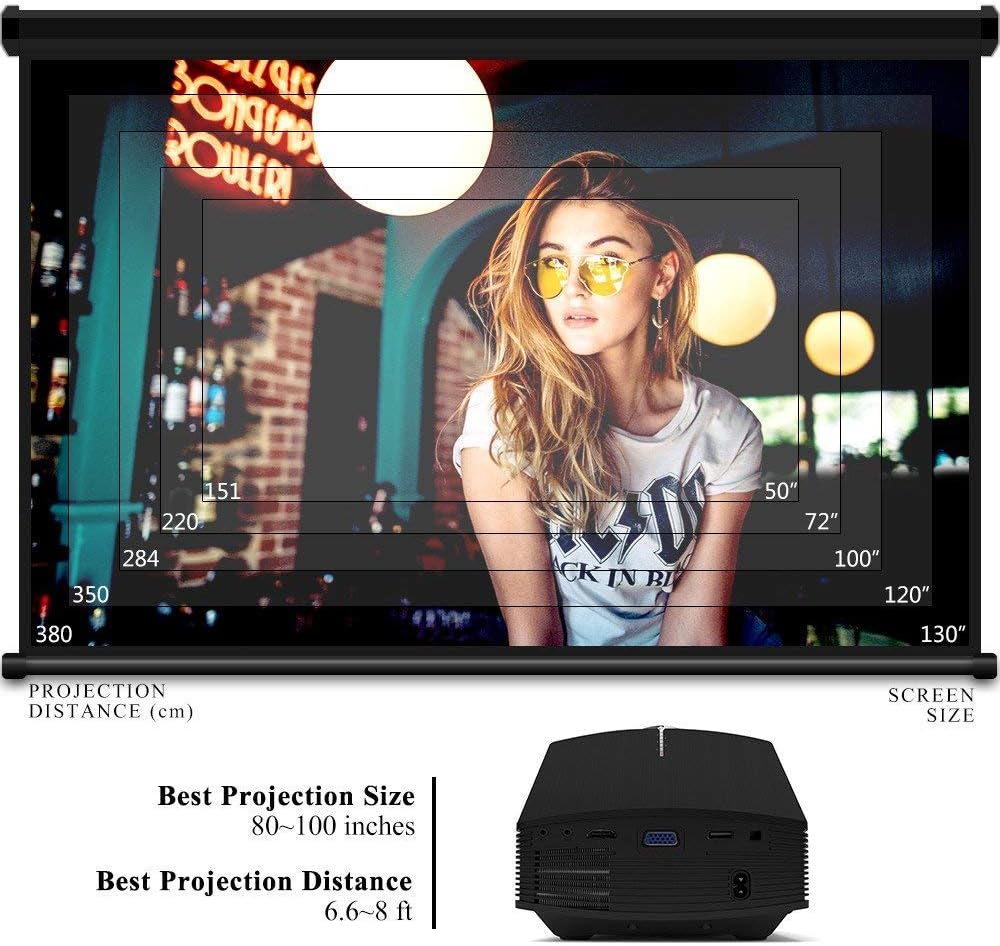
Figure 5.5: Focus and Keystone Adjustment.
6. Betjeningsvejledning
6.1 Tænd/sluk
Tryk på tænd/sluk-knappen på projektoren eller fjernbetjeningen for at tænde eller slukke projektoren.
6.2 Kildevalg
Press the 'Source' button on the projector or remote control to cycle through available input sources (HDMI, VGA, USB, AV, SD). Select the desired input source corresponding to your connected device.
6.3 Menunavigation
Use the arrow buttons on the projector or remote control to navigate through the on-screen menu. Press 'OK' or 'Enter' to confirm selections. Use the 'Menu' button to access settings and 'Exit' or 'Return' to go back.
6.4 Lydudgang
The projector has a built-in 2W speaker. For external audio, connect speakers or headphones to the 3.5mm audio output jack on the projector.
7. Vedligeholdelse
7.1 Rengøring af linsen
Use a soft, lint-free cloth or lens cleaning paper to gently wipe the projector lens. Do not use abrasive cleaners or solvents.
7.2 Rengøring af luftventiler
Regularly clean the air vents to ensure proper airflow and prevent overheating. Use a soft brush or compressed air to remove dust accumulation.
7.3 Opbevaring
When not in use, store the projector in a cool, dry place, away from direct sunlight and extreme temperatures. Use the original packaging or a protective case to prevent dust and damage.
8. Fejlfinding
| Problem | Mulig årsag | Løsning |
|---|---|---|
| Intet billede vises | Incorrect input source selected; Cable not connected properly; Device not powered on. | Select the correct input source; Check all cable connections; Ensure the source device is powered on. |
| Billedet er sløret | Fokus ikke justeret; Projektoren er for tæt på/langt fra skærmen. | Juster fokusringen; Juster projektionsafstanden. |
| Billedet er trapezformet | Projektoren er ikke vinkelret på skærmen. | Juster keystone-korrektion. |
| Ingen lyd | Lydstyrken er for lav; Slået fra; Ekstern lydenhed er ikke tilsluttet/konfigureret. | Øg lydstyrken; Slå lyden til; Kontroller eksterne lydforbindelser og indstillinger. |
| Fjernbetjening virker ikke | Lave/døde batterier; Blokering mellem fjernbetjening og projektor; Fjernbetjeningssensor blokeret. | Replace batteries; Remove obstructions; Ensure remote sensor is clear. |
9. Specifikationer
| Feature | Detalje |
|---|---|
| Mærke | GooDee |
| Modelnummer | GD-DE-9 |
| Display Type | LCD |
| Indfødt opløsning | 800 x 480 pixels |
| Understøttet opløsning | Op til 1080p |
| Lysstyrke | 3000 lumen (LED) |
| Lamp Liv | 30,000 timer |
| Forbindelsesteknologi | HDMI, USB, VGA, AV, SD Card |
| Hardware-interface | HDMI, USB, VGA |
| Integreret højttaler | 2W Stereo Speaker |
| Projektionsafstand | 1.5 - 4 meters (6.6 - 8 feet recommended) |
| Skærmstørrelse | 50 - 130 inches (80 - 100 inches recommended) |
| Keystone korrektion | ±15° Manuel |
| Formfaktor | Transportabel |
| Monteringstype | Bordplademontering |
| Farve | Sort |
| Pakkedimensioner | 33 x 21.6 x 11.8 cm |
| Varens vægt | 1.48 kg |
| Anbefalet brug | Spil, hjemmebiograf |
| Kompatible enheder | Smartphone, PC, Laptop, DVD Player, PS3/4, Xbox ONE, Fire TV Stick |
10. Garanti og support
GooDee offers a 3-year warranty for this projector. If you encounter any issues or are not completely satisfied with your purchase, please contact GooDee customer support. A refund or replacement is available within the first 2 months of purchase. Customer satisfaction is our top priority.
For support, please refer to the contact information provided on the GooDee official webwebsted eller din købsplatform.