
1. Introduktion
This manual provides detailed instructions for the setup, operation, and maintenance of your OWLENZ SD60 Wi-Fi Mini Projector. Please read this manual thoroughly before using the product to ensure proper functionality and safety. The SD60 features advanced LED light technology with 1500 lumens brightness, Wi-Fi screen sharing capabilities (Miracast/Airplay), and multiple media playback options for a versatile home theater experience. Its portable and compact design allows for easy installation and use.
2. Vigtige sikkerhedsoplysninger
- Se ikke direkte ind i projektorlinsen, når lamp er tændt.
- Sørg for korrekt ventilation omkring projektoren for at forhindre overophedning.
- Hold projektoren væk fra vand eller andre væsker.
- Brug kun den strømadapter, der følger med projektoren.
- Undgå at placere projektoren på ustabile overflader.
- The LED light technology is designed to be gentle on the eyes and has no radiation.
3. Pakkens indhold
Bekræft, at alle nedenstående varer er inkluderet i din pakke. Hvis der mangler eller er beskadigede varer, bedes du kontakte kundesupport.
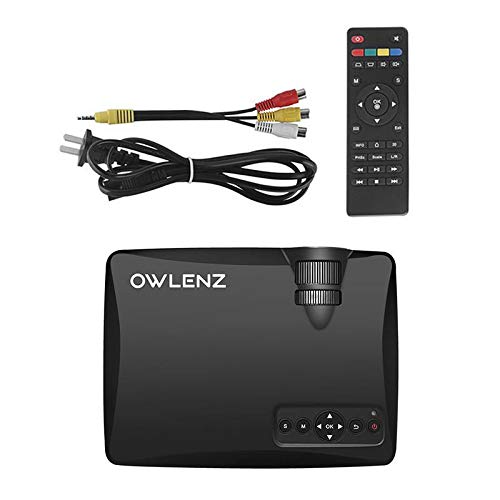
Image: OWLENZ SD60 Projector, remote control, power cable, and AV cables.
- OWLENZ SD60 Mini Projector
- Fjernbetjening
- Strømkabel
- AV-kabel
- Brugervejledning (dette dokument)
4. Produktet er slutview
Familiarize yourself with the various parts and controls of your OWLENZ SD60 projector.
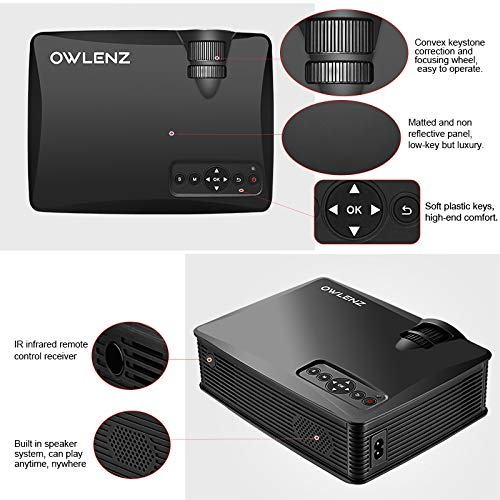
Image: Key features of the OWLENZ SD60 projector, including the focusing wheel, keystone correction, control panel, IR receiver, and built-in speaker.
- Convex Keystone Correction and Focusing Wheel: Located on the top, these allow for easy image adjustment.
- Matted and Non-Reflective Panel: Provides a sleek, low-key appearance.
- Soft Plastic Keys: For comfortable and responsive control.
- IR Infrared Remote Control Receiver: For remote operation.
- Indbygget højttalersystem: A 3W speaker for integrated audio playback.
- Indgangsporte: HDMI, USB, AV, SD Card slot (located on the side/rear).
5. Opsætning
5.1 Strømtilslutning
- Tilslut strømkablet til projektorens strømindgang.
- Sæt den anden ende af strømkablet i en passende stikkontakt.
- Tryk på tænd/sluk-knappen på projektoren eller fjernbetjeningen for at tænde den.
5.2 Tilslutning af indgangskilder
The projector supports various input options:
- HDMI: Connect an HDMI cable from your device (laptop, gaming console, etc.) to the projector's HDMI port.
- USB: Indsæt et USB-drev i USB-porten for direkte medieafspilning.
- AV: Brug det medfølgende AV-kabel til at tilslutte enheder med AV-udgang.
- SD-kort: Insert an SD card into the SD card slot for media playback.
After connecting, select the appropriate input source from the projector's menu using the remote or control panel.
5.3 Wi-Fi Screen Sharing (Miracast / Airplay)
The SD60 supports wireless screen sharing from compatible smartphones and tablets.
- Sørg for, at din mobilenhed og projektoren er forbundet til det samme Wi-Fi-netværk.
- On the projector, navigate to the "Screen Share" or "Miracast/Airplay" option in the main menu.
- On your mobile device, activate the screen mirroring function (e.g., "Smart View" på Android, "Skærmspejling" på iOS).
- Vælg projektorens navn fra listen over tilgængelige enheder for at oprette forbindelsen.
5.4 Fokus- og Keystone-justering
- Fokus: Rotate the focusing wheel near the lens until the projected image is clear and sharp.
- Keystone-korrektion: Use the keystone correction wheel to adjust the image shape if it appears trapezoidal (wider at the top or bottom).
6. Betjening
6.1 Grundlæggende kontroller
Use the control panel on the projector or the remote control to navigate menus and adjust settings.
- Power knap: Tænder/slukker projektoren.
- Navigationsknapper (Pile/OK): Til menunavigation og valg.
- Kildeknap: Switches between input sources (HDMI, USB, AV, SD Card, Wi-Fi).
- Menu-knap: Giver adgang til projektorens indstillingsmenu.
6.2 Medieafspilning
Once an input source is selected, the projector will display content. For USB/SD card playback, navigate through the file browser to select your desired media.
6.3 Lydudgang
- Indbygget højttaler: The projector has a built-in 3W speaker suitable for small viewing områder.
- Ekstern højttaler: For a better listening experience, connect external speakers or headphones to the 3.5mm audio port.
6.4 Projektionsstørrelse
The projector supports projection sizes ranging from 40 to 150 inches, offering a large screen experience.
7. Vedligeholdelse
7.1 Rengøring
- Brug en blød, tør klud til at rengøre projektorens yderside.
- For the lens, use a lens cleaning cloth and specialized lens cleaning solution. Do not use abrasive materials.
- Regularly clean the ventilation openings to ensure proper airflow and prevent dust buildup.
7.2 LED Bulb Lifespan
The OWLENZ SD60 features an LED bulb with a lifespan of up to 30,000+ hours, significantly longer than traditional projector lamps. No regular bulb replacement is typically required under normal usage conditions.
8. Use Cases
The OWLENZ SD60 Mini Projector is versatile and suitable for various applications:
- Hjemmebiograf: Nyd film, tv-serier og sport på en stor skærm.
- Spil: Connect gaming consoles for an immersive gaming experience.
- Uddannelsesmæssige formål: Project educational content, videos, and presentations.
- Children's Entertainment: Ideal for playing videos and cartoons for children.
- Lille Viewing Areas: Its compact design and built-in speaker make it perfect for use in smaller rooms or spaces.
9. Fejlfinding
| Problem | Mulig årsag | Løsning |
|---|---|---|
| Intet billede vises | Incorrect input source selected; loose cable connection; source device not powered on. | Select the correct input source. Check all cable connections. Ensure the source device is powered on. |
| Billedet er sløret | Fokus ikke justeret korrekt. | Adjust the focusing wheel until the image is clear. |
| Billedet er trapezformet | Keystone not adjusted correctly. | Juster keystone-korrektionshjulet. |
| Ingen lyd | Volume too low; external speakers not connected properly; audio format not supported. | Increase volume. Check external speaker connection or use built-in speaker. Ensure audio format is compatible. |
| Wi-Fi screen sharing not working | Devices not on the same Wi-Fi network; screen mirroring function not activated on mobile device. | Ensure both devices are on the same Wi-Fi. Activate screen mirroring on your mobile device and select the projector. |
10. Specifikationer
| Feature | Detalje |
|---|---|
| Mærke | OWLENZ |
| Model | SD60 |
| Produktmål (LxBxH) | 20.8 x 16.5 x 8 cm |
| Varens vægt | 949 g |
| Hardware-interface | HDMI, USB |
| Forbindelsesteknologi | HDMI, USB, Wi-Fi |
| Kompatible enheder | Smartphones, tablets, bærbare computere |
| Særlige funktioner | Indbygget højttaler, bærbar |
| Displayteknologi | LCD |
| Lysstyrke | 1500 lumen |
| LED Bulb Lifespan | Op til 30,000+ timer |
| Projektionsstørrelse | 40 til 150 tommer |
| Indbygget højttalereffekt | 3W |
| Formfaktor | Transportabel |
| Monteringstype | Bordplademontering |
| Wattage | 24 watt |
| Batterier påkrævet | Yes (for remote control, not included) |
11. Produktvideo overview
Se denne korte video for en hurtig gennemgangview of the OWLENZ SD60 Mini Projector's features and capabilities.
Video: En kort gennemgangview highlighting the OWLENZ SD60 projector's display, sound, smart features, other features, portability, and use cases.
12. Garanti og support
The OWLENZ SD60 Mini Projector comes with a standard brand warranty. For detailed warranty information, technical support, or service inquiries, please refer to the product detail page on Amazon.in or contact OWLENZ customer service directly.
For further information, visit the product detail page: Amazon-produktside