
Indledning
Welcome to the world of sewing with your new Janome IT 1028 Glamour mechanical sewing machine. This manual provides essential information for the safe and efficient operation, setup, maintenance, and troubleshooting of your machine. Please read it thoroughly before using the machine to ensure optimal performance and longevity.
The Janome IT 1028 Glamour is designed for ease of use, featuring 12 stitch types, a free arm for circular sewing, an oscillating hook, automatic buttonholes, and adjustable stitch length and width. It also includes a double presser foot lift, feed dog lowering, a thread cutter, a needle threader, and a soft cover for protection.
Sikkerhedsinstruktioner
For at reducere risikoen for elektrisk stød, forbrændinger, brand eller personskade:
- Tag altid stikket ud af maskinen umiddelbart efter brug og før rengøring, fjernelse af dæksler eller foretagelse af brugervedligeholdelsesjusteringer.
- Brug ikke maskinen som legetøj. Vær særlig opmærksom, når maskinen bruges af eller i nærheden af børn.
- Brug kun denne maskine til dens tilsigtede formål som beskrevet i denne manual. Brug kun tilbehør, der er anbefalet af producenten.
- Brug aldrig denne maskine, hvis den har en beskadiget ledning eller et beskadiget stik, hvis den ikke fungerer korrekt, hvis den er blevet tabt eller beskadiget, eller hvis den er blevet tabt i vand.
- Tab eller indsæt aldrig nogen genstand i nogen åbning.
- Må ikke bruges udendørs.
- Må ikke anvendes, hvor der anvendes aerosolprodukter (spray), eller hvor der indgives ilt.
- Hold fingrene væk fra alle bevægelige dele. Der kræves særlig forsigtighed omkring symaskinens nål.
- Brug altid den rigtige stingplade. Den forkerte plade kan få nålen til at knække.
- Brug ikke bøjede nåle.
- Træk eller skub ikke i stoffet under syning. Dette kan afbøje nålen og få den til at knække.
- Sluk symaskinen, når du foretager justeringer i nåleområdet, f.eks. trådning af nålen, skift af nål, trådning af spolen eller skift af trykfoden.
- Always unplug the machine when removing the light bulb.
- Tag ikke stikket ud ved at trække i ledningen. For at tage stikket ud skal du tage fat i stikket, ikke i ledningen.
Produkt overview
Nøglefunktioner
- 12 Stitch Types: Versatile options for various sewing projects.
- Fri arm: Facilitates sewing cuffs, sleeves, and other small, circular items.
- Oscillating Hook: Ensures smooth and consistent stitch formation.
- Justerbar stinglængde og -bredde: Provides control over stitch appearance.
- Automatic Four-Step Buttonhole: Simplifies the creation of professional-looking buttonholes.
- Double Presser Foot Lift: Allows for sewing thicker fabrics.
- Feed Dog Lowering: Useful for darning and free-motion quilting.
- Trådskærer: Conveniently trims threads.
- Nåletråder: Assists in quickly threading the needle.
- Blødt betræk: Protects the machine from dust and damage.
Maskinkomponenter
Familiarize yourself with the main parts of your Janome IT 1028 Glamour sewing machine.

Figur 1: Forside view of the Janome IT 1028 Glamour sewing machine with the soft cover in place. This image shows the overall design and the stitch selection and length dials.

Figur 2: Nærbillede view of the stitch selector dial (left) and stitch length dial (right) on the Janome IT 1028 Glamour. The decorative illustration on the machine body is also visible.
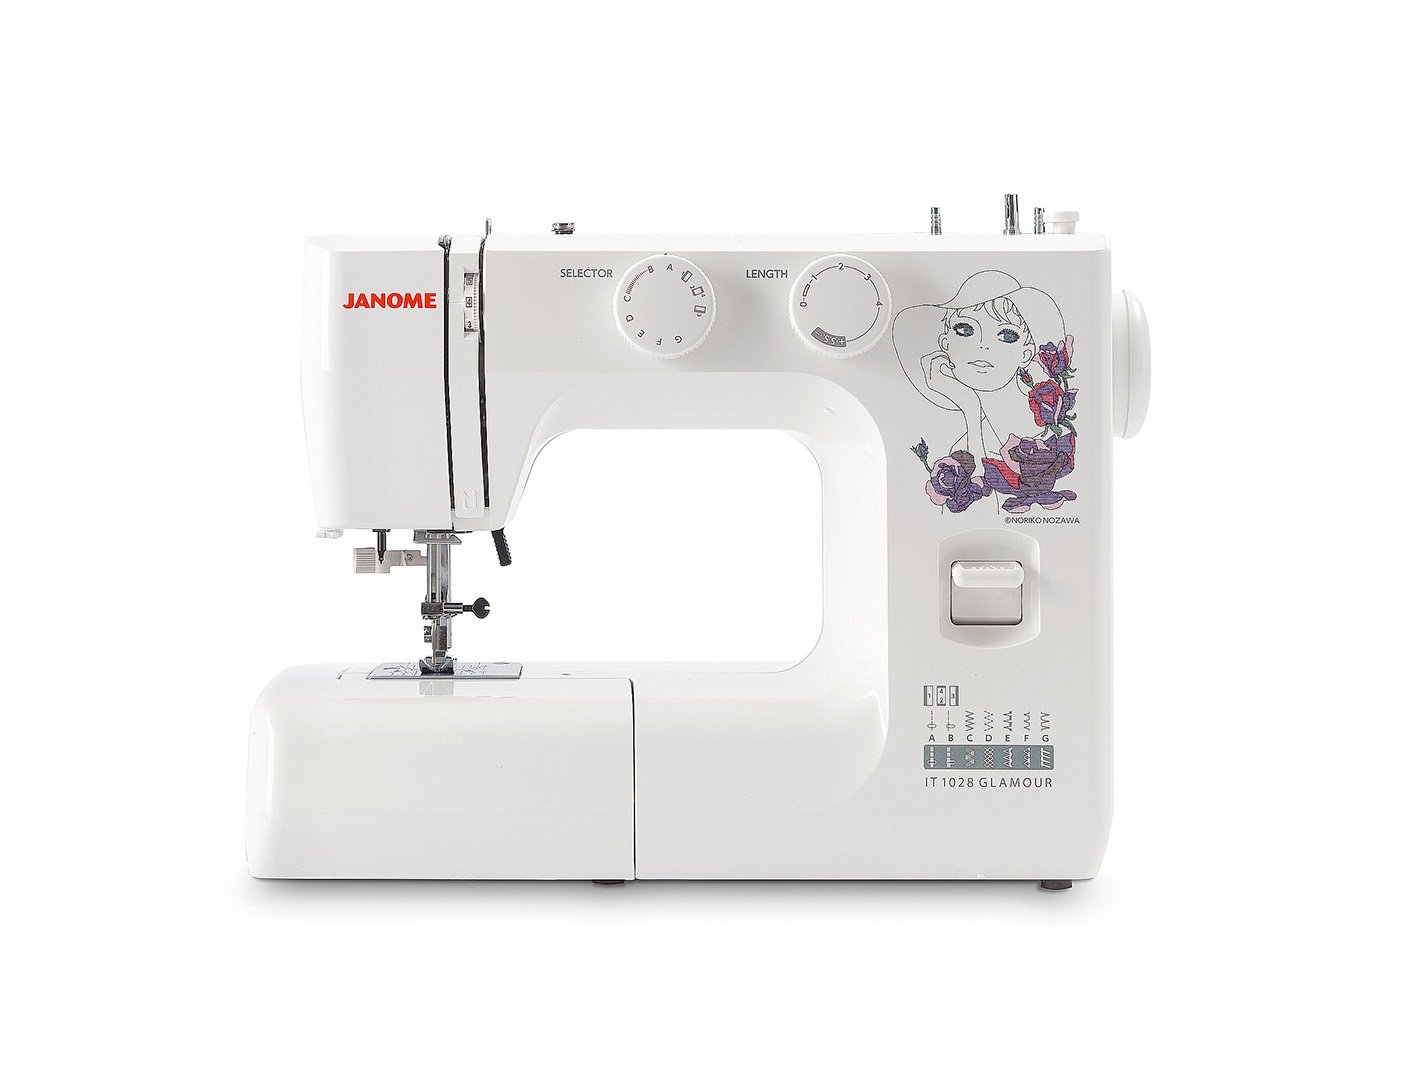
Figure 3: The Janome IT 1028 Glamour sewing machine with the accessory tray removed, revealing the free arm and the bobbin case area. This view is essential for bobbin insertion and cleaning.
Opsætning
1. Udpakning og placering
- Tag forsigtigt maskinen ud af emballagen.
- Placer maskinen på en stabil, flad overflade.
- Remove any protective films or packing materials.
2. Strømtilslutning
- Sørg for, at maskinens tænd/sluk-knap er i "OFF"-positionen.
- Tilslut netledningen til maskinens strømindgangsstik.
- Sæt netledningen i en passende stikkontakt.
3. Spolning af spolen
- Læg en trådrulle på trådrulleholderen.
- Før tråden gennem den øverste trådfører og rundt om spolespændingsskiven.
- Før tråden gennem hullet i spolen indefra og ud.
- Placer spolen på spolevinderens spindel, og skub spindlen til højre.
- Start maskinen. Spolen spoles automatisk. Stop, når spolen er fuld.
- Cut the thread and push the bobbin winder spindle to the left. Remove the bobbin.
4. Isætning af spolen
- Sluk for maskinen.
- Open the bobbin cover plate located on the free arm.
- Insert the bobbin into the bobbin case with the thread running in the direction indicated by the arrows.
- Pull the thread through the tension spring and into the guide slot.
- Luk spoledækslet.
5. Trådning af overtråden
- Løft trykfodsløfteren.
- Læg en trådrulle på trådrulleholderen.
- Før tråden gennem den øverste trådfører.
- Bring the thread down the right channel, up the left channel, and through the take-up lever from right to left.
- Fortsæt med at føre tråden ned til nålestangens trådfører.
- Brug den indbyggede nåletråder, eller tråd nålen manuelt forfra og bagud.
- Træk cirka 6 cm tråd gennem nåleøjet.
6. Optagning af undertråden
- Hold let i overtråden med venstre hånd.
- Turn the handwheel towards you to lower the needle into the needle plate and then raise it.
- Overtråden vil fange undertråden og danne en løkke.
- Træk i løkken for at føre undertråden op gennem hullet i stingpladen.
- Træk begge tråde (overtråd og spole) under trykfoden og mod maskinens bagside.
Betjeningsvejledning
1. Valg af sting
Drej på Stingvælgerhjul (refer to Figure 2) to choose your desired stitch pattern. The available stitches are indicated by letters or symbols on the dial.
2. Justering af stinglængde og -bredde
- Stinglængde: Brug Stinglængdeskive (refer to Figure 2) to adjust the length of your stitches. Higher numbers indicate longer stitches.
- Stingbredde: For stitches that allow width adjustment, use the corresponding dial or setting. (Note: The Janome IT 1028 Glamour has adjustable stitch width, typically integrated with the stitch selector or a separate dial. Consult the machine's markings for specific controls.)
3. Grundlæggende syning
- Læg stoffet under trykfoden.
- Sænk trykfodsløfteren.
- Tænd for maskinen.
- Tryk forsigtigt på fodpedalen for at begynde at sy. Jo hårdere du trykker, desto hurtigere syr maskinen.
- Guide the fabric gently with your hands, but do not pull or push forcefully.
- To secure the beginning and end of a seam, use the reverse lever to sew a few stitches backward.
- Når du er færdig, hæves nålen til den højeste position, trykfoden løftes og stoffet trækkes væk fra maskinen.
- Use the built-in thread cutter or scissors to trim the threads.
4. Brug af friarmen
To use the free arm, simply slide off the accessory tray (refer to Figure 3). This exposes the narrow free arm, ideal for sewing small, tubular items like sleeves, pant hems, and cuffs.
5. Automatic Four-Step Buttonholes
The Janome IT 1028 Glamour features an automatic four-step buttonhole function. Refer to the stitch selector dial for the buttonhole settings (usually marked with a buttonhole symbol and steps 1-4).
- Fastgør knaphulsfoden.
- Marker knaphullets placering på stoffet.
- Indstil stingvælgeren til det første knaphulstrin.
- Sy den første side af knaphullet.
- Change the stitch selector to the next step and sew the bar tack.
- Continue through all four steps, following the machine's markings for each segment of the buttonhole.
- Carefully cut open the buttonhole using a seam ripper, ensuring not to cut the stitches.
Opretholdelse
1. Rengøring af maskinen
Regelmæssig rengøring hjælper med at opretholde maskinens ydeevne. Tag altid stikket ud af maskinen, inden du rengør den.
- Spoleområde: Remove the needle plate and bobbin case. Use a small brush to remove lint and dust from the bobbin area and feed dogs.
- Ydre: Wipe the exterior surfaces with a soft, dry cloth. Do not use harsh chemicals or abrasive cleaners.
2. Udskiftning af nåle
Replace the needle regularly (after 8-10 hours of sewing) or if it becomes bent, dull, or damaged. A damaged needle can cause skipped stitches or fabric damage.
- Sluk for maskinen, og tag stikket ud.
- Løsn nålen clamp skrue.
- Fjern den gamle nål.
- Sæt en ny nål i med den flade side mod maskinens bagside, og skub den så langt op som muligt.
- Spænd nålen clamp skrue sikkert.
Fejlfinding
Dette afsnit omhandler almindelige problemer, du kan støde på. Ved problemer, der ikke er nævnt her, bedes du kontakte kundesupport.
| Problem | Mulig årsag | Løsning |
|---|---|---|
| Springet sting over | Forkert nål, bøjet nål, forkert trådning, forkert nålestørrelse til stoffet. | Skift nål, tråd maskinen om, og sørg for korrekt nåletype/størrelse. |
| Thread Breakage (Upper) | Forkert trådning, for stram spænding, tråd af dårlig kvalitet, bøjet nål, grat på stingpladen. | Re-thread machine, adjust upper tension, use quality thread, replace needle, check needle plate for damage. |
| Trådbrud (spole) | Improperly wound bobbin, bobbin inserted incorrectly, lint in bobbin case, tension too tight. | Re-wind bobbin, re-insert bobbin correctly, clean bobbin case, adjust bobbin tension (if adjustable). |
| Ujævne sømme | Incorrect tension settings, pulling/pushing fabric, wrong presser foot. | Adjust tension, guide fabric gently, use appropriate presser foot. |
| Maskine starter ikke | Ikke tilsluttet, strømafbryder slukket, fodpedal ikke tilsluttet. | Check power connections, ensure switch is ON, connect foot controller. |
Specifikationer
- Modelnummer: 8100000017663 (IT 1028 Glamour)
- Mærke: JANOME
- Materiale: Plast
- Vægt: 8 kilo
- Dimensioner (P x L x H): 10 cm x 35 cm x 25 cm (Depth x Width x Height)
- Strømkilde: El-kabel
- Stingtyper: 12
- Hook Type: oscillerende
- Knaphulstype: Automatic Four-Step
Garanti og support
For warranty information, service, or technical support, please refer to the warranty card included with your product or contact your authorized Janome dealer or customer service center. Keep your purchase receipt as proof of purchase.