
1. Introduktion
The NorStone Stylum 3 speaker stands are designed to provide a stable and acoustically optimized platform for your compact speakers. These sturdy stands feature a robust construction, cable management capabilities, and adjustable components to ensure optimal performance and integration into your audio setup. The larger column can be optionally filled with sand for enhanced resonance dampening, contributing to a clearer sound reproduction.
Nøglefunktioner omfatter:
- Cable management system for a tidy appearance.
- Adjustable spikes and counter spikes for stability on various floor types.
- Skidproof rubber pads for speaker isolation on the top plate.
- Optional sand filling for improved resonance dampslutning.
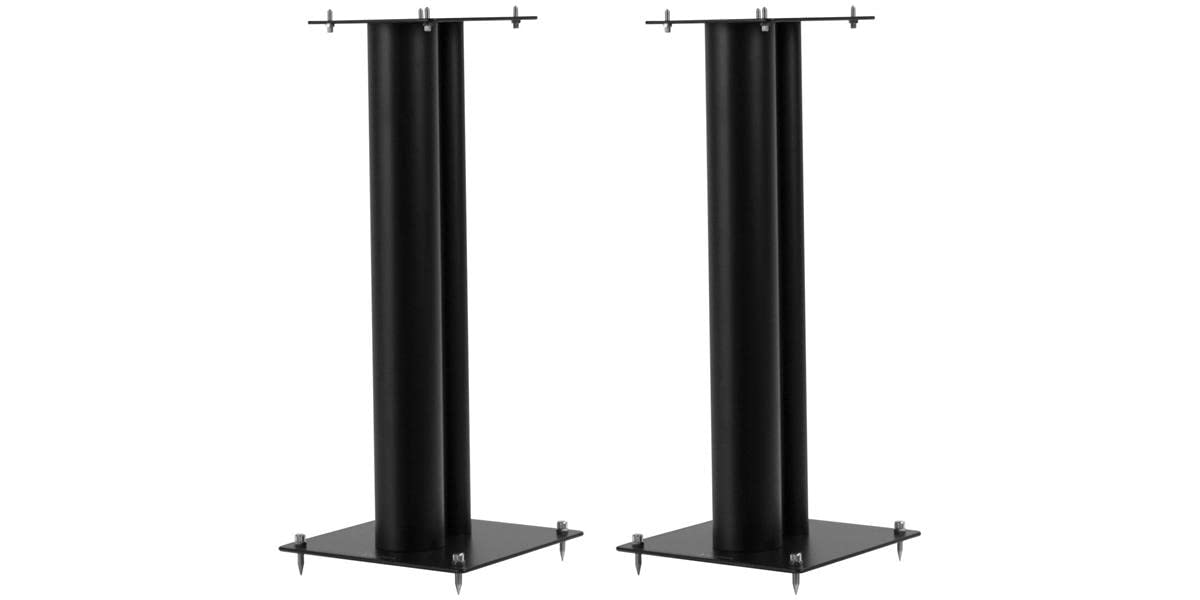
Figure 1: NorStone Stylum 3 Speaker Stands (exampbilledet).
2. Pakkens indhold
Please verify that all components are present in the package before beginning assembly. If any parts are missing or damaged, please contact your retailer or NorStone customer support.
- 2 x Speaker Stand Columns (main and smaller rear column)
- 2 x bundplader
- 2 x Topplader
- 8 x Adjustable Ground Spikes
- 8 x Protective Metal Plates for Ground Spikes
- 8 x Adjustable Top Spikes
- 8 x Skidproof Rubber Pads (for top plate)
- Samlebeslag (skruer, skiver, møtrikker)
- Assembly Tool (e.g., Allen key, wrench)
3. Sikkerhedsoplysninger
Read all instructions carefully before assembly and use. Keep this manual for future reference.
- Belastningskapacitet: Do not exceed the maximum load capacity of 50 kg (110 lbs) per stand. Overloading can cause instability and damage.
- Stabilitet: Ensure the stands are assembled correctly and placed on a level, stable surface. Adjust the ground spikes to eliminate any wobbling.
- Børn og kæledyr: Keep children and pets away from the stands during assembly and ensure the stands are stable to prevent accidental tipping.
- Skarpe kanter: Be cautious of sharp edges, especially with the spikes. Use protective plates under ground spikes to prevent floor damage.
- Forsamling: Follow the assembly instructions precisely. Incorrect assembly can lead to instability and potential injury.
4. Opsætning og montering
Follow these steps to assemble your NorStone Stylum 3 speaker stands:
- Udpak komponenter: Tag forsigtigt alle dele ud af emballagen, og læg dem på en ren, blød overflade for at forhindre ridser. Kontroller, at alle komponenter, der er anført i afsnit 2, er til stede.
- Fastgør bundpladen: Secure the base plate to the bottom of the main stand column using the provided screws and assembly tool. Ensure the screws are tightened firmly but do not overtighten.
- Fastgør topplade: Secure the top plate to the top of the main stand column using the provided screws and assembly tool. Ensure it is oriented correctly for speaker placement.
- Installer jordspyd: Screw the adjustable ground spikes into the threaded inserts on the underside of the base plate. Place the protective metal plates under each spike if the stands are on a delicate floor surface (e.g., wood, laminate) to prevent scratches.
- Install Top Spikes or Rubber Pads: For optimal speaker isolation, you have two options for the top plate:
- Top Spikes: Screw the adjustable top spikes into the threaded inserts on the top plate. These provide a rigid coupling between the speaker and stand.
- Skidproof Rubber Pads: Alternatively, place the provided skidproof rubber pads on the top plate. These offer vibration dampening and prevent speakers from sliding.
- Optional Sand Filling: The larger main column can be filled with dry sand (not included) for increased mass and improved resonance dampening. Remove the top cap (if present) and carefully pour dry sand into the column. Ensure the sand is completely dry to prevent moisture issues. Replace the cap securely after filling.
- Kabelstyring: The stand features a cable management system. Route your speaker cables through the designated openings in the columns to keep them tidy and out of sight.
5. Betjening
Once assembled, position your NorStone Stylum 3 speaker stands in the desired location, ensuring they are on a stable and level surface.
- Højttalerplacering: Carefully place your speakers onto the top plates. If using top spikes, ensure the speaker's base makes firm contact with all four spikes. If using rubber pads, center the speaker on the pads.
- Leveling and Stability: Adjust the height of the ground spikes by turning them clockwise or counter-clockwise until the stand is perfectly level and stable, with no wobbling. This is crucial for optimal sound performance and safety.
- Kabelføring: Utilize the internal cable management system to route speaker cables from your amplifier to the speakers. This helps maintain a clean aesthetic and prevents cable clutter.
6. Vedligeholdelse
Regular maintenance will help preserve the appearance and functionality of your speaker stands.
- Rensning: Wipe the stands with a soft, slightly damp cloth to remove dust and fingerprints. Avoid using abrasive cleaners, solvents, or harsh chemicals, as these can damage the finish.
- Tjek forbindelser: Kontrollér regelmæssigt alle skruer og forbindelser for at sikre, at de forbliver stramme. Spænd om nødvendigt, men overspænd ikke.
- Spike-tilstand: Inspect the spikes for any damage or wear. Ensure the protective plates are still in place if used.
7. Fejlfinding
Her er løsninger på almindelige problemer, du kan støde på:
- Stand is Unstable or Wobbles:
- Sørg for, at stativet står på en plan overflade.
- Adjust the ground spikes individually until all four make firm contact with the floor and the stand is stable.
- Kontroller, at alle monteringsskruer er forsvarligt spændt.
- Vanskeligheder med at føre kabler:
- Ensure the cable diameter is compatible with the internal routing channels.
- Gently guide the cables through the openings. If necessary, use a thin, flexible wire to help pull the cable through.
- Unwanted Resonance or Vibration:
- Consider filling the main column with dry sand to increase mass and damp vibrationer.
- Ensure speakers are properly isolated on the top plate, either with top spikes or rubber pads.
8. Specifikationer
| Feature | Specifikation |
|---|---|
| Mærke | NorStone |
| Modelnummer | NORSTY |
| Materiale | Metal (main structure), Rubber (pads) |
| Farve | Black (matt) |
| Maksimal højde | 80 centimeter |
| Base Plate Dimensions (W x D) | 25 x 25 cm |
| Top Plate Dimensions (W x D) | 16.5 x 22 cm |
| Belastningskapacitet | 50 kg (110 lbs) per stand |
| Varens vægt (ca.) | 0.01 Kilograms (Note: This weight is likely for a small component, not the full stand. Actual stand weight will be significantly higher.) |
| Funktioner | Cable management, adjustable spikes, rubber pads, optional sand filling |
9. Garanti og support
For warranty information, please refer to the documentation provided with your purchase or contact your retailer. NorStone products are designed for durability and performance.
If you encounter any issues or require technical assistance, please contact NorStone customer support or your authorized dealer. Please have your model number (Stylum 3 / NORSTY) and purchase details ready when contacting support.


