Indledning
This manual provides comprehensive instructions for the safe and efficient operation of your Uten 16-Stitch Electric Sewing Machine, Model FR machine a coudre 508. Designed for both beginners and experienced users, this portable machine offers 16 built-in stitch patterns, double thread, and double speed functionality for a variety of sewing projects. Please read this manual thoroughly before first use and keep it for future reference.
Vigtige sikkerhedsinstruktioner
- Always unplug the sewing machine from the electrical outlet immediately after use and before cleaning, servicing, or removing any parts.
- Keep fingers away from the needle, hand wheel, and other moving parts during operation.
- Never operate the machine with any air openings blocked. Keep ventilation openings of the sewing machine free from lint, dust, and loose cloth.
- Use only the power adapter supplied with the machine.
- Lad ikke børn betjene maskinen uden opsyn.
- Tab eller indsæt aldrig nogen genstand i nogen åbning.
- Må ikke bruges udendørs.
- Må ikke anvendes, hvor der anvendes aerosolprodukter (spray), eller hvor der indgives ilt.
- For at afbryde skal du dreje alle knapper til slukket position og derefter tage stikket ud af stikkontakten.
Produktkomponenter
Familiarize yourself with the various parts of your sewing machine before operation.
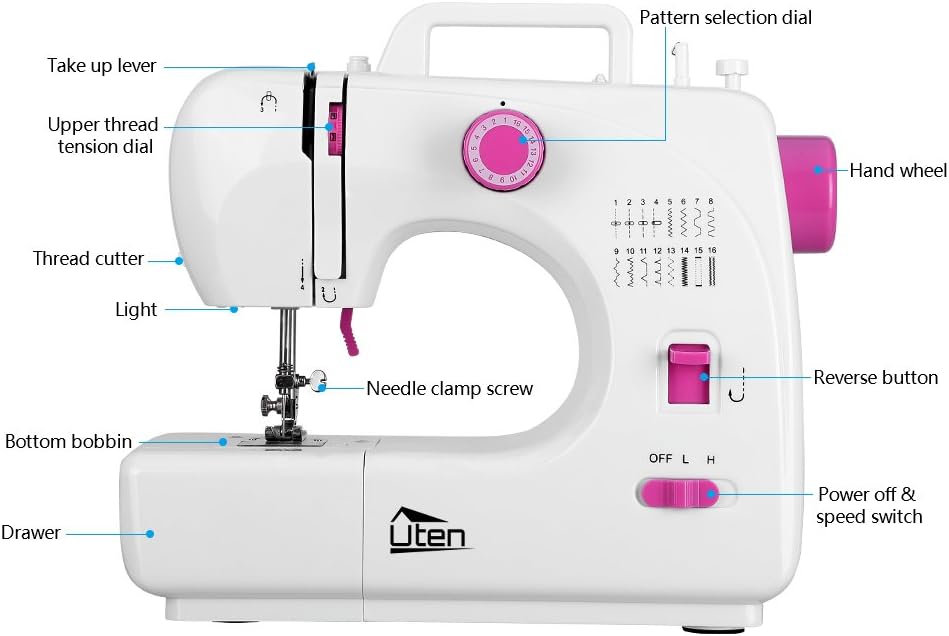
Figure 1: Front Components Overview
This image highlights the main operational parts on the front of the sewing machine, including the take-up lever, thread tension dial, thread cutter, light, needle clamp screw, bottom bobbin area, accessory drawer, pattern selection dial, hand wheel, reverse button, and power/speed switch.

Figure 2: Top and Rear Components Overview
This image shows the components located on the top and rear of the sewing machine, such as the bobbin winder pin, bobbin winder stop, bobbin winder tension disk, presser foot lifter, presser foot, foot pedal input, and DC power input.
Opsætning
1. Strømtilslutning
- Ensure the machine is switched off (Power off & speed switch in 'OFF' position).
- Connect the foot pedal cable to the 'FOOT PEDAL' input on the side of the machine.
- Connect the power adapter cable to the 'DC 12V 1.5A' input.
- Sæt strømadapteren i en passende stikkontakt.

Figure 3: Power and Foot Pedal Connection
This image illustrates how to connect the foot pedal and the DC power adapter to the respective input ports on the side of the sewing machine.
2. Spoleopvikling
- Læg en trådrulle på trådrulleholderen.
- Guide the thread through the bobbin winder tension disk.
- Place an empty bobbin onto the bobbin winder pin.
- Wind the thread clockwise around the bobbin a few times manually.
- Push the bobbin winder pin to the right.
- Turn on the machine and press the foot pedal (or use the speed switch) to start winding. Stop when the bobbin is full.
- Cut the thread and push the bobbin winder pin back to the left. Remove the wound bobbin.
3. Overtrådning
- Løft trykfodsløfteren.
- Raise the needle to its highest position by turning the hand wheel towards you.
- Læg en trådrulle på trådrulleholderen.
- Før tråden gennem den første trådfører.
- Pass the thread down through the tension control assembly.
- Før tråden op og gennem trådgiveren fra højre mod venstre.
- Guide the thread down through the remaining thread guides.
- Thread the needle from front to back. Pull about 15 cm (6 inches) of thread through the needle eye.
4. Lower Bobbin Insertion
- Åbn spoledækslet.
- Sæt den opviklede spole i spolekapslen, og sørg for, at tråden afvikles mod uret.
- Pull the thread through the small slot in the bobbin case.
- Hold the upper thread lightly with one hand. Turn the hand wheel towards you to lower and raise the needle. The needle will catch the bobbin thread and bring it up through the needle plate.
- Pull both upper and lower threads to the back under the presser foot.
- Luk spoledækslet.
Betjeningsvejledning
1. Turning On/Off and Speed Selection
- To turn on the machine, slide the 'Power off & speed switch' to 'L' (Low speed) or 'H' (High speed).
- To turn off the machine, slide the switch to 'OFF'.
- The machine can be operated either by the foot pedal or by the speed switch. When using the foot pedal, ensure the speed switch is in 'OFF' position.
2. Stitch Pattern Selection
- Turn the 'Pattern selection dial' to choose one of the 16 available stitch patterns.
- Ensure the needle is in its highest position before changing stitch patterns to prevent needle breakage.

Figure 4: Stitch Pattern Selection
This image displays the stitch pattern selection dial and a visual guide to the 16 built-in stitch patterns available on the machine.
3. Baglæns syning
- To reinforce the beginning and end of a seam, press and hold the 'Reverse button'. The machine will sew backward.
- Release the button to resume forward sewing.
4. Grundlæggende syning
- Læg stoffet under trykfoden.
- Sænk trykfodsløfteren.
- Slowly press the foot pedal or slide the speed switch to 'L' or 'H' to start sewing.
- Guide the fabric gently with both hands, keeping it flat. Do not pull or push the fabric forcefully.
- When finished, raise the needle to its highest position, lift the presser foot, and gently pull the fabric away.
- Use the 'Thread cutter' on the side of the machine to cut the threads.
5. Using the Sewing Light
- The built-in light illuminates the sewing area for better visibility. It turns on automatically when the machine is powered on.
Opretholdelse
1. Rensning
- Tag altid stikket ud af maskinen før rengøring.
- Brug en blød børste til at fjerne fnug og støv fra spoleområdet og transportøren.
- Tør maskinens ydre af med en blød, damp klæde. Brug ikke skrappe kemikalier.
2. Udskiftning af nåle
- Sørg for, at maskinen er taget ud af stikkontakten.
- Løsn nålen clamp skruen ved at dreje den mod uret.
- Fjern den gamle nål.
- Sæt en ny nål i med den flade side mod maskinens bagside, og skub den så langt op som muligt.
- Spænd nålen clamp skrue sikkert.
3. Presser Foot Replacement
- Sørg for, at maskinen er taget ud af stikkontakten.
- Løft trykfodsløfteren.
- Press the presser foot release lever (usually located at the back of the presser foot holder) to detach the current presser foot.
- Align the new presser foot with the presser foot holder and lower the presser foot lifter until it snaps into place.
Fejlfinding
| Problem | Mulig årsag | Løsning |
|---|---|---|
| Maskinen starter ikke | Power not connected; Speed switch in 'OFF' position; Foot pedal not connected or faulty. | Check power adapter and foot pedal connections. Ensure speed switch is set to 'L' or 'H' (if not using foot pedal) or 'OFF' (if using foot pedal). |
| Springet søm over | Incorrect needle size or type; Needle bent or dull; Incorrect threading; Fabric too thick. | Replace needle with correct type/size. Re-thread the machine carefully. Use appropriate needle for fabric thickness. |
| Tråd knækker | Incorrect thread tension; Poor quality thread; Needle bent or dull; Incorrect threading. | Adjust upper thread tension. Use good quality thread. Replace needle. Re-thread the machine. |
| Fabric puckering | Thread tension too high; Stitch length too short for fabric. | Reduce upper thread tension. Increase stitch length. |
| Spoletrådsfiltring | Bobbin incorrectly inserted; Upper thread tension too loose. | Re-insert bobbin correctly, ensuring thread unwinds counter-clockwise. Increase upper thread tension. |
Specifikationer
- Mærke: Uten
- Model: FR machine a coudre 508
- Farve: Hvid
- Materiale: Rustfrit stål, plast
- Produktvægt: 7.5 pund (ca. 3.4 kg)
- Strømkilde: Electric (Cable)
- Stingmønstre: 16 Indbygget
- Funktioner: Double thread, Double speed, Reverse sewing, Built-in light, Replaceable presser foot
Garanti og support
Information regarding product warranty and customer support was not provided in the product details. Please refer to your purchase documentation or contact the retailer for specific warranty terms and support options.