
TRONIC SMV9809
TRONIC 3-in-1 Detector SMV9809 User Manual
Model: SMV9809
1. Introduktion
Thank you for choosing the TRONIC 3-in-1 Detector, Model SMV9809. This device is designed to detect wood, metal, and live electrical voltage behind walls, ceilings, and floors. Please read this manual thoroughly before using the device to ensure safe and effective operation. Keep this manual for future reference.
2. Sikkerhedsinstruktioner
ADVARSEL: Manglende overholdelse af disse sikkerhedsinstruktioner kan resultere i elektrisk stød, brand eller alvorlig personskade.
- Gå altid ud fra, at der er strømførende ledninger bag væggene. Udvis ekstrem forsigtighed.
- Do not rely solely on the detector to locate live wires. Always turn off power to the area before drilling or cutting.
- The device is designed for indoor use only. Avoid exposure to moisture or extreme temperatures.
- Åbn eller modificer ikke enheden. Reparationer bør kun udføres af kvalificeret personale.
- Opbevar enheden utilgængeligt for børn.
- Rengør enheden med en tør, blød klud. Brug ikke slibende rengøringsmidler eller opløsningsmidler.
3. Produktet er slutview
The TRONIC SMV9809 detector features an LCD display and intuitive controls for easy operation.
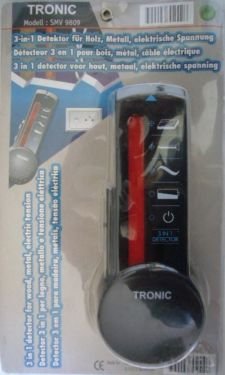
Figur 1: Forside view of the TRONIC 3-in-1 Detector SMV9809, showing the LCD screen and control buttons.
3.1 Komponenter
- LCD-skærm: Shows detection mode, signal strength, and battery status.
- Mode knap: Switches between Wood, Metal, and AC Voltage-detektionstilstande.
- Scan knap: Initiates the scanning process.
- Sensorområde: Located on the back of the device, this area must be placed flat against the surface for accurate detection.
- Batterirum: Placeret på bagsiden, til installation af batteri.
4. Opsætning
4.1 Batteriinstallation
The TRONIC SMV9809 requires a 9V battery (not included).
- Åbn batterirummets dæksel på bagsiden af enheden.
- Isæt et nyt 9V-batteri, og sørg for korrekt polaritet (+/-).
- Luk batterirummets dæksel forsvarligt.
Note: Replace the battery when the low battery indicator appears on the LCD display.
5. Betjeningsvejledning
5.1 Generelle driftstips
- Ensure the surface is dry and free of dust.
- Hold the device flat against the surface. Do not tilt or lift it during scanning.
- Bevæg enheden langsomt og støt hen over overfladen.
- Mark the detected areas with a pencil.
5.2 Wood Detection Mode
This mode is used to locate wood studs behind drywall or other common wall materials.
- Tryk på Mode knap until the "WOOD" indicator appears on the LCD.
- Place the device flat against the wall where you want to start scanning.
- Tryk og hold på Scan-knap. Wait for calibration (a beep may sound).
- Skub langsomt enheden vandret hen over overfladen.
- The signal strength indicator on the LCD will increase as you approach a wood stud. A distinct sound and full bar indication will signal the center of the stud.
5.3 Metal Detection Mode
This mode detects ferrous and non-ferrous metals, such as pipes, rebar, or conduit.
- Tryk på Mode knap until the "METAL" indicator appears on the LCD.
- Place the device flat against the wall.
- Tryk og hold på Scan-knap.
- Slowly slide the device horizontally.
- The signal strength will increase as you approach metal. A continuous tone and full bar indication will signal the presence of metal.
5.4 AC Voltage Detection Mode
CAUTION: This mode detects live, unshielded AC wires. Always confirm power is off before working.
- Tryk på Mode knap until the "AC" indicator appears on the LCD.
- Place the device flat against the wall.
- Tryk og hold på Scan-knap.
- Slowly slide the device horizontally.
- The signal strength will increase, and an audible alarm will sound when live AC voltage is detected. The "AC" symbol will flash on the display.
6. Vedligeholdelse
- Rensning: Wipe the device with a dry, soft cloth. Do not use liquids or chemical cleaners.
- Opbevaring: Store the device in a dry, dust-free environment at room temperature. Remove the battery if the device will not be used for an extended period.
- Udskiftning af batteri: Replace the 9V battery when the low battery indicator is displayed.
7. Fejlfinding
| Problem | Mulig årsag | Løsning |
|---|---|---|
| Enheden tændes ikke. | Dødt eller forkert installeret batteri. | Kontroller batteriets polaritet; udskift batteriet. |
| Upræcise aflæsninger. | Device not calibrated correctly; surface too wet/uneven; interference. | Ensure proper calibration (press and hold scan button on clear area); ensure dry, flat surface; avoid scanning near strong electromagnetic fields. |
| No detection in AC mode. | Wires are shielded or too deep; power is off. | Ensure power is on for the circuit; AC detection depth is limited. |
8. Specifikationer
- Model: SMV9809
- Registreringstilstande: Wood, Metal, AC Voltage
- Strømkilde: 9V batteri (medfølger ikke)
- Vise: LCD
- Materiale: Plast
- International beskyttelsesvurdering: IP66 (Dust tight and protected against powerful jets of water)
- Justerbar længde: Ja
9. Garanti og support
TRONIC products are manufactured to high-quality standards. For warranty information or technical support, please refer to the documentation provided with your purchase or contact your retailer. Keep your proof of purchase for any warranty claims.
Ask a question about this manual
Ask about setup, troubleshooting, compatibility, parts, safety, or missing instructions. Manuals+ will review the question and use this page’s manual context to help answer it.