
1. Introduktion
This manual provides comprehensive instructions for the installation, operation, and maintenance of your StarTech.com 4-Port Dual DisplayPort KVM Switch (SV431DPDDUA2). This device allows you to control up to four computers, each with dual DisplayPort outputs, from a single console consisting of two DisplayPort monitors, a USB keyboard, a USB mouse, and audio peripherals. It supports resolutions up to 4K at 60Hz, making it suitable for demanding multimedia and professional applications.
2. Hvad er der i æsken
- 1x SV431DPDDUA2 KVM Switch
- 1x Universal Power Adapter (NA/JP, EU, UK, ANZ)
- 1x hurtigstartguide
- 4 x gummifødder

3. Produktfunktioner
- Understøttelse af to skærme: Connects two DisplayPort monitors to a single console.
- High Resolutions: Supports dual 4K (3840x2160) resolution at 60Hz.
- 4-ports KVM: Control up to four computers from one workstation.
- Deling af periferiudstyr: Features separate 3.5 mm microphone and speaker ports, and two USB ports for sharing peripherals independently of the keyboard and mouse.
- Alsidig funktionalitet: Ideal for graphic design, video editing, CAD drawing, and other high-bandwidth applications.
- TAA-kompatibel: Meets Trade Agreements Act requirements.
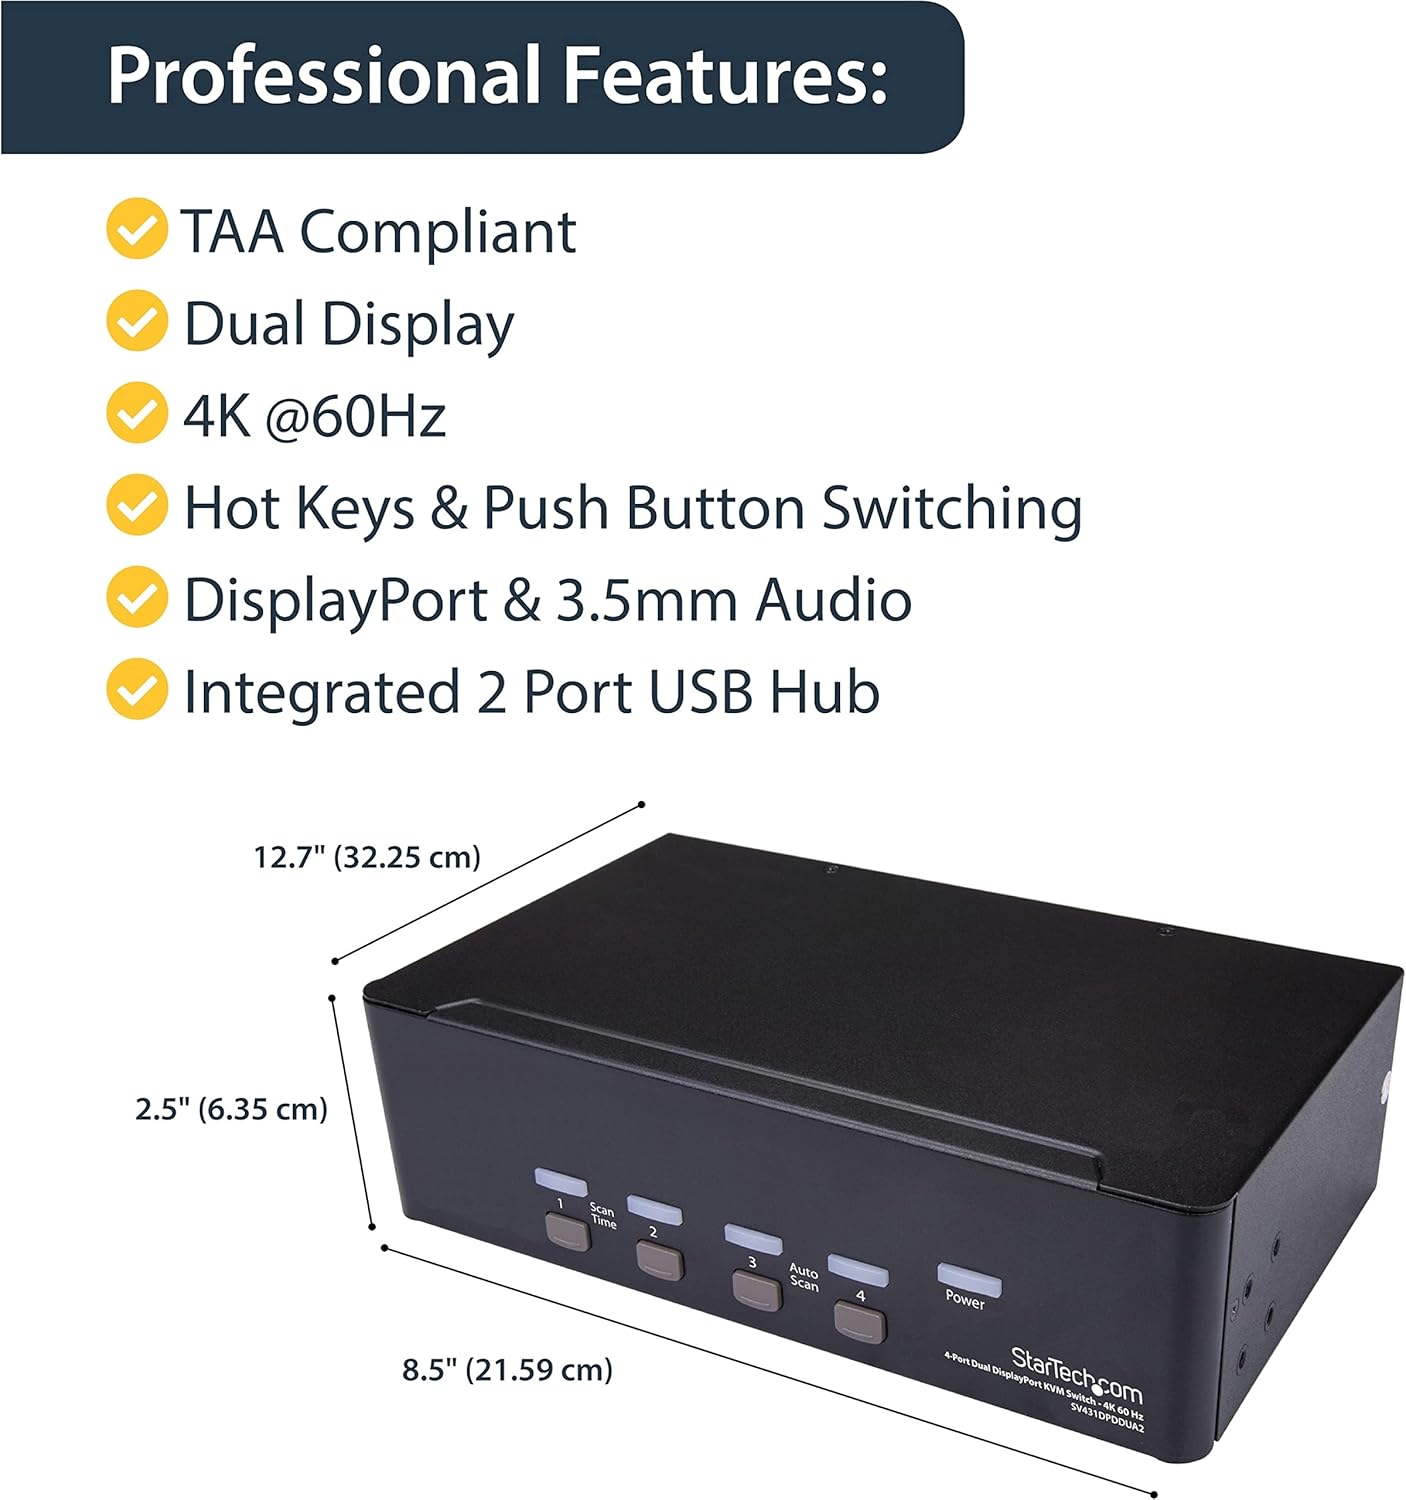
4. Produktet er slutview
4.1 Frontpanel

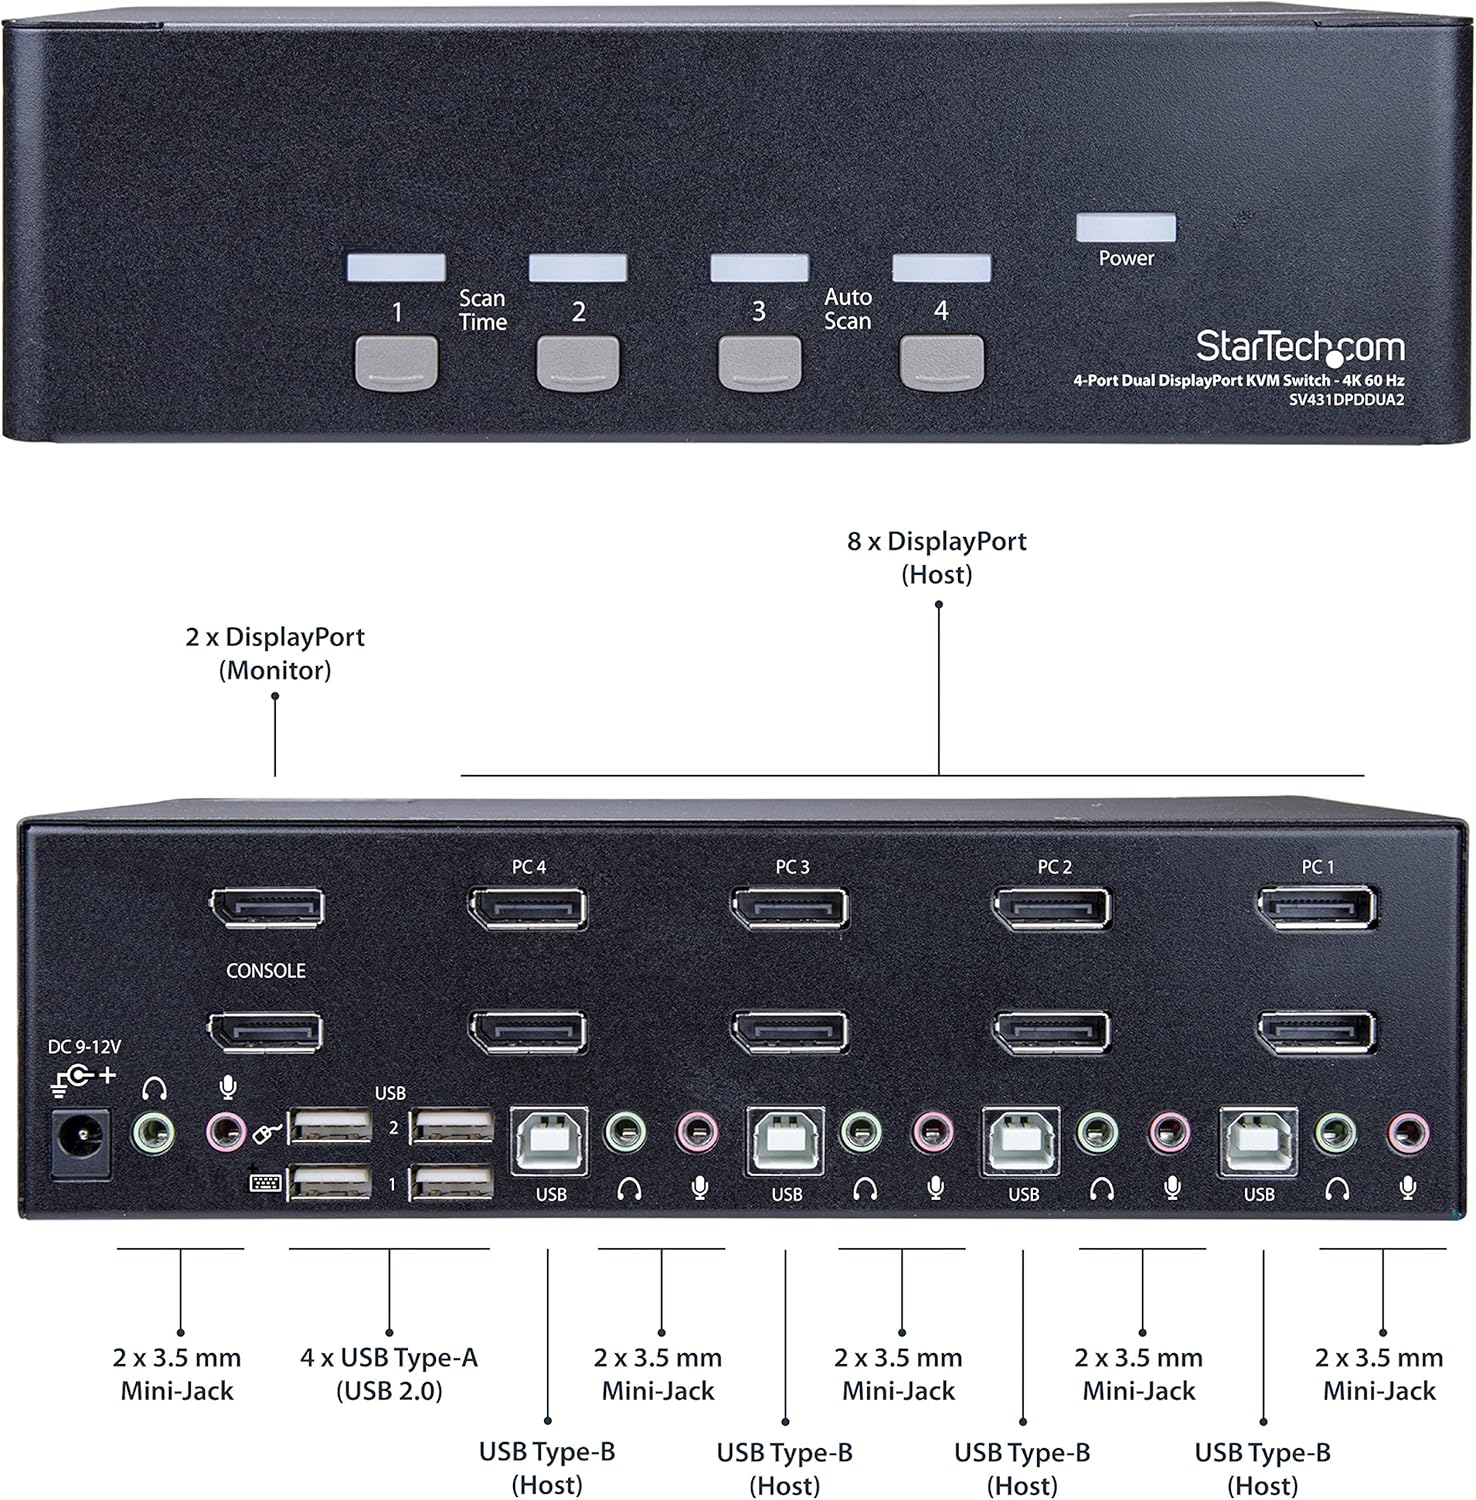
The front panel features four push buttons (1, 2, 3, 4) for direct port selection. Each button has an associated LED indicator. Additional buttons for 'Scan Time' and 'Auto Scan' are present, along with a 'Power' indicator LED.
4.2 Bagpanel

Bagpanelet har alle nødvendige tilslutningsporte:
- DC 9-12V strømindgang: For connecting the universal power adapter.
- Konsolporte: Two DisplayPort outputs for connecting your primary and secondary monitors.
- USB Ports (Console): Two dedicated USB-A ports for keyboard and mouse, and two additional USB-A ports for other peripherals.
- Audio Jacks (Console): 3.5mm jacks for microphone and speakers.
- PC Input Ports (1-4): Each PC input includes two DisplayPort inputs, one USB-B input, and 3.5mm audio jacks for microphone and speakers.
5. Opsætning
Følg disse trin for at konfigurere din KVM-switch:
- Sluk alle enheder: Ensure all computers, monitors, and the KVM switch are powered off before making any connections.
- Tilslut skærme: Connect your two DisplayPort monitors to the 'CONSOLE' DisplayPort output ports on the rear of the KVM switch.
- Tilslut konsoludstyr: Connect your USB keyboard and mouse to the dedicated USB-A ports on the rear panel. Connect your microphone and speakers to the respective 3.5mm audio jacks in the 'CONSOLE' section.
- Tilslut computere: For each computer (up to four), connect:
- Two DisplayPort cables from the computer's video outputs to the corresponding 'PC' DisplayPort inputs on the KVM switch.
- One USB-B cable from a USB-A port on the computer to the corresponding USB-B input for that PC on the KVM switch.
- 3.5mm audio cables from the computer's audio output/input to the corresponding audio jacks for that PC on the KVM switch (optional).
- Tilslut strøm: Connect the universal power adapter to the 'DC 9-12V' input on the KVM switch, then plug it into a power outlet.
- Tænd: Power on the KVM switch, then power on your monitors, and finally power on your connected computers.


6. Betjeningsvejledning
6.1 Skift mellem computere
Du kan skifte mellem tilsluttede computere på to måder:
- Knapper på frontpanelet: Press the corresponding numbered button (1, 2, 3, or 4) on the front panel of the KVM switch to select the desired computer.
- Genvejstaster: Use keyboard hotkey commands. The default hotkey sequence is to press the Scroll Lock key twice, followed by the port number (1, 2, 3, or 4). For example, to switch to PC 2, press Scroll Lock, Scroll Lock, 2.
6.2 Auto Scan Function
The 'Auto Scan' feature allows the KVM switch to automatically cycle through all connected computers, displaying each for a set duration. To activate or adjust this feature, refer to the detailed instructions in the included Quick Start Guide or the full product manual available on the StarTech.com webwebsted.
7. Vedligeholdelse
For at sikre optimal ydeevne og levetid for din KVM-switch:
- Rensning: Brug en blød, tør klud til at rengøre enhedens yderside. Undgå flydende rengøringsmidler eller opløsningsmidler.
- Ventilation: Sørg for, at KVM-switchen er placeret et godt ventileret område for at forhindre overophedning. Bloker ikke ventilationsåbninger.
- Miljøforhold: Operate the device within the specified temperature range (0°C to 45°C) and humidity levels.
- Kabelstyring: Keep cables organized and avoid excessive bending or tension to prevent damage to connectors and ports.
8. Fejlfinding
If you encounter issues with your KVM switch, refer to the following common solutions:
- No Display on Monitor(s):
- Verify all DisplayPort cables are securely connected between the computers, KVM, and monitors.
- Ensure the KVM switch is powered on and the correct input port is selected.
- Test monitors by connecting them directly to a computer to rule out monitor or cable issues.
- If a monitor does not wake from sleep, try switching to another port and then back, or power cycling the monitor.
- Tastatur/mus reagerer ikke:
- Ensure the USB keyboard and mouse are connected to the dedicated console USB ports.
- Verify the USB-B cables are securely connected from each computer to the KVM switch.
- Prøv at tilslutte tastaturet/musen direkte til computeren for at bekræfte funktionaliteten.
- Some specialized keyboards/mice with integrated hubs or unique drivers may require connection to the shared USB ports or direct connection to the computer.
- Ingen lyd eller dårlig lydkvalitet:
- Check all 3.5mm audio cables for secure connections.
- Ensure audio settings on the connected computers are correctly configured for the KVM's audio output/input.
- Test audio devices by connecting them directly to a computer.
- Switching Delays or Inconsistencies:
- Ensure high-quality DisplayPort and USB cables are used. Cable quality can impact performance, especially with 4K resolutions.
- If experiencing occasional failures to switch, try pressing input buttons 1 and 3 simultaneously to reset the KVM, then select the desired port.
9. Specifikationer
| Feature | Specifikation |
|---|---|
| Model | SV431DPDDUA2 |
| Antal havne | 4 |
| Video interface | DisplayPort 1.2 |
| Maksimal opløsning | 4K (3840x2160) ved 60Hz |
| USB interface | USB 2.0 (Dedicated for HID), USB 2.0 (Shared) |
| Lydgrænseflade | 3.5mm Mini-Jack (Microphone, Speaker) |
| Kontrolmetode | Trykknap, genvejstaster |
| Materiale | Stål |
| Varedimensioner (L x B x H) | 8.5 x 5 x 2.5 tommer (21.59 x 12.7 x 6.35 cm) |
| Varens vægt | 2.64 pund (1.2 kg) |
| Strømforbrug | 18 watt |
| Driftstemperatur | 0°C til 45°C (32°F til 113°F) |
| Certificeringer | RoHS, WEEE |
10. Garanti og support
Dette StarTech.com-produkt er understøttet af en 2-års garanti. For the most current warranty information and technical support, please visit the official StarTech.com website or contact their customer service department. Support resources typically include online FAQs, driver downloads, and direct contact options via phone or live chat.