1. Produktet er slutview
The Cloudray 60W CO2 Laser Power Supply (Model: MYJG-60W 110V) is designed for compatibility with 55W-60W CO2 laser tubes, commonly used in laser engraving and cutting machines. This power supply offers quick response, high performance, and features essential safety mechanisms to ensure reliable operation and extend the lifespan of your laser tube.

Key features include versatile compatibility, effortless control via TTL level signals, and robust protection features such as output open circuit protection and water flow indication. An external LCD ammeter allows for real-time monitoring of current and status, with a trimmer potentiometer for precise adjustments.

2. Sikkerhedsoplysninger
Always prioritize safety when working with laser equipment. This power supply generates high voltage and current. Only qualified personnel should perform installation, maintenance, and troubleshooting. Ensure proper grounding and follow all local electrical codes.
- Høj voltage Advarsel: Åbn ikke strømforsyningen casing mens den er tilsluttet strøm.
- Korrekt jording: Ensure the power supply and laser machine are correctly grounded.
- Vandkøling: Verify the water cooling system for the laser tube is functioning correctly before operation. The power supply includes a water through signal indication.
- Nødstop: Familiarize yourself with the emergency stop procedures of your laser machine.
3. Installation og opsætning
Careful installation is crucial for optimal performance and safety. Refer to the wiring diagrams and specifications provided.
3.1 Fysisk installation
Mount the power supply securely within your laser machine's enclosure, ensuring adequate ventilation. The unit is designed for forced air cooling (fan cooling).
3.2 Ledningsforbindelser
Connect the power supply to your laser tube and control system according to the following guidelines:
- AC-indgang: Connect the 110V AC power source to the FG, AC, and AC terminals.
- Høj voltage Output: Connect the LASER output terminal to the anode (+) of the CO2 laser tube. The cathode (-) of the laser tube connects to the power supply's ground.
- Kontrolsignaler: The power supply supports TTL-level signals for control.
- Vandbeskyttelse: Connect your water protection sensor to the designated terminals (P).
- Ammeter Connection: Connect the external ammeter to monitor current output.


4. Betjening
Once installed and wired correctly, the power supply is ready for operation.
4.1 Tænd og sluk
Ensure all connections are secure before applying power. Use the main power switch of your laser machine to turn the system on or off. The power supply will activate in conjunction with the machine.
4.2 Laser Output Control
The laser output is controlled via TTL level signals from your laser machine's control board. The power supply responds quickly to these signals for precise laser firing.
4.3 Monitoring with LCD Ammeter
The external LCD ammeter provides real-time feedback on the processing current and status, including water protection and laser signal indications. Use the trimmer potentiometer on the ammeter to fine-tune the current as needed for different materials and applications.

4.4 Manual Output Test
A convenient button is included on the power supply to manually check the output laser. This is useful for testing connections or the laser tube itself. Use extreme caution and appropriate laser safety eyewear when performing this test.
5. Vedligeholdelse
Regular maintenance ensures the longevity and consistent performance of your power supply.
- Rensning: Periodically clean the exterior of the power supply, especially the fan vents, to prevent dust buildup that can impede cooling. Use a soft, dry cloth. Do not use liquid cleaners.
- Ventilation: Ensure the power supply has adequate airflow around it. Do not block the ventilation openings.
- Tilslutningskontrol: Kontrollér regelmæssigt alle ledningsforbindelser for tæthed og tegn på slid eller korrosion.
- Miljøforhold: Operate the power supply within the specified environmental temperature range (-30°C to +65°C) to prevent overheating.
6. Fejlfinding
Dette afsnit omhandler almindelige problemer, du kan støde på.
- Ingen laseroutput:
- Check power supply input voltage.
- Verify water protection sensor is active and water is flowing.
- Ensure TTL control signals are correctly connected and active.
- Check the laser tube for damage or signs of failure.
- Use the manual test button on the power supply to check for output.
- Unstable Output Current:
- Inspect all high voltage connections for loose contacts.
- Check the laser tube for signs of aging or degradation.
- Sørg for, at input voltage er stabil.
- Power Supply Overheating:
- Verify the cooling fan is operating correctly and not obstructed.
- Sørg for tilstrækkelig ventilation omkring enheden.
- Tjek den omgivende temperatur.
For issues not covered here, or if problems persist, contact Cloudray customer support.
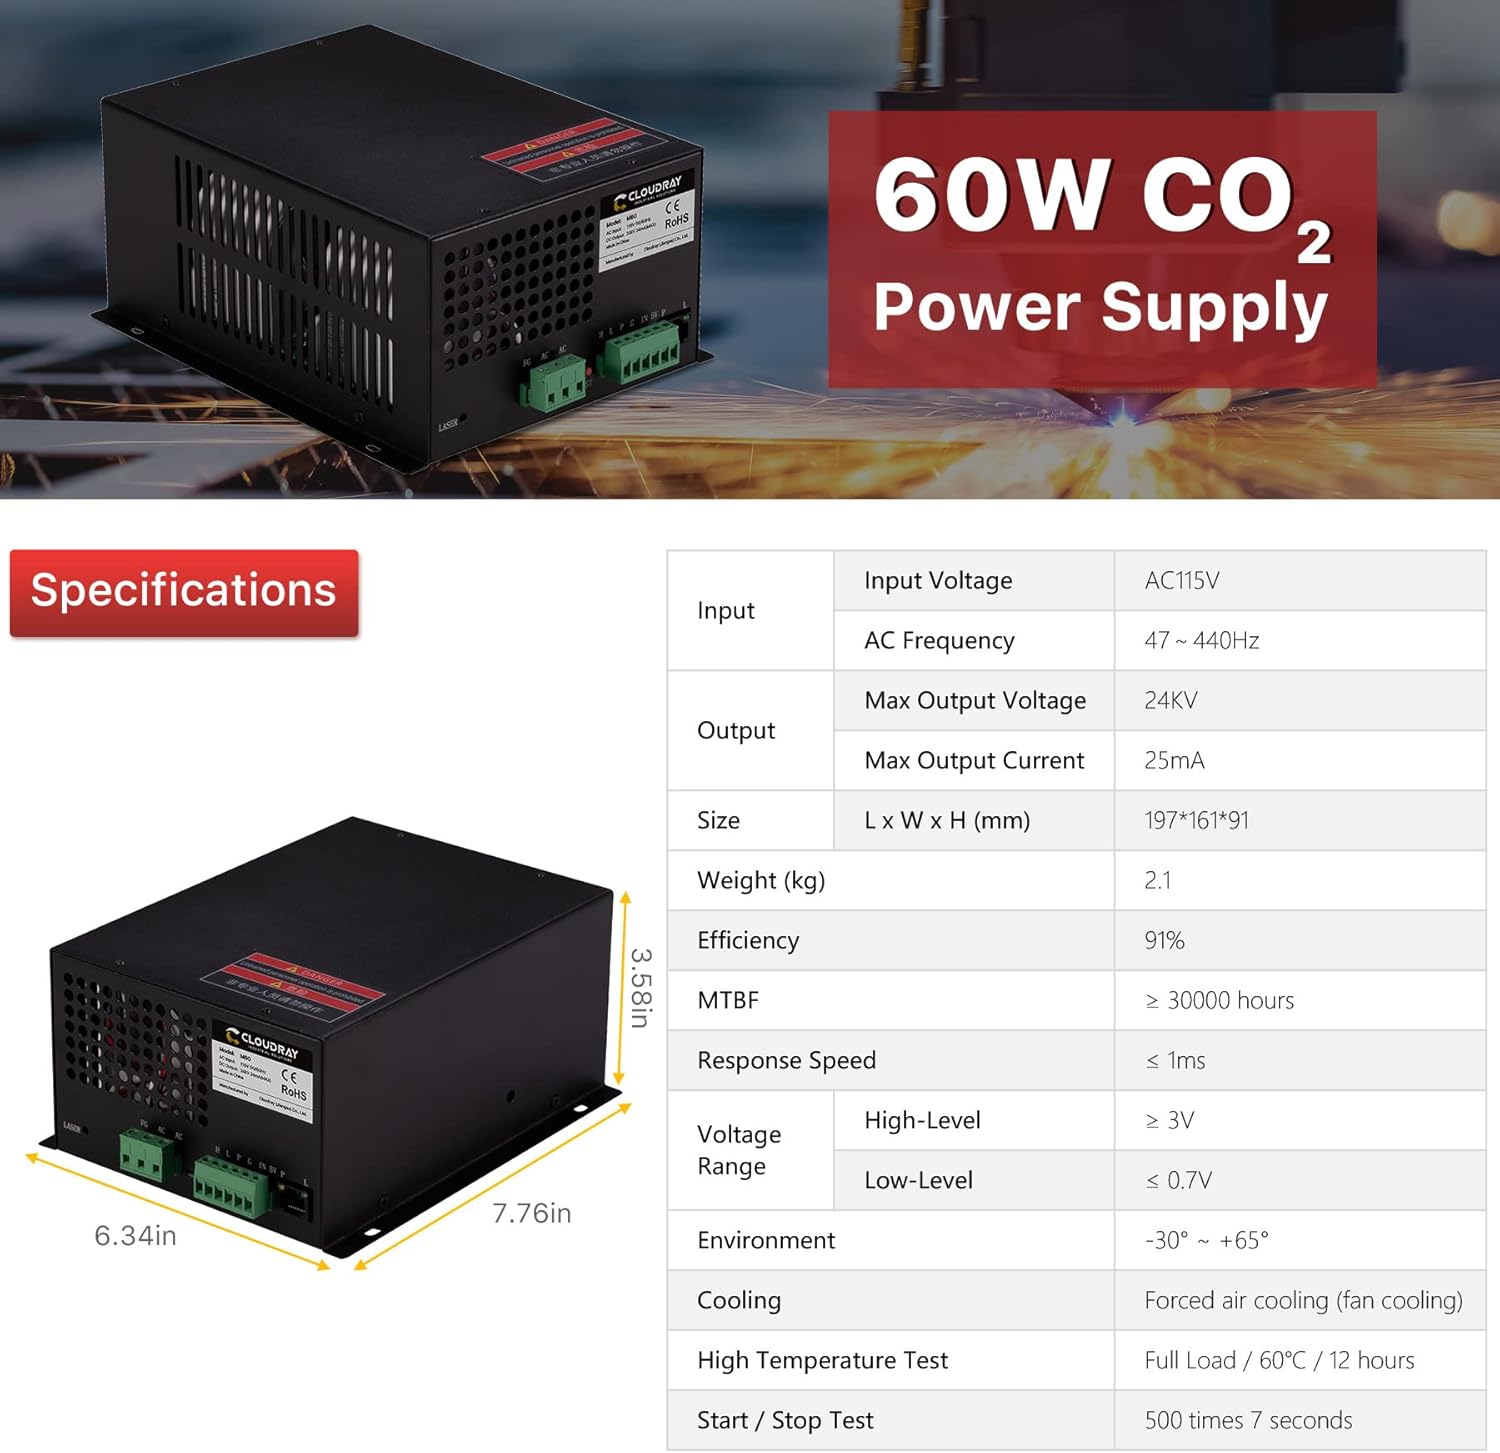
7. Specifikationer
Detailed technical specifications for the Cloudray 60W CO2 Laser Power Supply MYJG-60W 110V.
| Parameter | Værdi |
|---|---|
| Input bindtage | AC115V |
| AC frekvens | 47 ~ 440Hz |
| Maks. Output voltage | 24 KV |
| Maks. Udgangsstrøm | 25mA |
| Størrelse (L x B x H) | 197 x 161 x 91 mm (7.76 x 6.34 x 3.58 tommer) |
| Vægt | 2.1 kg (4.63 lbs) |
| Effektivitet | 91 % |
| MTBF (Mean Time Between Failures) | ≥ 30000 timer |
| Responshastighed | ≤ 1 ms |
| Voltage Range (High-Level) | ≥ 3V |
| Voltage Range (Low-Level) | ≤ 0.7V |
| Omgivelsestemperatur | -30°C ~ +65°C |
| Afkølingsmetode | Forced air cooling (fan cooling) |
| Høj temperatur test | Full Load / 60°C / 12 hours |
| Start / Stop Test | 500 gange 7 sekunder |
8. Garanti og support
Cloudray stands behind the quality of its products. For warranty information, technical support, or service inquiries, please contact Cloudray customer service through their official channels or visit their website. Please have your product model number (MYJG-60W 110V) and purchase details ready when contacting support.