
Klip xtreme KPM-300
Klip Xtreme KPM-300 Enkeltskærms bordmonteringsvejledning
Model: KPM-300 | Brand: Klip Xtreme
1. Introduktion
This manual provides detailed instructions for the installation, operation, and maintenance of your Klip Xtreme KPM-300 Single Monitor Desk Mount. This mount is designed to support a single monitor, allowing for adjustable positioning to enhance ergonomic comfort and reclaim desktop space. It is compatible with screens ranging from 13 to 32 inches and weighing up to 17.6 lbs (8 kg).
The KPM-300 features a sturdy C-clamp base for secure attachment to a desk or table edge, and also supports grommet mounting. Its fully articulating arm allows for tilt, swivel, and rotation adjustments, providing flexibility in viewing angles. Integrated cable management clips help maintain an organized workspace.
2. Sikkerhedsoplysninger
- Vægt kapacitet: Do not exceed the maximum weight capacity of 17.6 lbs (8 kg). Overloading may result in instability and potential damage or injury.
- Skærmstørrelse: This mount is designed for monitors between 13 and 32 inches. Ensure your monitor falls within this range.
- VESA-kompatibilitet: Verify that your monitor has VESA mounting patterns of 75x75mm or 100x100mm. Attempting to mount a non-compatible monitor may cause damage.
- Skrivebords tykkelse: Ensure your desk surface is strong enough to support the combined weight of the mount and monitor. For C-clamp installation, the desk thickness must be within the specified range (refer to specifications).
- Sikker installation: Ensure all screws and bolts are securely tightened before use. Periodically check for tightness.
- Forsamling: Follow all assembly instructions carefully. If you encounter difficulties, seek professional assistance.
- Bevægelige dele: Be aware of pinch points when adjusting the mount. Keep hands clear of moving parts.
3. Pakkens indhold
Kontroller venligst, at alle komponenter er til stede og ubeskadigede, før du fortsætter installationen.
- Skærmarmsamling
- Skrivebordsstang
- C-Clamp Grundlag
- Grommet-monteringskomponenter
- VESA-plade
- Hardware Kit (various screws, washers, Allen keys)
- Kabelhåndteringsklip

Figur 1: Overview of the Klip Xtreme KPM-300 monitor desk mount, showing the articulating arm, pole, and C-clamp base. Small inset circles indicate both C-clamp and grommet mounting options are available.
4. Opsætning og installation
4.1 Vælg monteringsmetode
The KPM-300 supports two installation methods: C-clamp or grommet mount. Select the method best suited for your desk.
4.1.1C-Clamp Installation
- Fastgør C-clamp base to the bottom of the desk pole.
- Placer den samlede clamp and pole at the desired location on your desk edge.
- Spænd C-clamp skru den fast, indtil beslaget er sikkert fastgjort til skrivebordet. Sørg for, at det er stabilt og ikke vipper.
4.1.2 Montering af rørbeslag
- If your desk has an existing grommet hole, remove the cover. If not, drill a hole of appropriate diameter (refer to specifications for hole size).
- Insert the grommet bolt through the desk hole.
- Attach the grommet plate and nut from underneath the desk, tightening until the mount is secure.

Figur 2: Bag view of the monitor mount's pole and C-clamp mechanism, illustrating how it attaches to the edge of a desk. This image highlights the stability provided by the clamp.
4.2 Assemble Arm and Attach to Pole
- Slide the monitor arm assembly onto the desk pole.
- Adjust the arm to the desired height and secure it using the provided locking mechanism or screw.
4.3 Fastgør VESA-pladen til monitoren
- Remove the VESA plate from the monitor arm by loosening the quick-release screw.
- Juster VESA-pladen med monteringshullerne på bagsiden af din skærm.
- Using the appropriate screws and washers from the hardware kit, securely attach the VESA plate to your monitor. Do not overtighten.

Figur 3: En detaljeret view of the articulating joint on the monitor arm and the VESA mounting plate. This illustrates the connection point for the monitor and the flexibility of the arm's movement.
4.4 Mount Monitor to Arm
- Carefully slide the monitor (with the attached VESA plate) onto the monitor arm's VESA bracket.
- Ensure the monitor is fully seated and secure the quick-release screw to lock it in place.
4.5 Kabelstyring
Utilize the integrated cable management clips along the arm and pole to route your monitor cables neatly. This helps to reduce clutter and maintain a clean workspace.
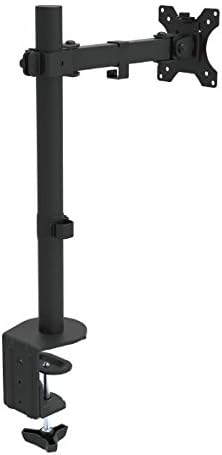
Figur 4: En vinklet view of the fully assembled monitor desk mount, showing the pole, articulating arm, and VESA plate ready to receive a monitor. This image provides a perspective of the mount's overall structure.
5. Betjening og justeringer
The KPM-300 offers various adjustment options to customize your viewoplevelse:
- Højdejustering: Loosen the locking mechanism on the pole to slide the arm up or down to your desired height. Re-tighten to secure.
- Justering af hældning: The monitor can be tilted +45° to -45° (90° total range) to reduce glare and optimize viewing angles. Loosen the tilt knob on the VESA plate, adjust, and re-tighten.
- Drejejustering: The arm can swivel +90° to -90° (180° total range) at the pole and arm joints, allowing you to share your screen or change viewing retning.
- Rotationsjustering: The VESA plate allows for 360° rotation, enabling you to switch your monitor between landscape and portrait orientations without removing it.
- Spændingsjustering: Each joint can be tightened or loosened individually using the provided Allen keys. Adjust the tension to achieve the desired fluidity or stability of movement for your monitor's weight.
6. Vedligeholdelse
- Rensning: Rengør holderen med en blød kludamp klud. Undgå slibende rengøringsmidler eller opløsningsmidler, der kan beskadige overfladen.
- Periodiske kontroller: Kontroller regelmæssigt alle skruer, bolte og klude.amp mechanisms to ensure they remain tight and secure. Re-tighten as necessary to maintain stability.
- Smøring: No lubrication is typically required for the moving parts. If movement becomes stiff, check for debris or overtightened joints.
7. Fejlfinding
7.1 Monitor Sags or Does Not Hold Position
- Tjek vægt: Ensure your monitor's weight does not exceed the maximum capacity of 17.6 lbs (8 kg).
- Juster spænding: Use the provided Allen keys to tighten the tension screws at the articulating joints, particularly the tilt and swivel points, until the monitor holds its position.
7.2 Mount is Unstable or Wobbles
- Sikker Clamp/Grommet: Spænd C-cl'en igenamp or grommet bolt to ensure the base is firmly attached to the desk.
- Skrivebordsstabilitet: Ensure your desk itself is stable and not prone to wobbling.
- Polforbindelse: Verify that the arm assembly is securely fastened to the pole.
7.3 Difficulty Attaching Monitor to VESA Plate
- VESA-kompatibilitet: Double-check that your monitor's VESA pattern is 75x75mm or 100x100mm.
- Skruelængde: Ensure you are using the correct length screws from the hardware kit. Screws that are too long can damage the monitor; too short will not secure it.
8. Specifikationer
| Modelnummer | KPM-300 |
| Skærmstørrelseskompatibilitet | 13 til 32 tommer |
| Maksimal belastningskapacitet | 17.6 lbs (8 kg) |
| VESA-kompatibilitet | 75x75mm, 100x100mm |
| Tilt vinkel | +45° to -45° (90° total) |
| Drejevinkel | +90° to -90° (180° total) |
| Rotationsjustering | 360° |
| Maksimal højde | 21.5 tommer |
| Monteringstype | C-Clamp, Grommet Base |
| Materiale | Stål og plastik |
| Farve | Sort |
| Produktmål (LxBxH) | 4.4 x 13.5 x 21.5 cm (omtrentligt, samlet) |
| Item Weight (with hardware) | 6.6 lbs |
| UPC | 798302077874 |
9. Garanti og support
The Klip Xtreme KPM-300 Monitor Desk Mount comes with a Livstidsgaranti. For warranty claims or technical support, please refer to the contact information provided with your purchase documentation or visit the official Klip Xtreme webwebsted.
Relaterede dokumenterKPM-300


Ask a question about this manual
Ask about setup, troubleshooting, compatibility, parts, safety, or missing instructions. Manuals+ will review the question and use this page’s manual context to help answer it.