Best Choice Products VD-22769BKEP
Brugermanual
Best Choice Products Portable Countertop Ice Maker
Model: VD-22769BKEP
1. Introduktion
Tak for købetasing the Best Choice Products Portable Countertop Ice Maker. This appliance is designed to provide you with a convenient and efficient way to produce fresh ice cubes quickly. Its compact design makes it suitable for various settings, including kitchens, offices, apartments, and dorm rooms. Please read this manual thoroughly before operating the ice maker to ensure safe and optimal performance.
2. Sikkerhedsoplysninger
To reduce the risk of fire, electric shock, or injury when using your ice maker, follow these basic safety precautions:
- Læs alle instruktioner før brug.
- Rør ikke ved fordamperen eller isbladene, når enheden er i drift.
- Do not immerse the power cord, plug, or any part of the unit in water or other liquids.
- Tæt opsyn er nødvendigt, når apparatet bruges af eller i nærheden af børn.
- Tag stikket ud af stikkontakten, når ismaskinen ikke er i brug, og før rengøring.
- Betjen ikke noget apparat med en beskadiget ledning eller stik, eller efter at apparatet ikke fungerer korrekt eller er blevet beskadiget på nogen måde.
- Må ikke bruges udendørs.
- Må ikke placeres på eller i nærheden af en varm gas- eller elektrisk brænder eller i en opvarmet ovn.
- Ensure proper ventilation around the unit. Maintain at least 6 inches of space on all sides for adequate airflow.
- Brug kun drikkevand i reservoiret.
- Important: After delivery, allow the ice maker to stand upright for at least 1 hour before plugging it in. This allows the refrigerant to settle.
3. Produktet er slutview
Familiarize yourself with the components of your ice maker:

Figur 3.1: Forside View med kontrolpanel

Figure 3.2: Interior Components

Figur 3.3: Side View with Ventilation

Figure 3.4: Ice Basket and Scoop
Komponenter:
- Kontrolpanel: Features indicator lights for "Add Water" and "Ice Full," along with "Power" and "Select" buttons.
- Vandreservoir: Located beneath the ice basket, holds water for ice production.
- Iskurv: Removable basket for collecting produced ice cubes.
- Ice Scoop: Inkluderet for nem isudtagning.
- Luftudluftning: Located on the side, essential for proper heat dissipation.
- Bundprop: Placeret i bunden til dræning af vand.
4. Opsætning
- Pakker ud: Carefully remove all packaging materials and check for any damage. Ensure all accessories (ice basket, scoop) are present.
- Ren: Before first use, clean the interior of the ice maker, including the water reservoir, ice basket, and scoop, with a soft cloth and mild detergent. Rinse thoroughly and dry.
- Placering: Place the ice maker on a flat, stable, and level surface away from direct sunlight and heat sources. Ensure there is at least 6 inches of clear space around the unit for proper ventilation.
- Kølemiddelaflejring: After transporting or receiving the unit, allow it to stand upright for at least 1 hour before plugging it into a power outlet. This allows the refrigerant system to stabilize.
- Strømtilslutning: Plug the ice maker into a grounded 120V electrical outlet.
5. Betjeningsvejledning
- Fyld vandbeholder: Åbn låget, og fyld vandbeholderen med drikkevand op til MAX-mærket. Overfyld ikke.
- Tænd: Press the "POWER" button to turn on the ice maker. The "POWER" indicator light will illuminate.
- Vælg isstørrelse: Press the "SELECT" button to choose your desired ice cube size: Small (S) or Large (L). The corresponding indicator light will illuminate.
- Isproduktion: The ice maker will begin its cycle. The first batch of ice may take slightly longer to produce (approximately 6-13 minutes, depending on water temperature and selected size). Subsequent cycles will be faster.
- Is fuld indikator: When the ice basket is full, the "ICE FULL" indicator light will illuminate, and the ice production will automatically pause. Remove ice from the basket to resume production.
- Tilføj vand-indikator: If the water level in the reservoir is too low, the "ADD WATER" indicator light will illuminate, and the unit will stop producing ice. Refill the reservoir with water to resume operation.
- Hent is: Use the provided ice scoop to remove ice from the basket. For best results, transfer ice to a freezer for long-term storage as the ice maker is not a freezer and ice will melt over time.
- Sluk: Press the "POWER" button again to turn off the ice maker.
6. Vedligeholdelse
Regelmæssig rengøring og vedligeholdelse vil forlænge levetiden på din ismaskine.
Rengøring af interiøret:
- Tag enheden ud af stikkontakten.
- Fjern iskurven.
- Tøm eventuelt resterende vand fra beholderen ved at fjerne aftapningsproppen, der er placeret i bunden af enheden.
- Rengør det indvendige med en blød klud dampened with a mixture of water and mild vinegar or a non-abrasive cleaner.
- Rinse thoroughly by filling the reservoir with clean water and draining it a few times.
- Dry all interior surfaces thoroughly before reassembling.
Rengøring af ydersiden:
- Tør ydersiden af med en blød, damp klæde. Brug ikke skrappe kemikalier eller slibende rengøringsmidler.
- Ensure the air vents are clear of dust and debris to maintain proper airflow.
Opbevaring:
- If storing for an extended period, ensure the unit is completely drained and dry.
- Opbevares på et køligt, tørt sted.
7. Fejlfinding
| Problem | Mulig årsag | Løsning |
|---|---|---|
| Indikatorlampen for "TILFØJ VAND" lyser. | Vandbeholderen er tom, eller vandstanden er for lav. | Tilsæt drikkevand til beholderen op til MAX-påfyldningslinjen. |
| Indikatorlampen for "ICE FULD" lyser. | Iskurven er fuld. | Fjern is fra kurven. |
| Ice cubes are too small or wet. | Water temperature is too high; ambient temperature is too warm. | Use colder water. Ensure the unit is in a cooler, well-ventilated area. Allow several cycles for optimal ice formation. |
| Ismaskinen producerer ikke is. | No water, ice full, or unit malfunction. | Check water level. Check if ice basket is full. If issues persist, unplug for 10 minutes and restart. |
| Enheden tænder ikke. | Ingen strøm. | Check power cord connection and wall outlet. Try a different outlet. |
8. Specifikationer
| Feature | Detalje |
|---|---|
| Modelnummer | VD-22769BKEP |
| Overordnede dimensioner | 14" (L) x 9.5" (W) x 13" (H) / 35.56 x 24.13 x 33.02 cm |
| Vandbeholderkapacitet | 2.3 qt |
| Daglig isproduktion | Op til 26 lbs (11.79 kg) |
| Vægt | 21 lbs (ca. 9.5 kg) |
| Materiale | Plastic (Exterior), Stainless Steel (Internal components) |
| Magt | 120V AC |
| Certificeringer | ETL-listed, meets CSA and UL standards |
| UPC | 842957100149 |
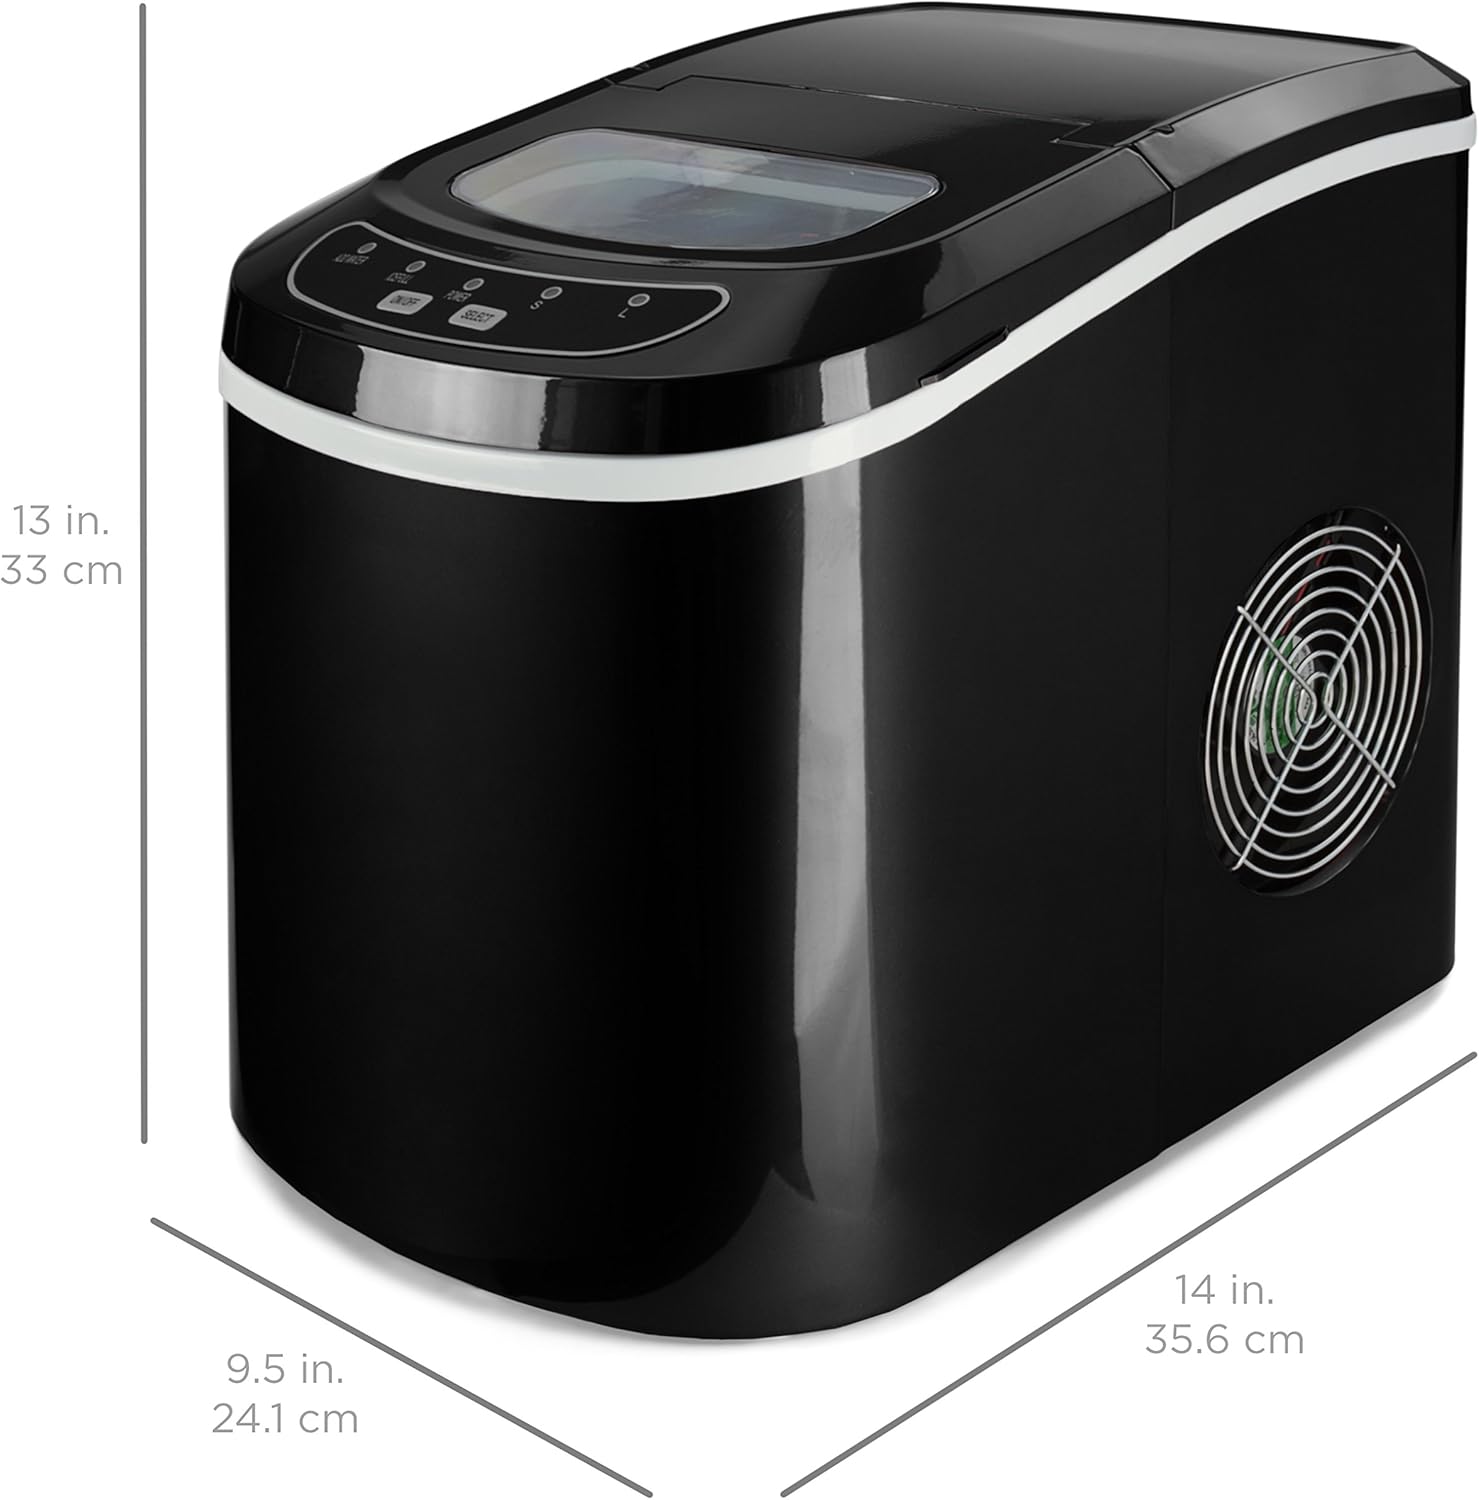
Figur 8.1: Produktmål
9. Garanti og support
For warranty information or technical support, please contact Best Choice Products customer service. Keep your purchase receipt for warranty claims.
Kontaktoplysninger kan typisk findes på producentens officielle webwebstedet eller på produktemballagen.
Ask a question about this manual
Ask about setup, troubleshooting, compatibility, parts, safety, or missing instructions. Manuals+ will review the question and use this page’s manual context to help answer it.