1. Introduktion og overview
Thank you for choosing the KLH Bassbite-II Powered Subwoofer. This unit is designed to enhance the low-frequency response of your existing audio system, providing deep, rich bass for an immersive listening experience. This manual provides essential information for the safe and effective operation of your subwoofer.
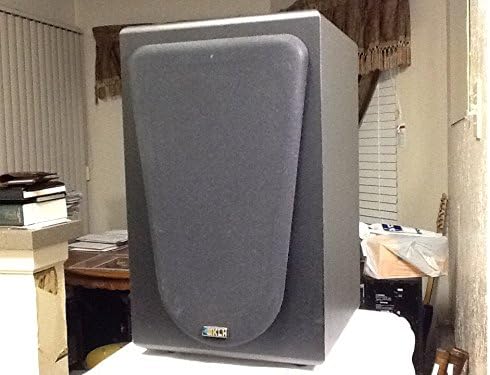
Figur 1.1: Forside view of the KLH Bassbite-II Powered Subwoofer with grille.
This image shows the front of the KLH Bassbite-II subwoofer, featuring its dark gray cabinet and a removable front grille that covers the speaker driver. The KLH logo is visible at the bottom of the grille.
2. Vigtige sikkerhedsinstruktioner
Please read and follow all safety instructions before operating the subwoofer to prevent electric shock, fire, or injury.
- Læs instruktionerne: Læs alle sikkerheds- og betjeningsvejledninger, før apparatet tages i brug.
- Gem instruktionerne: Gem sikkerheds- og betjeningsvejledningen til fremtidig reference.
- Vær opmærksom på advarsler: Overhold alle advarsler på apparatet og i brugsanvisningen.
- Følg instruktionerne: Følg alle betjenings- og brugsanvisninger.
- Vand og fugt: Brug ikke dette apparat i nærheden af vand.
- Rensning: Rengør kun med en tør klud.
- Ventilation: Bloker ikke ventilationsåbninger. Installer i overensstemmelse med producentens anvisninger.
- Varme: Må ikke installeres i nærheden af varmekilder såsom radiatorer, varmeapparater, komfurer eller andre apparater (inklusive ampløftere), der producerer varme.
- Strømledningsbeskyttelse: Beskyt netledningen mod at blive trådt på eller klemt, især ved stik, stikkontakter og det sted, hvor de kommer ud af apparatet.
- Lyn: Træk stikket ud af dette apparat under tordenvejr, eller når det ikke skal bruges i længere perioder.
- Service: Overlad al service til kvalificeret servicepersonale. Service er påkrævet, når apparatet er blevet beskadiget på nogen måde, såsom strømforsyningsledning eller stik er beskadiget, væske er blevet spildt, eller genstande er faldet ind i apparatet, apparatet har været udsat for regn eller fugt, ikke fungerer normalt , eller er blevet droppet.
3. Pakkens indhold
Tjek venligst pakken for følgende varer:
- KLH Bassbite-II Powered Subwoofer
- Strømkabel (medfølger)
Hvis der mangler eller er beskadigede varer, bedes du kontakte din forhandler.
4. Opsætning
4.1. Placering
The placement of your subwoofer can significantly affect its sound performance. Experiment with different locations to find the best bass response for your room.
- Hjørneplacering: Placing the subwoofer in a corner of the room can often maximize its output and provide the most impactful bass.
- Near Front Speakers: Placing the subwoofer near your main front speakers can help create a more seamless soundstage.
- Undgå forhindringer: Ensure the subwoofer is not placed in an enclosed cabinet or directly against a wall that might block its port (if applicable) or restrict airflow.
4.2. Forbindelser
The KLH Bassbite-II subwoofer offers multiple connection options to integrate with your audio system. Ensure all components are turned off before making any connections.

Figure 4.1: Rear panel of the KLH Bassbite-II Subwoofer.
This image displays the rear panel of the subwoofer, featuring the speaker level inputs/outputs ("FROM AMPLIFIER", "TO SPEAKERS"), RCA low-level inputs, a power switch, and a volume control knob. The attached power cord is also visible.

Figure 4.2: Close-up of the connection panel.
En detaljeret view of the connection panel, highlighting the speaker wire terminals (red and black clips) for "FROM AMPLIFIER" and "TO SPEAKERS", and the RCA jacks for "LOW LEVEL" input. The "POWER" switch and "VOLUME" knob are also clearly visible.
Option 1: Low-Level (RCA) Connection (Recommended for Receivers with Subwoofer Output)
- Tilslut et RCA-kabel fra "SUBWOOFER OUT"- eller "LFE OUT"-stikket på din receiver/amplifier to the "LOW LEVEL" (L or R) input on the Bassbite-II subwoofer. If your receiver has a single LFE output, connect it to either the L or R input on the subwoofer.
- Sørg for, at subwooferens tænd/sluk-knap er i OFF-positionen.
- Plug the subwoofer's power cord into a standard 120 VAC, 60 Hz electrical outlet.
Option 2: Speaker Level Connection (For Amplifiers without Subwoofer Output)
- Connect speaker wires from the "SPEAKER OUT" terminals of your amplifier/receiver to the "FROM AMPLIFIER" speaker level inputs on the Bassbite-II subwoofer. Ensure correct polarity (+ to + and - to -).
- Connect speaker wires from the "TO SPEAKERS" outputs on the Bassbite-II subwoofer to your main left and right speakers. Again, ensure correct polarity.
- Sørg for, at subwooferens tænd/sluk-knap er i OFF-positionen.
- Plug the subwoofer's power cord into a standard 120 VAC, 60 Hz electrical outlet.
5. Betjeningsvejledning
5.1. Tænd/sluk
- To turn on the subwoofer, flip the "POWER" switch located on the rear panel to the ON position.
- To turn off the subwoofer, flip the "POWER" switch to the OFF position.
5.2. Justering af lydstyrke
The "VOLUME" knob on the rear panel controls the output level of the subwoofer.
- Rotate the knob clockwise to increase the volume.
- Drej knappen mod uret for at sænke lydstyrken.
- Start with the volume at a low setting and gradually increase it until the bass blends seamlessly with your main speakers without overpowering them.
6. Vedligeholdelse
Proper care will ensure the longevity and performance of your KLH Bassbite-II Subwoofer.
- Rensning: Use a soft, dry cloth to clean the cabinet. Do not use abrasive cleaners, waxes, or solvents, as they may damage the finish.
- Støv: Regularly dust the subwoofer to prevent accumulation, especially around the rear panel connections and ventilation areas.
- Miljø: Undgå at udsætte subwooferen for ekstreme temperaturer, fugtighed eller direkte sollys.

Figure 6.1: Subwoofer with grille removed.
This image shows the KLH Bassbite-II subwoofer with its front grille detached, revealing the bass reflex port located at the bottom of the front baffle. This port helps enhance the low-frequency output.
7. Fejlfinding
Hvis du oplever problemer med din subwoofer, kan du se følgende almindelige problemer og løsninger:
| Problem | Mulig årsag | Løsning |
|---|---|---|
| Ingen strøm | Power cord not connected; Power switch off; Outlet not working. | Ensure power cord is securely plugged into the subwoofer and a working electrical outlet. Flip the power switch to ON. Test the outlet with another device. |
| Ingen lyd | Incorrect connections; Volume too low; Source device not sending signal. | Check all audio connections (RCA or speaker wires) for proper seating and polarity. Increase the subwoofer's volume knob. Ensure your receiver/amplifier is powered on and sending an audio signal. |
| Forvrænget eller buldrende lyd | Volume too high; Improper placement; Source signal distortion. | Decrease the subwoofer's volume. Experiment with different placement locations (refer to Section 4.1). Check if the audio source itself is distorted. |
| Brummende støj | Ground loop; Nearby electrical interference. | Try plugging the subwoofer into a different electrical outlet (preferably on a different circuit). Ensure all audio cables are high quality and properly shielded. Avoid running audio cables parallel to power cables. |
8. Specifikationer
| Modelnavn | Bassbite-II |
| Modelnummer | E206825 (KLH Bassbite-II) |
| Mærke | KLH |
| Højttaler type | Drevet subwoofer |
| Maksimal højttalerudgangseffekt | 40 watt |
| Strømkilde | Corded Electric (120 VAC, 60 Hz) |
| Dimensioner (H x B x D) | 38.1 cm x 22.9 cm x 26.7 cm (15 tommer x 9 tommer x 10.5 tommer) |
| Vægt | 6.35 kg (14 lbs) |
| Kompatible enheder | Video Game Consoles, Home Theater Systems, Televisions |
9. Garanti og support
For specific warranty information, please refer to the documentation provided by your retailer at the time of purchase. Manufacturer warranty details are typically included with new products.
If you require technical support or have questions regarding your KLH Bassbite-II Subwoofer, please contact your original retailer or visit the official KLH Audio Systems webwebsted for supportressourcer.
Note: The product description mentions a "Two weeks Return/Refund Guarantee" which refers to a seller's return policy and not a manufacturer's warranty.