
Flysky FS-i6X
Flysky FS-i6X 10CH 2.4GHz AFHDS 2A RC Transmitter User Manual
Model: FS-i6X Transmitter & FS-iA10B Receiver
Mærke: Flysky
1. Introduktion
This manual provides detailed instructions for the operation, setup, and maintenance of your Flysky FS-i6X 10-channel 2.4GHz AFHDS 2A RC Transmitter and FS-iA10B Receiver. This system is designed for use with fixed-wing aircraft, gliders, and helicopters, offering reliable and precise control.
The FS-i6X transmitter and FS-iA10B receiver are pre-bound at the factory. Therefore, re-binding is generally not required upon initial receipt. Please read this manual thoroughly before operating the device to ensure safe and correct usage.
2. Pakkens indhold
Bekræft, at alle nedenstående varer er inkluderet i din pakke:
- 1x Flysky FS-i6X Transmitter
- 1x FS-iA10B Receiver
- 1x Bindprop
- 1x Upgrade Cable
Bemærk: Batterier er ikke inkluderet og skal købes separat.
3. Produktet er slutview
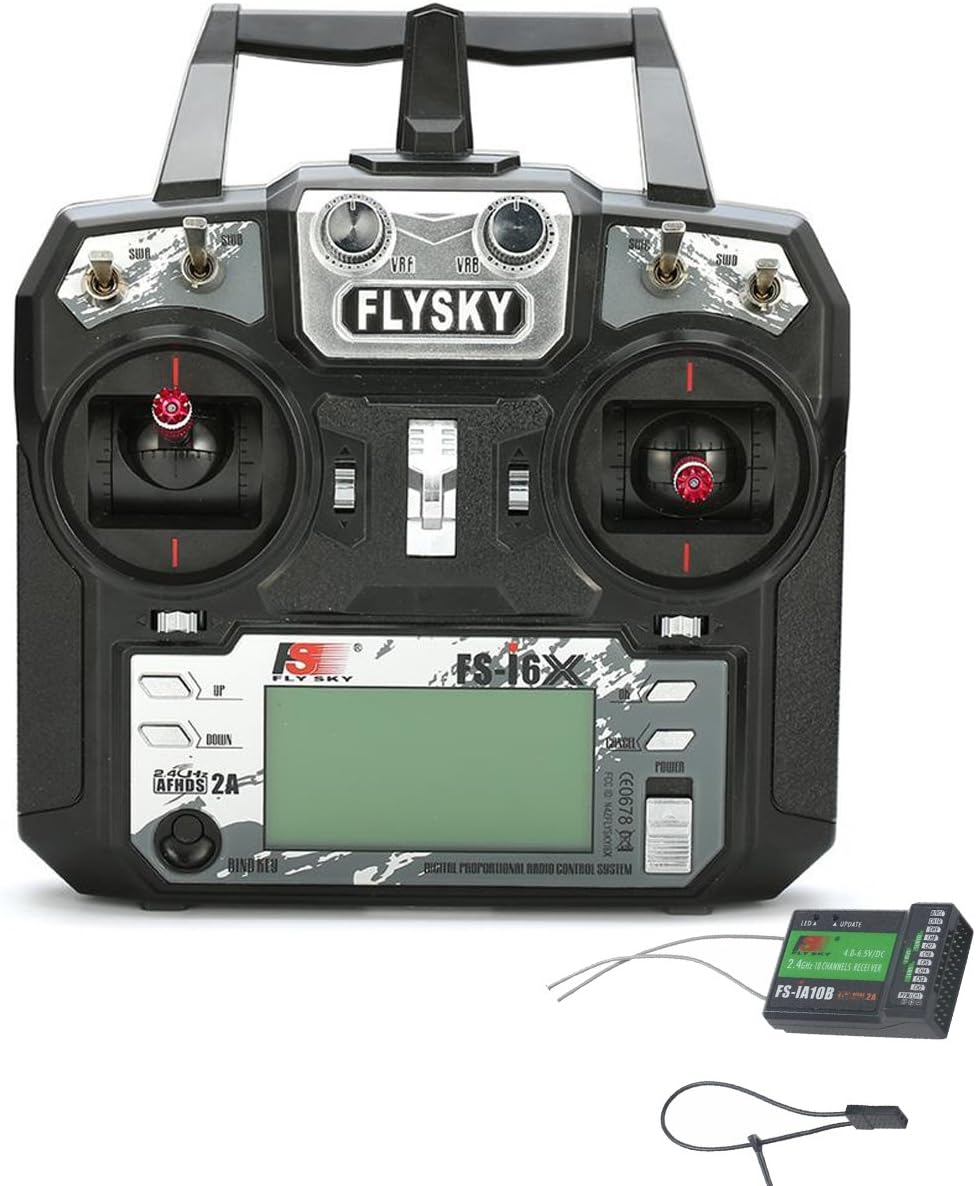
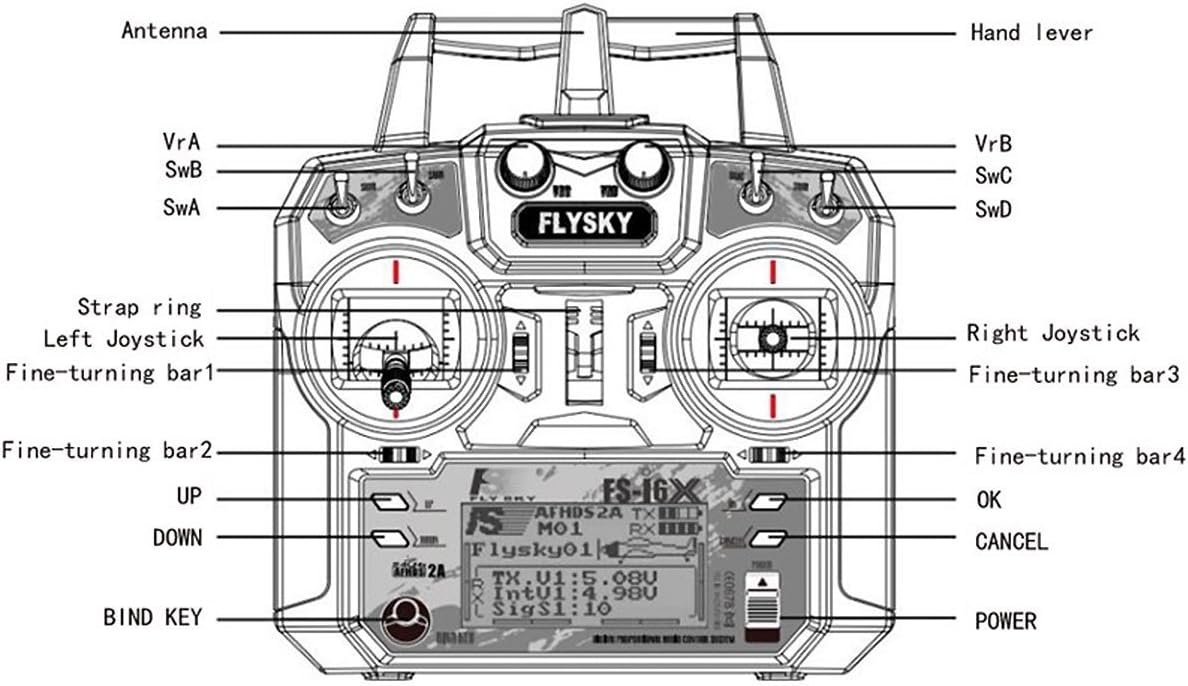
3.1 FS-i6X Transmitter Components
3.2 FS-iA10B Receiver Components

4. Opsætning
4.1 Batteriinstallation (sender)
The FS-i6X Transmitter requires four (4) AA batteries (1.5V each) for a total of 6V DC power. Ensure correct polarity when inserting batteries.
- Åbn batteridækslet på bagsiden af senderen.
- Insert four AA batteries according to the polarity markings (+/-) inside the compartment.
- Luk batterirummets dæksel forsvarligt.

4.2 Modtagertilslutning
Connect your servos and other control devices to the appropriate channels on the FS-iA10B receiver. Ensure that the power supply for the receiver is within the specified range of 4.0-6.5V DC.
4.3 Bindende procedure
The FS-i6X transmitter and FS-iA10B receiver are pre-bound from the factory. You do not need to bind them again upon receipt. However, if you need to re-bind or bind to a new receiver, follow these steps:
- Sørg for, at senderen er slukket.
- Insert the bind plug into the B/VCC port on the FS-iA10B receiver.
- Connect power to the receiver. The receiver's LED should flash rapidly, indicating it is in binding mode.
- While holding down the BIND KEY on the transmitter, turn on the transmitter.
- Release the BIND KEY once the transmitter display shows "RX Binding" or similar.
- Modtagerens LED-lampe skal lyse konstant, hvilket indikerer vellykket binding.
- Sluk for både sender og modtager.
- Fjern bindestikket fra modtageren.
- Turn on the transmitter first, then the receiver. The system should now be bound and operational.
5. Betjeningsvejledning
5.1 Tænd/sluk
- For at tænde: Press and hold the POWER button on the transmitter until the display illuminates.
- For at slukke: Tryk på POWER-knappen, og hold den nede, indtil displayet slukker.
5.2 Channel Setup (Enabling 10 Channels)
The FS-i6X transmitter defaults to 6 channels. To enable all 10 channels, follow these steps:
- Tryk længe på OK button for 2 seconds to enter the main menu setting.
- Naviger til og vælg Systemopsætning.
- Scroll down to the last item, Aux SWitches (auxiliary switch setting), and select it to enter.
- For switches SwA, SwB, SwC, SwD, set their selection to On for at aktivere dem.
- Change the channel assignment from Ch6 til Ch10.
- Tryk længe på OPHÆVE button to automatically save the settings and exit the menu.
5.3 Lav Voltage Advarsel
The transmitter features a low voltage warning system. If the battery voltage drops below 4.2V, an alert will be displayed on the LCD screen, indicating that the batteries need to be replaced or recharged (if using rechargeable batteries).
6. Specifikationer
6.1 FS-i6X RC Transmitter Specifications
| Feature | Detalje |
|---|---|
| Kanal | 6-10 (standard 6) |
| Model Type | Fixed-Wing/Svævefly/Helikopter |
| RF rækkevidde | 2.408-2.475 GHz |
| RF strøm | <20dBm |
| RF-kanal | 135 |
| Båndbredde | 500KHz |
| 2.4 GHz-system | AFHDS 2A/AFDHS |
| Modulationstype | GFSK |
| Stick opløsning | 4096 |
| Lav voltage Advarsel | <4.2V |
| DSC port | PS/2 Port PPM |
| Opkræves | Ingen |
| Antennens længde | 26mm (Dual Antenna) |
| Vægt | 392 g |
| Magt | 6V DC 1.5AA*4 |
| Vise | STNTransflective Display, LCD 128x64 Lattice, VA 73x39mm, LCD with white backlight |
| Størrelse | 174x89x190 mm |
| On-line Update | Ja |
| Farve | Sort |
| Certifikat | CE0678, FCC ID: N4ZFLYSKYI6X |
| Model | Model 2 (left hand throttle) |
6.2 FS-iA10B Receiver Specifications
| Feature | Detalje |
|---|---|
| Kanaler | 10 |
| Model Type | Fixed-Wing/Svævefly/Helikopter |
| RF rækkevidde | 2.4055-2.475 GHz |
| RF-kanal | 140 |
| RF-modtagerfølsomhed | -105dBm |
| Båndbredde | 500KHz |
| 2.4 GHz-system | AFHDS 2A |
| Modulationstype | GFSK |
| Magt | 4.0-6.5V DC |
| Antennens længde | 26mm (Dual Antenna) |
| Vægt | 17.6 g |
| Størrelse | 50.6*34.9*14.9 mm |
| i-BUS Port | Ja |
| Data Acquisition Port | Ja |
| Farve | Sort |
| Certifikat | CE0678, FCC |
7. Vedligeholdelse
- Hold sender og modtager rene og fri for støv og fugt. Brug en blød, tør klud til rengøring.
- Avoid exposing the devices to extreme temperatures, direct sunlight, or corrosive materials.
- Fjern batterierne fra senderen, hvis den ikke skal bruges i længere tid, for at forhindre lækage.
- Regularly check all connections for secure fit.
8. Fejlfinding
| Problem | Løsning |
|---|---|
| Senderen tænder ikke. | Check battery installation and ensure batteries are fresh or fully charged. Verify correct polarity. |
| Receiver LED flashes rapidly, not binding. | Ensure the bind plug is correctly inserted into the B/VCC port. Confirm the transmitter is in binding mode (holding BIND KEY while powering on). Ensure the receiver is powered. |
| No control response after binding. | Verify that the receiver is receiving power and its LED is solid. Check all servo connections to the receiver. Ensure the transmitter and receiver are within range and not experiencing interference. Re-bind the system if necessary. |
| Only 6 channels are active. | Follow the "Channel Setup (Enabling 10 Channels)" instructions in Section 5.2 to activate all 10 channels. |
| Lav voltage warning on display. | Replace the transmitter batteries immediately. |
9. Support and Online Resources
For further assistance, firmware updates, or additional product information, please visit the official Flysky website. Online communities and forums dedicated to RC hobbies can also provide valuable support and tips.
The FS-i6X supports online updates. Refer to the official Flysky website for instructions on how to perform firmware updates using the provided upgrade cable.
Relaterede dokumenter - FS-i6X
 |
Flysky FS-i6X 2.4GHz AFHDS 2A Digitalt Proportionelt Radiostyringssystem Brugsanvisning Denne instruktionsmanual indeholder omfattende detaljer om Flysky FS-i6X 2.4GHz AFHDS 2A digitalt proportionalt radiostyringssystem, der dækker sikkerhedsretningslinjer, systemfunktioner, sender og modtager.viewopsætningsprocedurer, betjeningsvejledning, detaljerede funktionsbeskrivelser, helikopterspecifikke funktioner, systemtilpasning, pakkeindhold, produktspecifikationer og FCC-overholdelsesoplysninger. |
 |
Flysky FS-i6X digitalt proportionalt radiostyringssystem: Brugsanvisning Omfattende instruktionsmanual til Flysky FS-i6X digitalt proportionalt radiostyringssystem, der dækker opsætning, betjening, funktioner og specifikationer for RC-entusiaster. |
 |
Flysky FS-L12 2.4GHz AFHDS 2A Radio Transmitter System User Manual Comprehensive user manual for the Flysky FS-L12 2.4GHz AFHDS 2A radio transmitter system, covering product overview, safety, setup, operation, features, specifications, and compliance information. |
 |
Flysky FS-L12 Digital Proportional Radio Control System Brugermanual Detaljeret brugermanual til Flysky FS-L12 10-kanals 2.4 GHz AFHDS 2A RC-sendersystemet. Dækker sikkerhed, introduktion, opsætning, betjening, systemfunktioner, specifikationer og certificeringer. |
 |
FLYSKY FS-i10 Digital Proportional Radio Control System Instruction Manual Comprehensive instruction manual for the FLYSKY FS-i10 Digital Proportional Radio Control System, covering setup, operation, safety, and specifications for RC models including airplanes, gliders, and helicopters. |
 |
FlySky FS-i6X Digital Proportional Radio Control System Instruction Manual Comprehensive instruction manual for the FlySky FS-i6X 6-channel 2.4GHz AFHDS 2A digital proportional radio control system, covering safety, introduction, system features, getting started, operation instructions, function descriptions, helicopter functions, system settings, RX setup, system customization, package contents, product specifications, and FCC statement. |
Ask a question about this manual
Ask about setup, troubleshooting, compatibility, parts, safety, or missing instructions. Manuals+ will review the question and use this page’s manual context to help answer it.