
1. Introduktion
Tak for købetasing the DEPSTECH WiFi Endoscope. This device is designed for visual inspection in hard-to-reach areas, offering high-definition imaging capabilities via a wireless connection to your smartphone or tablet. Please read this manual thoroughly before use to ensure proper operation and to maximize the lifespan of your device.
2. Sikkerhedsoplysninger
Overhold venligst følgende sikkerhedsforanstaltninger:
- Do not use this device for medical purposes or personal examination.
- Hold enheden væk fra børn.
- Do not expose the device to extreme temperatures or corrosive liquids.
- Ensure the camera probe is clean and dry before and after each use, especially if used in wet environments. The camera probe is water repellent, but the main control unit is not.
- Undgå at skille enheden ad, da dette vil ugyldiggøre garantien og kan forårsage skade.
- Brug kun det medfølgende opladningskabel eller et tilsvarende certificeret kabel.
3. Pakkens indhold
Bekræft at alle varer er til stede i din pakke:
- DEPSTECH WiFi Endoscope (Control Unit with Camera Cable)
- USB opladningskabel
- Accessory Set (Hook, Magnet, Mirror)
- Brugermanual
4. Produktet er slutview
Familiarize yourself with the components of your DEPSTECH WiFi Endoscope.
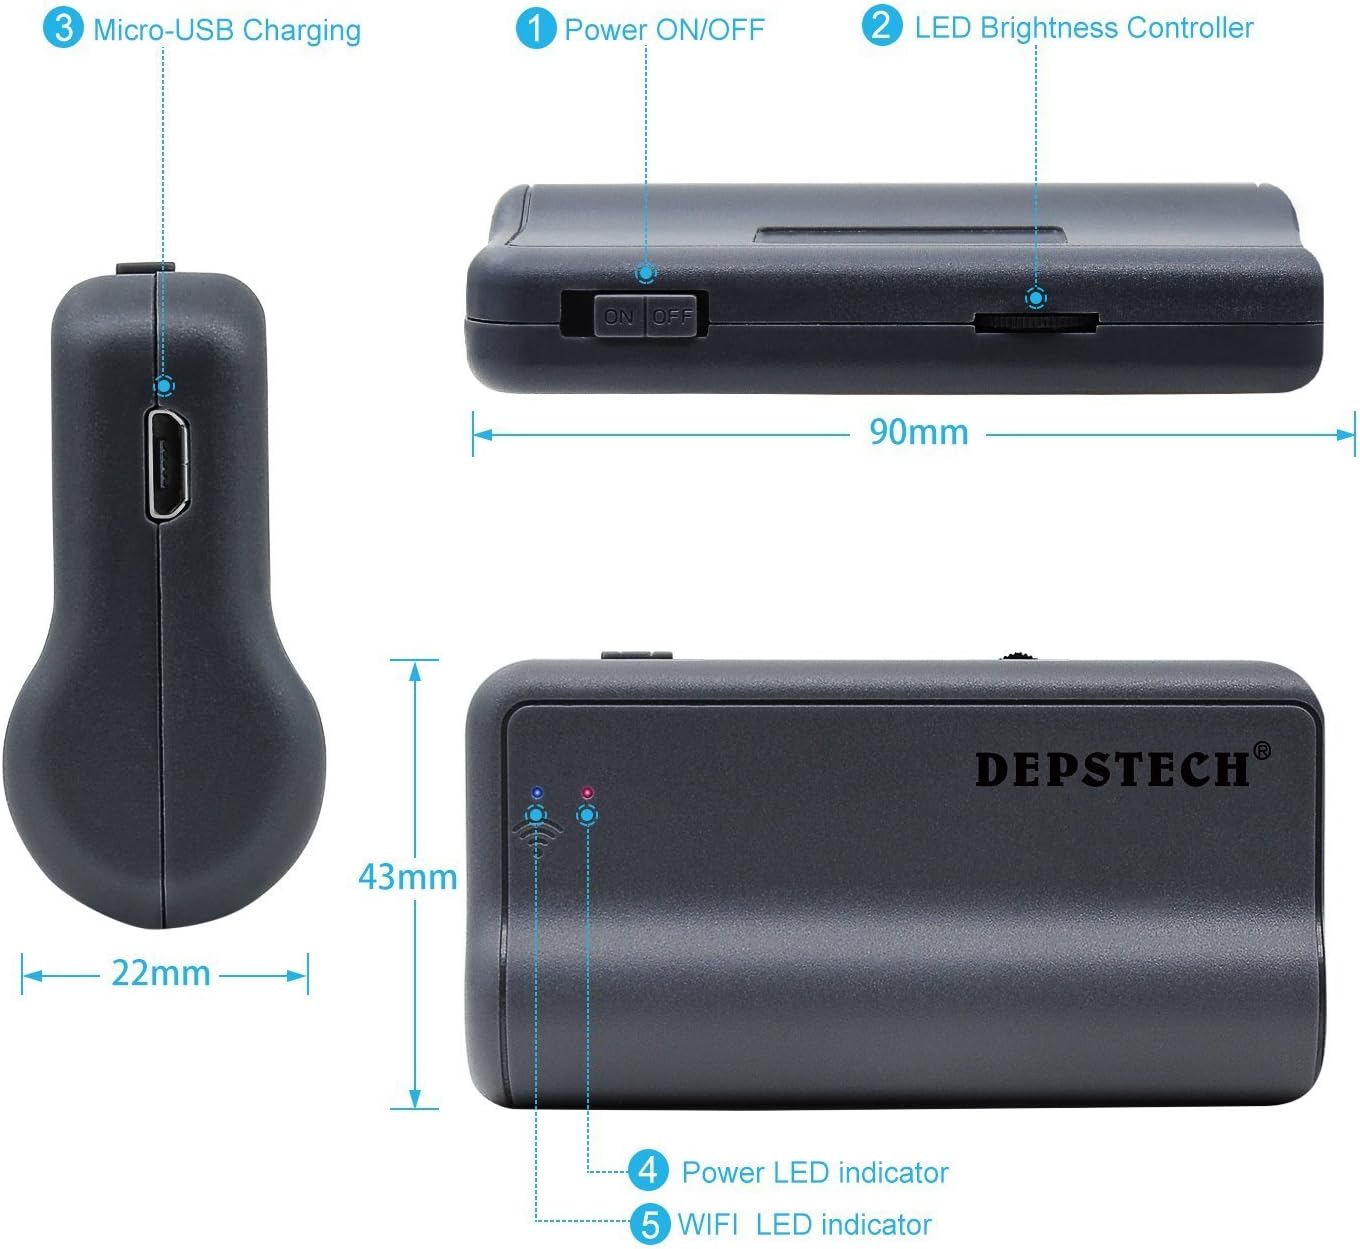
Billede: Diagram of the DEPSTECH WiFi Endoscope control unit, showing Micro-USB Charging port, Power ON/OFF switch, LED Brightness Controller, Power LED indicator, and WiFi LED indicator. Dimensions are also indicated: 90mm length, 43mm width, and 22mm for the car charger adapter.
- Tænd / sluk-kontakt: Toggles the device on or off.
- LED Brightness Controller: Adjusts the intensity of the camera's LED lights.
- Mikro-USB-opladningsport: Til opladning af det interne batteri.
- Power LED -indikator: Viser strømstatus.
- WiFi LED Indicator: Viser status for WiFi-forbindelsen.

Billede: Nærbillede view of the endoscope camera attachments: Magnet, Hook, and Mirror. A note advises to peel off the protective film from the mirror before use.
- Magnet: Useful for retrieving small metallic objects from inaccessible areas.
- Krog: Can be used to retrieve small non-metallic items or to maneuver objects.
- Spejl: Giver en side view, allowing inspection of areas at a 90-degree angle to the camera. Remember to remove the protective film before use.
5. Opsætningsvejledning
5.1. Opladning af enheden
Before first use, fully charge the endoscope's control unit. Connect the provided USB charging cable to the Micro-USB port (3) on the control unit and to a standard USB power adapter (not included) or computer USB port. The Power LED indicator (4) will show charging status.

Billede: Indre view of the DEPSTECH endoscope control unit showing the high-capacity lithium battery. The image indicates 3-4 hours of working time and an 1800mAh battery capacity.
5.2. Download af appen
Søg efter and download the "DEPSTECH-View" or "DEPSTECH" app from the Apple App Store (for iOS devices) or Google Play Store (for Android devices). Alternatively, scan the QR code provided in the quick start guide or on the product packaging.
5.3. Connecting via Wi-Fi
- Turn on the DEPSTECH WiFi Endoscope by sliding the Power ON/OFF switch (1) to the "ON" position. The Power LED indicator (4) will light up.
- Wait for the WiFi LED indicator (5) to start blinking, indicating the device is broadcasting its Wi-Fi signal.
- Gå til dine Wi-Fi-indstillinger på din smartphone eller tablet.
- Locate and select the Wi-Fi network named "DEPSTECH_XXXX" (where XXXX is a series of characters).
- Enter the default password, usually "12345678".
- Once connected, open the "DEPSTECH-View" app. The live video feed from the endoscope camera should appear.
- Note: If your phone automatically switches to cellular data because the endoscope's Wi-Fi does not provide internet, you may need to temporarily disable cellular data in your phone's settings to maintain the connection to the endoscope.
6. Betjeningsvejledning
6.1. Justering af LED-lysstyrke
Use the LED Brightness Controller (2) on the control unit to adjust the intensity of the LED lights around the camera lens. This helps illuminate dark inspection areas and can improve image clarity by reducing glare.

Billede: Illustration of the endoscope camera head with 6 circled blue tempered LED lights. The image compares the effect of DEPSTECH's blue LED technology versus standard white light, showing reduced image over-exposure and improved color temperature in dark environments.
6.2. Brug af vedhæftede filer
The included hook, magnet, and mirror attachments can be screwed onto the tip of the camera probe for various applications. Ensure they are securely fastened before use.
6.3. Optagelse af billeder og videoer
Within the "DEPSTECH-View" app, you will find buttons to capture still images and record videos. These files will be saved directly to your connected smartphone or tablet's gallery.
6.4. Optimal Viewi Afstand
The endoscope camera has a fixed focus. For the clearest images, position the camera approximately 1.2 to 3.9 inches (3 to 10 cm) from the object you are inspecting. Objects outside this range may appear blurry.

Billede: Diagram illustrating the performance of the 2nd generation chip, showing an improvement from 10fps (first generation) to 30fps (second generation), indicating up to 200% faster capture for clearer and closer views.
6.5. Gældende scenarier
The DEPSTECH WiFi Endoscope is suitable for various inspection tasks, including:
- Automotive inspection (engine, exhaust, chassis)
- Plumbing inspection (pipes, drains)
- HVAC inspection (ducts, vents)
- Home inspection (walls, ceilings, behind appliances)

Billede: Four panels showing different application scenarios for the endoscope: inspecting under a car, checking inside a wall, examining plumbing under a sink, and looking behind a washing machine.

Billede: Comparison illustrating the semi-rigid cable of the DEPSTECH endoscope (yellow, labeled "flexible") versus a soft cable from "Other brands" (black, labeled "soft"). This highlights the improved maneuverability of the DEPSTECH cable.
7. Vedligeholdelse
- Rengøring af kameralinsen: Gently wipe the camera lens with a soft, dry cloth. For stubborn dirt, use a small amount of lens cleaner on the cloth. Do not use abrasive materials or harsh chemicals.
- Rengøring af kablet: The semi-rigid cable can be wiped clean with a damp Sørg for, at den er helt tør, før den opbevares.
- Opbevaring: Store the endoscope and its accessories in a cool, dry place, away from direct sunlight and extreme temperatures. Keep it in its original packaging or a protective case to prevent damage.
- Batteripleje: To prolong battery life, avoid fully discharging the battery frequently. If storing for an extended period, charge the device to approximately 50% every three months.
8. Fejlfinding
| Problem | Mulig årsag | Løsning |
|---|---|---|
| No image on app / Wi-Fi connection fails. |
|
|
| Billedet er sløret. |
|
|
| Device won't charge or turn on. |
|
|
| Appen går ned eller fryser. |
|
|
9. Specifikationer
| Feature | Detalje |
|---|---|
| Mærke | DEPSTECH |
| Model | B06XS8MYVL |
| Forbindelsesteknologi | Wi-Fi |
| Videooptagelsesopløsning | 1080p |
| Sensortype | CMOS |
| Fokus Type | Fast fokus |
| Optimal Focus Distance | 1.2-3.9 tommer (3-10 cm) |
| Vandmodstandsniveau | Water Repellent (camera probe) |
| File Format (Image) | JPEG |
| File Format (video) | MP4 |
| Batterikapacitet | 1800mAh |
| Arbejdstid | 3-4 timer |
| Kamera Flash | Built-In LED (adjustable brightness) |
| Kabeltype | Semi-Rigid |
10. Garanti og support
DEPSTECH products come with a standard manufacturer's warranty. For detailed warranty terms and conditions, please refer to the warranty card included in your package or visit the official DEPSTECH website. If you encounter any issues or have questions regarding your product, please contact DEPSTECH customer support:
- Webwebsted: www.depstech.com
- E-mail: Refer to the contact information on the official webwebstedet eller din produktemballage.
Please have your model number (B06XS8MYVL) and purchase date ready when contacting support.