
Indledning
This manual provides detailed instructions for the setup, operation, and maintenance of your Intex Wi-Fi HD Camera, model IT-101. Please read this manual thoroughly before using the device to ensure proper functionality and safety.
Produkt overview
The Intex Wi-Fi HD Camera IT-101 is a compact security camera designed for monitoring. It features HD video resolution, night vision capabilities, and Wi-Fi connectivity for remote access.
Nøglefunktioner:
- HD-videoopløsning: Captures video at 1280x720 pixels (720p) with a frame rate of 25 frames per second.
- Bred linse View: Features a 77-degree lens view angle for broader coverage.
- Nattesyn: Equipped with Infrared LED illumination for clear night vision up to 10 meters.
- SD-kort support: Supports up to 64GB SD card for local storage.
- Trådløs forbindelse: Connects via Wi-Fi for remote monitoring through mobile or computer applications.
- Kompatibilitet: Supports Android and iOS operating systems.
Pakkeindhold:
- Intex Wi-Fi HD Camera IT-101
- Strømadapter (DC 5V/1A)
- Brugervejledning (dette dokument)
- Monteringstilbehør (hvis inkluderet)
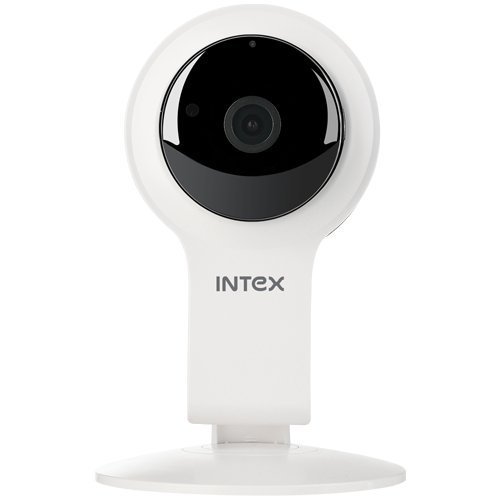
Figur 1: Forside view of the Intex Wi-Fi HD Camera IT-101. This image shows the camera lens and the main body of the device.
Opsætning
1. Tænd for kameraet:
- Connect the provided DC 5V/1A power adapter to the camera's power input port.
- Sæt strømadapteren i en almindelig stikkontakt.
- The camera will power on, and an indicator light will illuminate (refer to the camera's physical indicators for specific light behavior).
2. Installing an SD Card (Optional):
To enable local video recording, an SD card (up to 64GB) can be installed.
- Locate the SD card slot on the camera (consult the camera's physical design for exact location).
- Gently insert the SD card into the slot with the contacts facing the correct direction until it clicks into place.
- To remove, press the SD card inward until it springs out.
3. Connecting to Wi-Fi and Mobile App:
The camera requires a mobile application for initial setup and remote viewing. The specific app name is not provided in the product details, please refer to the packaging or a quick start guide for the correct app to download from your device's app store (Android/iOS).
- Download and install the designated mobile application on your smartphone or tablet.
- Open the application and create an account or log in if you already have one.
- Follow the in-app instructions to add a new device. This typically involves scanning a QR code on the camera or manually entering its device ID.
- Connect the camera to your home Wi-Fi network through the app. Ensure your Wi-Fi network is 2.4GHz, as 5GHz networks may not be supported.
- Once connected, the camera's indicator light will change (e.g., solid blue), and you should see the live feed in the app.
Betjeningsvejledning
Levende View:
Access the live video feed from your camera through the mobile application. This allows real-time monitoring of the camera's view.
Indspilning:
- Manuel optagelse: Most applications offer a manual record button to start and stop video recording directly to your phone or the installed SD card.
- Planlagt optagelse: Configure recording schedules within the app to automatically record at specific times.
- Optagelse af bevægelsesdetektering: Enable motion detection in the app settings. The camera will automatically record when motion is detected within its field of view.
Afspilning:
Optaget footage stored on the SD card can be accessed and played back through the mobile application. Navigate to the "Playback" or "History" section within the app.
Nattesyn:
The camera automatically switches to night vision mode in low-light conditions. The Infrared LED illuminates the area, allowing for clear black and white video capture up to 10 meters.
Indstillinger:
The mobile application provides various settings to customize your camera's operation, including:
- Video quality adjustment
- Bevægelsesdetektionsfølsomhed
- Notifikationsindstillinger
- Tids- og datosynkronisering
- SD card management (formatting, viewing storage)
Opretholdelse
- Rensning: Brug en blød, tør klud til at rengøre kameralinsen og huset. Undgå at bruge skrappe kemikalier eller slibende materialer.
- Firmwareopdateringer: Tjek regelmæssigt mobilapplikationen for tilgængelige firmwareopdateringer til dit kamera. At holde firmwaren opdateret sikrer optimal ydeevne og sikkerhed.
- SD-kortadministration: Regularly back up important recordings from your SD card. Consider formatting the SD card periodically through the app to maintain performance.
- Miljøforhold: Ensure the camera is operated within its specified temperature and humidity ranges. The camera is not water-resistant, so avoid exposure to moisture.
Fejlfinding
Kamera tænder ikke:
- Ensure the power adapter is securely connected to both the camera and a working electrical outlet.
- Verify that the power adapter is the correct DC 5V/1A model.
Kan ikke oprette forbindelse til Wi-Fi:
- Bekræft, at dit Wi-Fi-netværk er 2.4 GHz. Kameraet understøtter muligvis ikke 5 GHz-netværk.
- Sørg for, at kameraet er inden for rækkevidde af din Wi-Fi-router.
- Kontroller, at den indtastede Wi-Fi-adgangskode i appen er korrekt.
- Genstart din Wi-Fi-router og kameraet, og prøv derefter at genoprette forbindelsen.
- If issues persist, try resetting the camera to factory defaults (refer to the camera's physical buttons or app for reset option).
No Video Feed in App:
- Kontroller, at kameraet er tændt og forbundet til Wi-Fi.
- Tjek din internetforbindelse på din mobilenhed.
- Close and reopen the mobile application.
- Ensure the camera's privacy mode (if available) is not activated.
SD Card Not Recording or Recognized:
- Sørg for, at SD-kortet er korrekt isat.
- Verify the SD card is not full. Format it through the app if necessary (this will erase all data).
- Check if the SD card is damaged. Try a different compatible SD card.
- Confirm that recording settings (manual, scheduled, motion detection) are properly configured in the app.
Specifikationer
| Feature | Detalje |
|---|---|
| Modelnavn | IT-101 |
| Billedsensor | H42 1/4 CMOS Sensor |
| Videooptagelsesopløsning | 1280x720 Pixels (720p HD) |
| Billedhastighed | 25 fps |
| Linse View Vinkel | 77 grader |
| Linsetype | 3.6 mm, Zoom |
| Fokus Type | Autofokus |
| Nattesynsafstand | 10 meters (Infrared LED Illumination) |
| Dag/nat tilstand | Yes (Automatic switching) |
| Forbindelsesteknologi | Trådløs (Wi-Fi) |
| SD-kort support | Op til 64 GB |
| Video Supported Format | H.264, MP4 |
| Understøttet billedformat | JPEG |
| Operativsystemkompatibilitet | Android, iOS |
| Strømforsyning | DC 5V/1A |
| Bruttovægt | 260 g |
| Farve | Hvid |
| Vandmodstandsniveau | Ikke vandafvisende |
| Billedstabilisering | Ingen |
Garanti og support
For warranty information and technical support, please refer to the documentation included with your purchase or visit the official Intex webwebsted. Gem din købsbevis til garantikrav.
Fabrikant: Intex
Mærke: Intex