
1. Introduktion
This manual provides detailed instructions for the installation, operation, and maintenance of your ASRock AB350M-HDV MicroATX Motherboard. The ASRock AB350M-HDV is designed to support AMD Socket AM4 A-Series APUs (Bristol Ridge) and Ryzen Series CPUs (Summit Ridge), featuring a Digi Power design and 7 Power Phase design for stable performance. It supports DDR4 memory and offers various connectivity options including SATA3, USB 3.0, and an Ultra M.2 slot.
2. Produktet er slutview
The ASRock AB350M-HDV motherboard is a MicroATX form factor board, ideal for compact PC builds. It features essential components for a modern computing system.

Figur 2.1: Vinklet view of the ASRock AB350M-HDV Motherboard, showcasing its compact MicroATX design and various components.
Nøglefunktioner:
- Supports AMD Socket AM4 A-Series APUs (Bristol Ridge) and Ryzen Series CPUs (Summit Ridge).
- DDR4 memory support up to 3200+ (OC) for Ryzen CPUs and 2400 for A-series APUs.
- 1 PCIe 3.0 x16 slot and 1 PCIe 2.0 x1 slot for expansion cards.
- 4 SATA3 ports and 1 Ultra M.2 (PCIe Gen3 x4 & SATA3) slot for storage.
- 6 USB 3.0 ports (2 front, 4 rear) and 2 USB 2.0 ports for peripheral connectivity.
- Integrated Gigabit Ethernet for network connectivity.
- Video outputs: VGA, DVI, HDMI.

Figur 2.2: Top-down view of the ASRock AB350M-HDV Motherboard, highlighting the CPU socket, RAM slots, M.2 slot, and PCIe slots.
3. Opsætning og installation
Follow these steps carefully to install your ASRock AB350M-HDV motherboard and its components.
3.1 CPU installation
- Find AM4 CPU-sokkelen på bundkortet.
- Løft læssehåndtaget på siden af stikkontakten.
- Justér det trekantede mærke på CPU'en med det tilsvarende mærke på soklen. Sæt forsigtigt CPU'en i soklen uden at tvinge den.
- Sænk belastningshåndtaget for at fastgøre CPU'en på plads.
- Installer CPU-køleren i henhold til producentens anvisninger.
3.2 RAM (hukommelse) installation
- Locate the DDR4 DIMM slots. This motherboard has 4 slots.
- Åbn klipsene i begge ender af DIMM-stikket.
- Juster hakket på RAM-modulet med nøglen i DIMM-stikket.
- Insert the RAM module firmly into the slot until the clips snap into place. Ensure both clips are closed.
3.3 Installation af lagerenhed (SATA og M.2)
SATA-drev:
- Tilslut den ene ende af et SATA-datakabel til en SATA3-port på bundkortet.
- Tilslut den anden ende af SATA-datakablet til din harddisk eller SSD.
- Tilslut et SATA-strømkabel fra din strømforsyning (PSU) til lagerenheden.
M.2 SSD:
- Locate the Ultra M.2 slot on the motherboard.
- Fjern M.2-skruen og afstandsstykket fra rillen.
- Indsæt M.2 SSD'en i slotten i en 30-graders vinkel.
- Push the M.2 SSD down and secure it with the screw and standoff.
3.4 Strømforbindelser
- Tilslut 24-bens ATX-strømstikket fra din strømforsyning til 24-bens strømstikket på bundkortet.
- Connect the 8-pin (or 4-pin) ATX 12V power connector from your PSU to the corresponding socket near the CPU.
3.5 Frontpanelforbindelser
Connect the cables from your PC case (Power Button, Reset Button, HDD LED, Power LED, USB, Audio) to the corresponding headers on the motherboard. Refer to the motherboard layout diagram in your physical manual for exact header locations.
3.6 Installation af grafikkort
- Find PCIe 3.0 x16-slottet.
- Fjern det tilsvarende dæksel til udvidelsesslotten fra pc'ens kabinet.
- Align the graphics card with the PCIe slot and press it down firmly until it clicks into place.
- Fastgør grafikkortet til kabinettet med en skrue.
- Connect any required PCIe power cables from your PSU to the graphics card.
4. Betjeningsvejledning
4.1 Første opstart og BIOS/UEFI-opsætning
- Når du har samlet alle komponenter, skal du tilslutte din skærm, tastatur og mus.
- Tænd dit system.
- Tryk gentagne gange på knappen under opstart. DEL or F2 tasten for at åbne BIOS/UEFI-opsætningsprogrammet.
- In the BIOS, you can configure boot order, system time, and other advanced settings. Save changes and exit to boot into your operating system installation media.
4.2 Driverinstallation
After installing your operating system, install the necessary drivers for the motherboard components. These typically include chipset drivers, audio drivers, LAN drivers, and any specific utility drivers. Drivers can be found on the ASRock official webhjemmeside for din specifikke bundkortmodel.
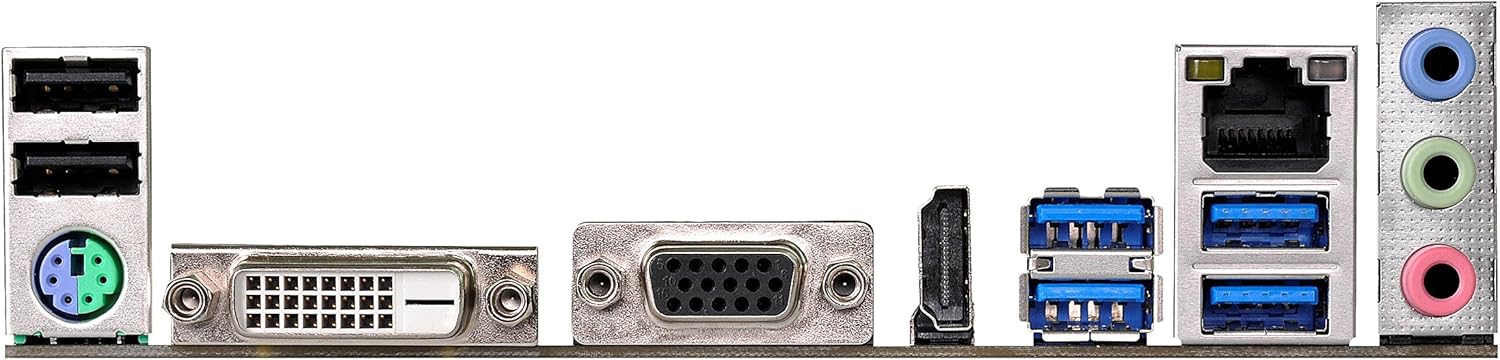
Figure 4.1: Rear I/O panel of the ASRock AB350M-HDV Motherboard, showing USB ports, video outputs (VGA, DVI, HDMI), LAN port, and audio jacks.
5. Vedligeholdelse
Korrekt vedligeholdelse sikrer dit bundkorts levetid og optimale ydeevne.
5.1 Rengøring
- Rens jævnligt støv fra bundkortet og komponenterne ved hjælp af trykluft.
- Sørg for, at systemet er slukket og frakoblet stikket, inden rengøring.
- Undgå at bruge flydende rengøringsmidler direkte på komponenterne.
5.2 BIOS/UEFI-opdateringer
Tjek ASRock regelmæssigt website for BIOS/UEFI updates. Updates can improve compatibility, stability, and performance. Follow the instructions provided by ASRock carefully when performing a BIOS update to avoid system damage.
6. Fejlfinding
Dette afsnit indeholder løsninger på almindelige problemer, du kan støde på.
6.1 Ingen strøm / Ingen POST (Power-On Self-Test)
- Tjek strømforbindelser: Ensure the 24-pin and 8-pin (or 4-pin) CPU power connectors are securely seated.
- Bekræft strømforsyning: Test your power supply unit (PSU) to ensure it is functional and providing adequate power.
- Genmonter komponenter: Remove and re-install the CPU, RAM, and graphics card to ensure they are properly seated.
- Ryd CMOS: Refer to your physical manual for instructions on how to clear the CMOS (Complementary Metal-Oxide-Semiconductor) settings, which can resolve boot issues.
6.2 Ingen skærmudgang
- Skærmforbindelse: Ensure your monitor is correctly connected to the graphics card or motherboard (if using an APU with integrated graphics).
- Grafikkort: If using a dedicated graphics card, ensure it is properly installed and has sufficient power. Test with another graphics card if possible.
- APU Compatibility: If using an AMD A-Series APU, ensure your monitor is connected to the motherboard's video outputs (VGA, DVI, HDMI). Ryzen CPUs without integrated graphics require a dedicated graphics card.
6.3 Operativsystemet starter ikke
- Boot-rækkefølge: Check the BIOS/UEFI settings to ensure the correct boot device (e.g., SSD/HDD with OS) is prioritized.
- Lagerenhed: Verify that your storage device is detected in the BIOS.
- OS-installation: If the OS is newly installed, ensure the installation process completed successfully.
7. Specifikationer
| Mærke | ASRock |
| Modelnavn | AB350M-HDV |
| CPU socket | Sokkel AM4 |
| Chipsættype | AMD Promontory B350 |
| Kompatible processorer | AMD A-Series APUs (Bristol Ridge), Ryzen Series CPUs (Summit Ridge) |
| RAM-hukommelsesteknologi | DDR4 |
| Hukommelses urhastighed | 2133 MHz (Base), up to 3200+ (OC) for Ryzen CPU |
| Hukommelsespladser til rådighed | 4 |
| Grafikkort interface | PCI Express (1x PCIe 3.0 x16, 1x PCIe 2.0 x1) |
| Total SATA Ports | 4 (SATA3) |
| M.2 Slot | 1 (Ultra M.2, PCIe Gen3 x4 & SATA3) |
| Samlet USB-porte | 8 (6x USB 3.0, 2x USB 2.0) |
| Videoudgange | VGA, DVI, HDMI |
| Type hovedstrømstik | 24-Pin ATX |
| Formfaktor | MicroATX |
| Varens vægt | 1.3 pund |
8. Garantioplysninger
The ASRock AB350M-HDV Motherboard comes with a 1 års garanti. For specific terms and conditions, please refer to the warranty card included with your product or visit the official ASRock webwebsted.
9. Support
For yderligere assistance, teknisk support eller download af drivere, besøg venligst den officielle ASRock-side. webwebsted:
You can also find contact information for customer service and support resources on their webwebsted.