
1. Introduktion
The HP Aruba 7030 Cloud Services Controller is designed to optimize cloud services and secure enterprise applications within branch office environments. It provides comprehensive configuration, management, encryption, and application visibility to ensure reliable delivery of network services. This controller supports up to 64 Access Points (APs) and unifies policy management for both wired and wireless networks, facilitating an all-wireless workplace in branch offices.
Capable of managing up to 4,000 users, the 7030 series enforces stateful firewall policies at speeds up to 8 Gbps. It secures IP tunnels for branch traffic across public and private transport networks to the cloud and headquarters. The device also integrates Aruba's Mobility Firewall with AppRF technology, which continuously evaluates application usage and performance, making real-time configuration adjustments to optimize bandwidth, priority, and network paths.
2. Sikkerhedsoplysninger
- Læs alle instruktioner omhyggeligt før installation og drift.
- Sørg for, at strømkilden matcher voltagde krav, der er angivet på enhedens etiket.
- Udsæt ikke enheden for vand, fugt eller ekstreme temperaturer.
- Installer enheden i et godt ventileret område for at forhindre overophedning.
- Only use accessories and attachments specified by the manufacturer.
- Afbryd strømmen før rengøring eller servicering af enheden.
- Denne enhed er kun beregnet til indendørs brug.
3. Pakkens indhold
Bekræft, at din pakke indeholder følgende varer:
- HP Aruba 7030 64 AP Branch Controller (Model JW687A)
- Rackmonteringssæt
- Power cord (region specific)
- Dokumentation (Hurtigstartguide, sikkerheds- og lovgivningsmæssige oplysninger)
If any items are missing or damaged, contact your vendor or HP Aruba support immediately.
4. Fysisk overview
The following image illustrates the front panel of the HP Aruba 7030 controller, highlighting key components and indicators.
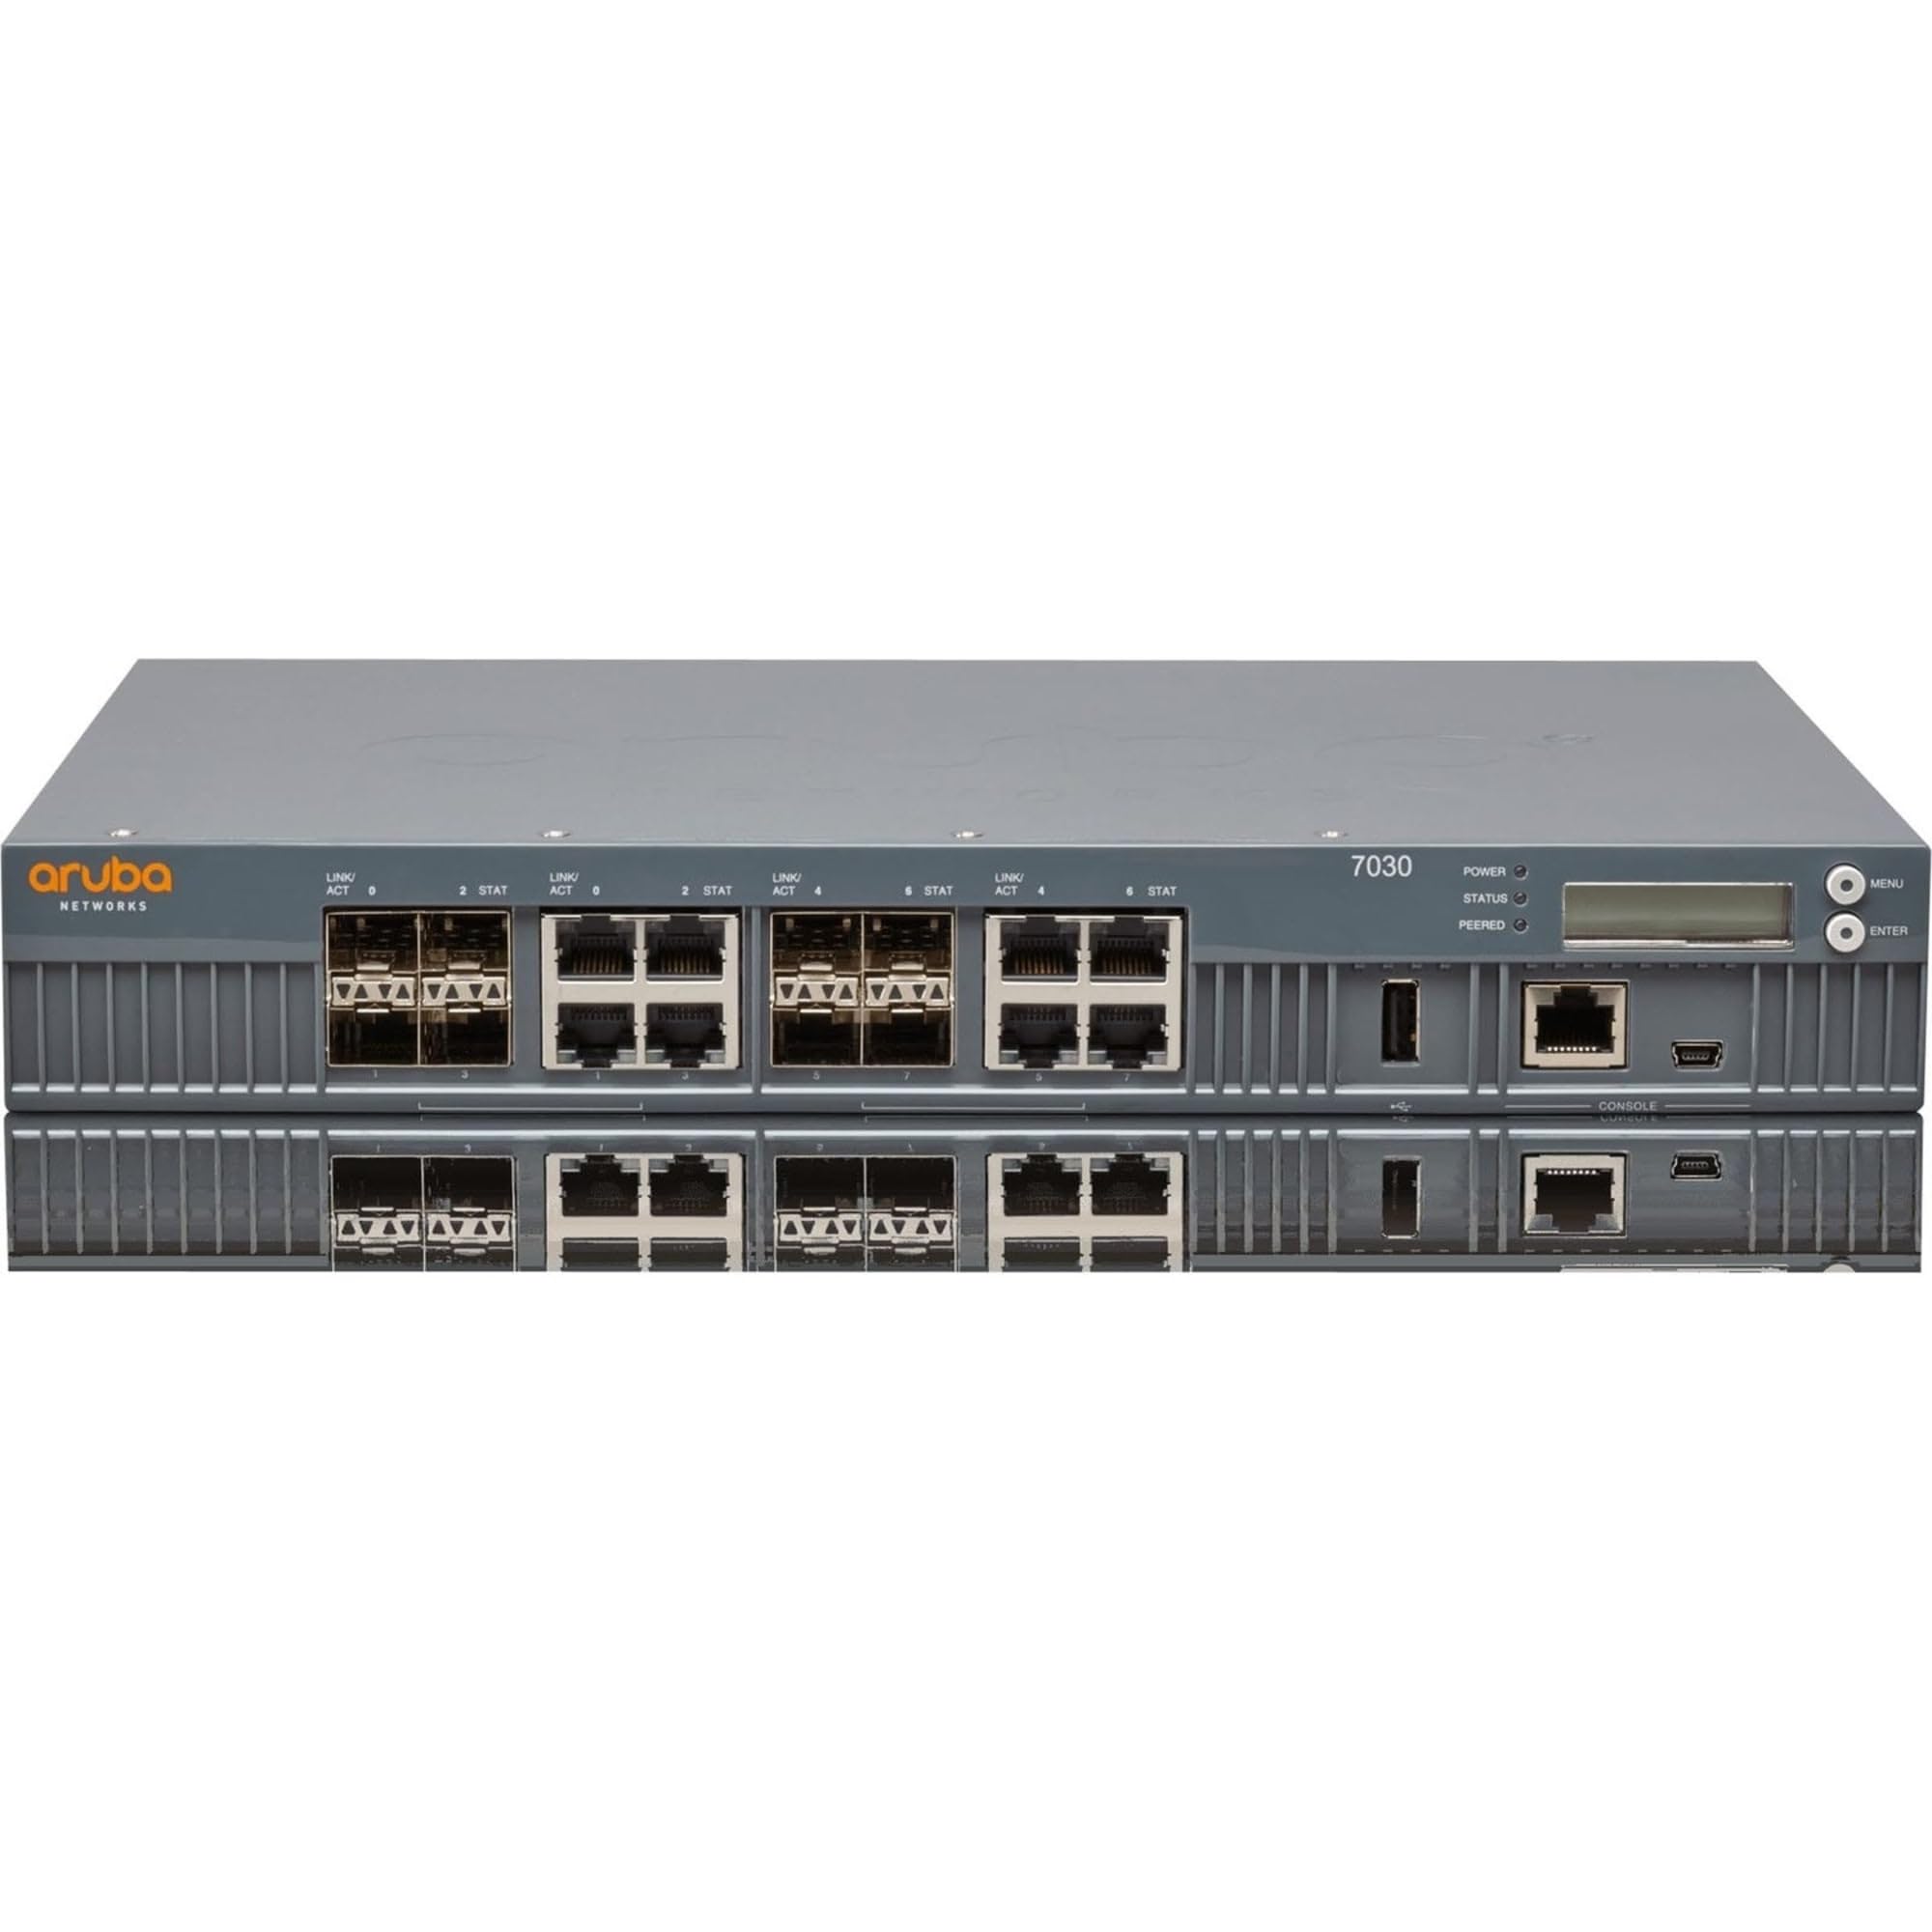
Figur 1: Front Panel of HP Aruba 7030 Controller
Frontpanelet har:
- Aruba Networks Logo: Mærkeidentifikation.
- LINK/ACT Indicators: LEDs indicating link status and activity for each network port.
- STAT Indicators: LEDs indicating the status of various system functions.
- Network Ports (RJ-45): Eight (8) RJ-45 ports for wired network connections.
- SFP/SFP+ porte: Four (4) SFP/SFP+ slots for fiber optic or high-speed copper connections.
- USB-port: For connecting USB devices, potentially for configuration or firmware updates.
- Konsolport: A serial port (likely RJ-45 or Mini-USB) for direct command-line interface access.
- Power LED: Angiver enhedens strømstatus.
- Status-LED: Angiver enhedens samlede driftsstatus.
- Peered LED: Indicates peering status in a high-availability setup.
- LCD-skærm: A small screen for displaying system information and menu options.
- Menu/Enter Buttons: Buttons for navigating and selecting options on the LCD display.
5. Opsætning
5.1. Rack montering
The HP Aruba 7030 controller is designed for rack installation. Use the provided rack-mount kit to secure the device in a standard 19-inch equipment rack.
- Attach the mounting brackets from the rack-mount kit to the sides of the controller using the screws provided.
- Align the controller with the desired rack unit (RU) space in your equipment rack.
- Secure the controller to the rack posts using appropriate rack screws (not always included with the kit, check your rack's hardware).
- Ensure there is adequate airflow around the device for proper cooling.
5.2. Tilslutning af strøm
- Connect the power cord to the power input on the rear panel of the controller.
- Plug the other end of the power cord into a grounded electrical outlet or a power distribution unit (PDU).
- The device will power on automatically. Observe the Power LED on the front panel; it should illuminate.
5.3. Connecting Network Cables
- Connect Ethernet cables from your network infrastructure (e.g., switches, routers) to the RJ-45 network ports on the front panel.
- For fiber optic or high-speed connections, insert appropriate SFP/SFP+ transceivers into the designated slots and connect fiber cables.
- Observe the LINK/ACT LEDs for each connected port; they should illuminate and blink to indicate a valid link and activity.
5.4. Adgang til indledende konfiguration
To perform initial configuration, you can use the console port or a web-baseret interface.
- Konsoladgang: Connect a serial cable from your computer to the console port on the controller. Use a terminal emulation program (e.g., PuTTY, Tera Term) with settings typically 9600 baud, 8 data bits, no parity, 1 stop bit, no flow control.
- Web Interface: Once the device obtains an IP address (via DHCP or a default static IP), you can access the web-based management interface by entering the controller's IP address into a web browser. Refer to the Quick Start Guide for default IP addresses or initial setup procedures.
6. Betjening af controlleren
6.1. Forståelse af LED-indikatorer
- Power LED:
- Konstant grøn: Enheden er tændt og fungerer normalt.
- Off: Device is powered off or experiencing a power issue.
- Status-LED:
- Solid Green: System is healthy.
- Blinking Green: System is booting or performing a specific operation.
- Solid Amber: Minor fault or warning.
- Blinking Amber: Major fault or error.
- Peered LED:
- Solid Green: Controller is successfully peered with another controller for high availability.
- Off: Not peered or peering failed.
- LINK/ACT LED'er (pr. port):
- Solid Green: Valid network link established.
- Blinking Green: Data activity on the port.
- Off: No link or cable disconnected.
6.2. Management Interface
The controller can be managed via its command-line interface (CLI) through the console port or SSH, and via a web-based graphical user interface (GUI). The GUI provides an intuitive way to configure and monitor the device.
- Konfiguration: Set up network parameters, VLANs, security policies, and AP management.
- Overvågning: View system status, connected devices, traffic statistics, and event logs.
- Firmwareopdateringer: Manage and apply firmware upgrades to the controller.
6.3. Nøglefunktioner ovenforview
- Cloud Services Optimization: Designed to enhance the performance and security of cloud-based applications.
- Unified Policy Management: Centralized control for both wired and wireless network policies.
- Mobility Firewall with AppRF: Provides deep packet inspection and application-level visibility for over 1,500 applications, allowing for real-time optimization of bandwidth and network paths.
- Secure IP Tunnels: Protects branch traffic across public and private networks.
- Adaptive Radio Management (ARM) & ClientMatch: Technologies for optimizing wireless performance and client connectivity.
- RFProtect Spectrum Analysis: Provides wireless intrusion protection and interference detection.
7. Vedligeholdelse
7.1. Firmwareopdateringer
Tjek regelmæssigt HP Aruba-supporten website for the latest firmware versions. Keeping your controller's firmware up-to-date ensures optimal performance, security, and access to new features. Follow the instructions provided with the firmware release notes for the update process, typically performed via the web GUI or CLI.
7.2. Rensning
To maintain proper airflow and prevent dust buildup, periodically clean the exterior of the controller. Use a soft, dry cloth. Do not use liquid or aerosol cleaners directly on the device. Ensure the device is powered off and disconnected from the power source before cleaning.
7.3. Miljøhensyn
Ensure the operating environment adheres to the specified temperature and humidity ranges. Avoid placing the controller near heat sources or in direct sunlight. Maintain clear space around ventilation openings to prevent overheating.
8. Fejlfinding
Dette afsnit indeholder løsninger på almindelige problemer, du kan støde på.
- Ingen strøm:
- Check if the power cord is securely connected to both the controller and the power outlet.
- Kontroller, at stikkontakten fungerer.
- Ensure the Power LED on the front panel is illuminated.
- Ingen netværksforbindelse:
- Check the Ethernet cables for secure connections to both the controller and the network device.
- Verify that the LINK/ACT LEDs for the connected ports are solid green or blinking.
- Confirm network settings (IP address, subnet mask, gateway) are correctly configured.
- Ensure connected devices are powered on and functioning.
- Kan ikke få adgang til administrationsgrænsefladen:
- Hvis du bruger web GUI, ensure your computer is on the same network segment as the controller or has a route to it.
- Verify the controller's IP address.
- Ryd din browsers cache, eller prøv en anden browser.
- If using console access, double-check serial port settings (baud rate, data bits, parity, stop bits, flow control).
- Dårlig trådløs ydeevne:
- Ensure connected Access Points (APs) are properly configured and online.
- Check for potential Wi-Fi interference from other devices.
- Review controller logs for any error messages related to APs or wireless clients.
- Consult the Aruba documentation for advanced wireless optimization techniques.
If you continue to experience issues, refer to the comprehensive documentation available on the HP Aruba support webwebstedet eller kontakt teknisk support.
9. Specifikationer
| Feature | Specifikation |
|---|---|
| Mærke | HEWLETT PACKARD |
| Modelnummer | JW687A |
| Antal havne | 8 (RJ-45) + SFP/SFP+ slots |
| Interface | RJ45, USB, Console |
| Dataoverførselshastighed | Op til 8 gigabit pr. sekund |
| Switch Type | Administreret |
| Varens vægt | 96 ounces (ca. 2.72 kg) |
| Øverste temperaturvurdering | 40 grader Celsius |
| Inkluderede komponenter | Rackmonteringssæt |
| UPC | 190017027425 |
10. Garantioplysninger
This HP Aruba product is covered by a limited warranty. For detailed information regarding warranty terms, conditions, and duration, please refer to the warranty card included with your product or visit the official HP Aruba webwebsted. Gem din købsbevis til garantikrav.
11. Teknisk support
For technical assistance, product documentation, software downloads, and frequently asked questions, please visit the official HP Aruba support webwebsted:
www.arubanetworks.com/support/
You may also contact HP Aruba customer service directly for further assistance.