
Indledning
This manual provides detailed instructions for the installation, operation, and maintenance of your Venstar T1900 Residential Slimline Platinum Thermostat. Please read this manual thoroughly before attempting to install or operate the thermostat to ensure proper function and to avoid potential damage.
Vigtige sikkerhedsoplysninger
- Sluk altid for strømmen til varme-/kølesystemet ved hovedafbryderen eller sikringsboksen, før du installerer eller servicerer termostaten.
- Denne termostat fungerer på 24 volt vekselstrøm. Må ikke tilsluttes til netspændingen.tage (120V eller 240V).
- Installationen bør udføres af en kvalificeret tekniker, hvis du ikke er bekendt med elektriske ledninger.
- Do not short circuit the terminals on the gas valve or at the system control to test the thermostat. This will damage the thermostat and void the warranty.
- Sørg for, at alle ledningsforbindelser er sikre og isolerede for at forhindre kortslutninger.
Pakkens indhold
Bekræft, at din pakke indeholder følgende varer:
- Venstar T1900 termostatenhed
- Monteringsudstyr (skruer og vægankre)
- Brugervejledning (dette dokument)
Produkt overview
The Venstar T1900 is a 7-day programmable digital thermostat designed for residential use. It offers precise temperature control and energy-saving scheduling capabilities. This thermostat is compatible with heat/cool, heat pump, and dual-fuel systems, controlling up to three heat stages og to seje stages.
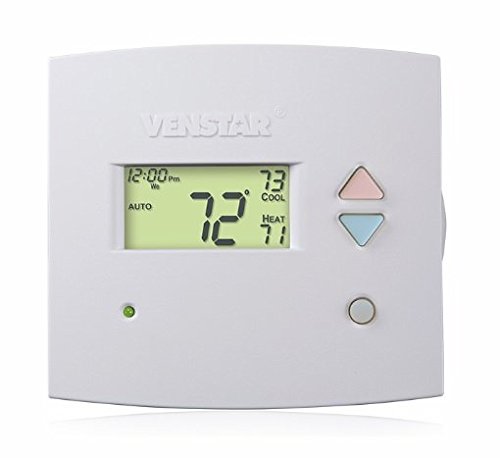
Figur 1: Front view of the Venstar T1900 Thermostat. This image displays the thermostat's LCD screen and control buttons, indicating its slimline design.
Nøglefunktioner:
- 7-dages programmerbarhed: Allows for customized heating and cooling schedules for each day of the week.
- Systemkompatibilitet: Works with heat/cool, dual-fuel, and heat pump systems.
- Multi-Stage Kontrol: Manages up to three heat stages og to seje stages.
- Mulighed for fjernbetjening: Controllable by phone using an optional add-on (sold separately).
- Automatic or Manual Operation: Provides flexibility for scheduled or on-demand temperature adjustments.
Installationsvejledning
Nødvendige værktøjer:
- Skruetrækker (Phillips og/eller flad)
- Drill with appropriate drill bit (if installing new wall anchors)
- Afisoleringstænger
- Blyant
- Niveau (valgfrit)
1. Sluk for strømmen
Locate the circuit breaker or fuse box that controls your heating and cooling system. Turn off the power completely before proceeding with any wiring.
2. Remove Old Thermostat (if applicable)
- Fjern forsigtigt dækslet på din gamle termostat.
- Take a picture of the existing wiring connections for reference.
- Label each wire with the terminal designation it was connected to (e.g., R, G, Y, W).
- Disconnect the wires and remove the old thermostat's mounting plate from the wall.
3. Monter den nye termostatbase
- Separate the front cover of the T1900 thermostat from its base plate.
- Position the base plate on the wall where you want to install the thermostat. Ensure it is level.
- Marker monteringshullerne med en blyant.
- Bor forhuller om nødvendigt, og isæt vægankre.
- Fastgør termostatens bundplade til væggen med de medfølgende skruer.
4. Ledninger
Connect the wires from your HVAC system to the corresponding terminals on the T1900 thermostat base. Refer to the wiring diagram provided with your specific HVAC system for precise connections. Ensure wires are stripped approximately 3/8 inch and securely fastened under the terminal screws.
Almindelige terminalbetegnelser:
- R/Rc/Rh: 24V Power (Heating/Cooling)
- C: Common (24V return)
- G: Ventilator
- Y/Y1: Kompressor Stage 1 (køling)
- Y2: Kompressor Stage 2 (køling)
- W/W1: Varme Stage 1 (Opvarmning)
- W2: Varme Stage 2 (Opvarmning)
- O/B: Reversing Valve (Heat Pumps)
Note: The T1900 supports various system types. Consult the detailed wiring diagrams in the full installation manual for specific configurations (e.g., heat pump with auxiliary heat, conventional multi-stage systems).
5. Fastgør termostaten til basen
Once wiring is complete and verified, carefully align the thermostat front cover with the mounted base plate and snap it into place.
6. Gendan strømmen
Return to your circuit breaker or fuse box and restore power to your heating and cooling system.
Indledende opsætning
Upon initial power-up, the thermostat may prompt you to configure basic settings. Follow the on-screen instructions to set the current date, time, and system type (e.g., Conventional, Heat Pump).
System Type Configuration:
It is crucial to correctly configure the thermostat for your specific HVAC system. Incorrect settings can lead to improper operation or damage. Access the installer settings menu (refer to the full installation guide for specific button sequences) to select:
- Systemtype: Heat/Cool, Heat Pump, Dual Fuel
- Antal varme Stages
- Antal Cool Stages
- Reversing Valve Operation: O (Cooling) or B (Heating)
Betjeningsvejledning
Forstå skærmen:
The LCD screen displays the current temperature, set temperature, system mode, fan mode, time, and programming status. Refer to the icons and indicators on the screen for current operational status.
Setting System Mode:
Tryk på MODE button to cycle through available system modes:
- VARME: The system will operate to maintain the heating setpoint.
- FEDT NOK: The system will operate to maintain the cooling setpoint.
- BIL: The thermostat automatically switches between heating and cooling as needed to maintain the set temperature range.
- OFF: Varme- og kølesystemet er slukket.
Setting Fan Mode:
Tryk på FAN knap til at skifte mellem ventilatortilstande:
- BIL: Ventilatoren kører kun, når varme- eller kølesystemet er aktivt i drift.
- PÅ: Ventilatoren kører kontinuerligt, uanset om der er behov for varme eller kølefunktion.
Justering af temperatur:
Brug UP og NED arrow buttons to adjust the desired temperature setpoint. In programmable modes, this will temporarily override the schedule until the next scheduled change.
Programming Schedules (7-Day):
The T1900 allows for 7-day programming, enabling different schedules for each day of the week. This feature helps save energy by adjusting temperatures when you are away or asleep.
- Tryk på PROGRAM knappen for at gå ind i programmeringstilstand.
- Brug DAG knappen til at vælge den dag eller gruppe af dage, du ønsker at programmere (f.eks. man-fre, lør-søn eller individuelle dage).
- Brug TID button to cycle through the four available periods: Wake, Leave, Return, Sleep.
- Brug UP og NED arrow buttons to set the desired temperature for each period.
- Brug HOLDE button to exit programming mode or save changes.
Refer to the detailed programming section in the full user guide for advanced options and specific button sequences.
Remote Control (Optional Add-on):
The Venstar T1900 thermostat can be controlled remotely via a phone using an optional add-on module (sold separately). This module connects to the thermostat and allows for remote access and control through a dedicated application. Installation and setup instructions for the remote control module are provided with the module itself.
Opretholdelse
Rengøring af termostaten:
To maintain the appearance and functionality of your thermostat, periodically wipe the exterior with a soft, damp klud. Brug ikke slibende rengøringsmidler, opløsningsmidler eller kemiske spray, da disse kan beskadige plastik- og elektroniske komponenter.
Udskiftning af batteri:
The Venstar T1900 thermostat does not require batteries for operation as it is powered by the 24V AC system.
Fejlfinding
If you experience issues with your Venstar T1900 thermostat, consult the following common problems and solutions:
| Problem | Mulig årsag | Løsning |
|---|---|---|
| Termostatdisplayet er tomt | Ingen strøm til termostaten. | Kontroller afbryderen til dit HVAC-system. Sørg for, at alle ledningsforbindelser er sikre. |
| Heating/Cooling system does not respond | Incorrect system mode selected; wiring issue; system lockout. | Verify the system mode (HEAT/COOL/AUTO). Check wiring connections. Wait 5 minutes for system lockout to reset. |
| Temperaturaflæsningen virker unøjagtig | Termostatens placering; sensorblokering. | Ensure the thermostat is not exposed to direct sunlight, drafts, or heat sources. Clean any dust from the thermostat vents. |
| Programming schedule is not working | Program not saved; temporary override active; incorrect time/day setting. | Ensure programs are saved. Check if a temporary override is active and cancel it. Verify current time and day settings. |
| Ventilatoren kører kontinuerligt i AUTO-tilstand | Fan mode set to ON; wiring issue. | Press the FAN button to ensure it is set to AUTO. Check fan wiring. |
If these solutions do not resolve the issue, please contact customer support or a qualified HVAC technician.
Specifikationer
| Feature | Specifikation |
|---|---|
| Mærke | Venstar |
| Modelnavn | Venstar T1900 |
| Controller type | Tryk knap |
| Speciel funktion | Programmerbar |
| Farve | Hvid |
| Specifikke anvendelser af produktet | Heat Pump, Heater |
| Temperaturkontrol type | Programmable, Smart/Remote (with add-on) |
| Voltage | 24 Volt AC |
| Display Type | LCD eller LED |
| Kontrolmetode | Remote (with add-on) |
| Baggrundsbelysning | Ja |
| Produktdimensioner | 5.3 x 2 x 2 tommer |
| Varens vægt | 0.01 ounce |
| Batterier påkrævet? | Ingen |
Garantioplysninger
Venstar products are manufactured to high-quality standards. This product is covered by a limited warranty against defects in materials and workmanship. The specific terms and duration of the warranty may vary. Please refer to the warranty card included with your product or visit the official Venstar webwebstedet for detaljerede garantioplysninger og registreringsprocedurer.
Kundesupport
For technical assistance, troubleshooting, or warranty inquiries, please contact Venstar customer support. You can typically find contact information, including phone numbers and email addresses, on the official Venstar webwebsted (www.venstar.com) or on the product packaging.
When contacting support, please have your thermostat model number (T1900) and any relevant purchase information ready.