Indledning
Welcome to the Necchi N82 Automatic Sewing Machine instruction manual. This guide provides essential information for the safe and efficient operation of your new sewing machine. Please read this manual thoroughly before using the machine to ensure proper setup, operation, and maintenance.
The Necchi N82 is a robust and versatile sewing machine, ideal for both beginners and experienced users. It features 8 stitch points, 14 programs, and a 4-step automatic buttonhole function, designed to handle various sewing projects with ease.
Vigtige sikkerhedsinstruktioner
Når du bruger et elektrisk apparat, skal grundlæggende sikkerhedsforanstaltninger altid følges, herunder følgende:
- Læs alle instruktioner, før du bruger denne symaskine.
- Opbevar disse instruktioner et praktisk sted i nærheden af maskinen.
- Tag altid stikket ud af symaskinen umiddelbart efter brug og før rengøring, fjernelse af dæksler, smøring eller andre brugerjusteringer, der er nævnt i instruktionsmanualen.
- Do not allow children to play with the machine. Close supervision is necessary when the sewing machine is used by or near children.
- Brug kun dette produkt til det tilsigtede formål som beskrevet i denne manual. Brug kun tilbehør, der er anbefalet af producenten.
- Brug aldrig denne symaskine, hvis den har en beskadiget ledning eller et stik, hvis den ikke fungerer korrekt, hvis den er faldet eller beskadiget eller er faldet i vand.
- Tab eller indsæt aldrig nogen genstand i nogen åbning.
- Må ikke bruges udendørs.
- Må ikke anvendes, hvor der anvendes aerosolprodukter (spray), eller hvor der indgives ilt.
- For at afbryde skal du dreje alle knapper til slukket position, og derefter tage stikket ud af stikkontakten.
- Hold fingrene væk fra alle bevægelige dele. Der kræves særlig forsigtighed omkring symaskinens nål.
- Brug altid den rigtige stingplade. Den forkerte plade kan få nålen til at knække.
- Brug ikke bøjede nåle.
- Træk eller skub ikke i stoffet under syning. Dette kan afbøje nålen og få den til at knække.
- Bær sikkerhedsbriller.
Pakkens indhold
Upon unpacking your Necchi N82 sewing machine, please ensure all the following items are present:
- Necchi N82 Sewing Machine
- Standard Zigzag Foot
- Lynlås fod
- Knaphulsfod
- Skruetrækker
- Olieringsenhed
- Needles (assorted)
- Quilt guide
- 3 spoler
- Darning Plate (for feed dog cover)
- 2 Spool Holders (large and small)
- Filtpude
- Electric Foot Pedal
- Instruktionsmanual (dette dokument)
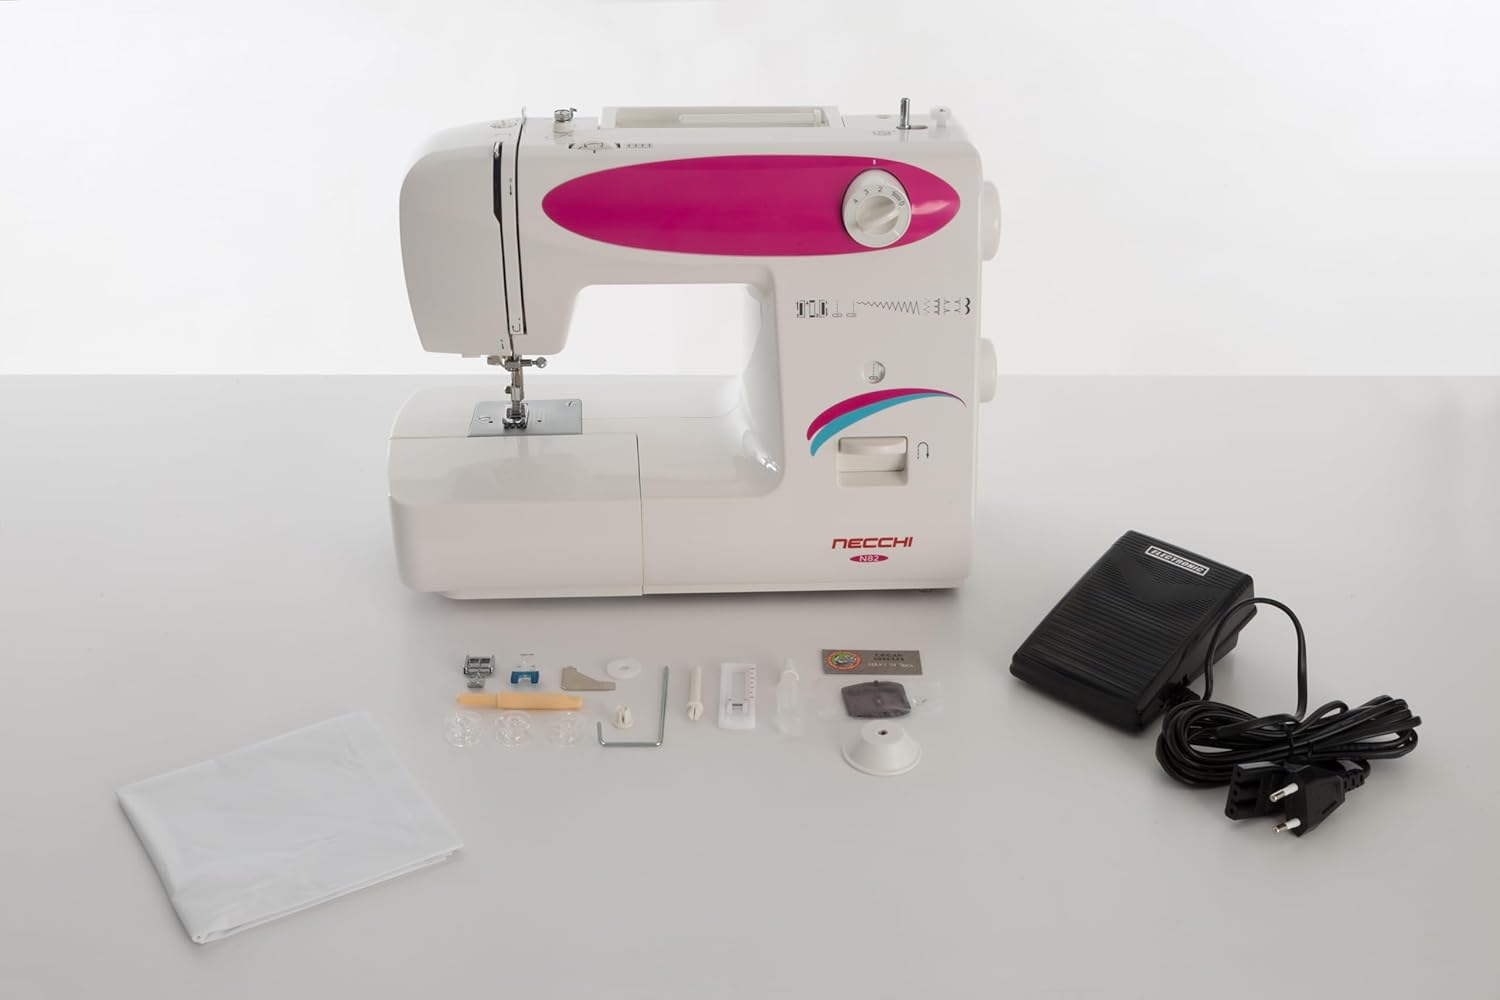
Image: The Necchi N82 sewing machine displayed with its complete set of accessories, including various presser feet, bobbins, needles, and the foot pedal.
Maskinen er slutview
Familiarize yourself with the main components of your Necchi N82 sewing machine.

Billede: En klar front view of the Necchi N82 sewing machine, highlighting its general design and controls.

Billede: En detaljeret front view of the Necchi N82 sewing machine, showing the needle area, presser foot, and stitch selection dial.

Billede: En side view of the Necchi N82 sewing machine, illustrating its profile and power input area.
Nøglekomponenter:
- Sømvælgerknap: Bruges til at vælge ønskede stingmønstre.
- Stitch Length/Width Dial: Adjusts the length and width of stitches.
- Spændingsskive: Controls the tension of the upper thread.
- Baglæns stinghåndtag: For reinforcing seams.
- Trykfodsløfter: Hæver og sænker trykfoden.
- Nål Clamp: Holder nålen på plads.
- Spoleopvikler: For winding thread onto bobbins.
- Fri arm: Giver mulighed for syning af cylindriske genstande som ærmer og buksekanter.
- Foot Pedal Connector: For connecting the electric foot pedal.
- Afbryderen: Tænder/slukker maskinen.
Opsætning
1. Strømtilslutning
- Sørg for, at tænd/sluk-knappen er i "OFF"-positionen.
- Connect the foot pedal cord to the machine's foot pedal connector.
- Sæt netledningen i en passende stikkontakt.
- Turn the power switch to "ON". The sewing light will illuminate.
2. Spolning af spolen
- Place a spool of thread on the spool pin, securing it with a spool holder.
- Før tråden gennem den øverste trådfører og rundt om spolespændingsskiven.
- Placer en tom spole på spolevinderens spindel.
- Vikl tråden med uret flere gange rundt om spolen.
- Skub spolevinderen til højre.
- Tryk forsigtigt på fodpedalen for at starte spolningen. Stop, når spolen er fuld.
- Cut the thread and push the bobbin winder spindle back to the left. Remove the wound bobbin.
3. Isætning af spolen
- Åbn spoledækslet.
- Sæt den opviklede spole i spolekapslen, og sørg for, at tråden afvikles i den rigtige retning (normalt mod uret).
- Før tråden gennem spændingsfjederen og ind i trådførerhullet.
- Luk spoledækslet.
4. Trådning af overtråden
- Løft trykfodsløfteren.
- Læg en trådrulle på trådrulleholderen.
- Før tråden gennem den øverste trådfører.
- Follow the numbered threading path down to the tension discs, up to the take-up lever, and then down to the needle.
- Thread the needle from front to back. Pull about 15 cm (6 inches) of thread through the needle eye.
5. Optagning af undertråden
- Hold let i overtråden med venstre hånd.
- Turn the handwheel towards you (counter-clockwise) to lower the needle into the needle plate and then raise it again.
- The needle thread will catch the bobbin thread, forming a loop. Pull the loop up with the upper thread.
- Træk begge tråde (overtråd og spole) under trykfoden og mod maskinens bagside.
Betjeningsvejledning
1. Valg af sting
The Necchi N82 offers 8 stitch points and 14 programs. To select a stitch, turn the Stitch Selector Dial until the desired stitch pattern aligns with the indicator mark. The visual stitch selection window allows you to see the chosen pattern.

Image: The Necchi N82 sewing machine set up on a table with fabric, scissors, and other sewing accessories, demonstrating a typical use scenario.
2. Justering af stinglængde og -bredde
Adjust the stitch length and width using the dedicated dials. Refer to the zigzag scale for precise adjustments, especially for decorative or zigzag stitches.
3. Justering af trådspænding
The tension dial controls the tightness of the upper thread. For balanced stitches, the upper and lower threads should interlock evenly between the fabric layers. Adjust as needed for different fabrics and threads.
4. Automatic Buttonhole Function (4-Step)
- Fastgør knaphulsfoden.
- Select the first step of the buttonhole program on the stitch selector dial.
- Follow the machine's markings or the manual's specific instructions for each of the four steps to create a complete buttonhole.
5. Syning med frie arme
To use the free arm, slide off the accessory box. This exposes the narrow free arm, perfect for sewing cuffs, sleeves, pant hems, and other small, cylindrical items.

Image: The Necchi N82 sewing machine with its removable accessory box detached, showcasing the free arm feature for sewing tubular items.
6. Baglæns syning
Press and hold the reverse stitch lever to sew in reverse. This is used to secure the beginning and end of seams, preventing unraveling. Release the lever to resume forward stitching.
7. Adjustable Presser Foot Pressure
The machine features an adjustable presser foot pressure control. This allows you to fine-tune the pressure applied to the fabric, which is crucial when working with very thin or very thick materials to ensure even feeding.
Opretholdelse
Regular maintenance ensures the longevity and optimal performance of your Necchi N82 sewing machine. Always unplug the machine before performing any maintenance.
1. Rensning
- Foderhunde: Remove the needle plate and use the small brush (included) to clean lint and dust from the feed dogs.
- Spoleområde: Remove the bobbin and bobbin case. Clean any lint or thread scraps from this area with the brush.
- Maskinoverflade: Tør maskinens yderside af med en blød, tør klud. Brug ikke skrappe kemikalier eller slibende rengøringsmidler.
2. Oliering
Your machine comes with an oiler. Apply a small drop of sewing machine oil to the moving metal parts in the bobbin area and other designated oiling points as indicated in a more detailed diagram (if available in a physical manual). Over-oiling can cause stains on fabric.
3. Udskiftning af nåle
- Sluk for maskinen, og tag stikket ud.
- Løsn nålen clamp skru med skruetrækkeren.
- Fjern den gamle nål.
- Sæt en ny nål i med den flade side mod maskinens bagside, og skub den så langt op som muligt.
- Spænd nålen clamp skrue sikkert.
Fejlfinding
Dette afsnit omhandler almindelige problemer, du kan støde på. Ved problemer, der ikke er nævnt her, bedes du kontakte kundesupport.
| Problem | Mulig årsag | Løsning |
|---|---|---|
| Springet sting over | Forkert nål, bøjet nål, forkert trådning, forkert nålestørrelse til stoffet. | Udskift nålen med den korrekte type/størrelse, tråd maskinen korrekt om, og sørg for, at nålen er sat helt i. |
| Thread Breakage (Upper) | Incorrect upper thread tension, poor quality thread, needle bent or blunt, improper threading, burr on needle plate. | Adjust tension, use good quality thread, replace needle, re-thread, check for burrs. |
| Trådbrud (spole) | Bobbin wound unevenly, bobbin inserted incorrectly, lint in bobbin case, incorrect bobbin tension. | Rewind bobbin evenly, re-insert bobbin correctly, clean bobbin case, check bobbin tension. |
| Ujævne sting / Rynker | Incorrect thread tension, wrong needle size, fabric not feeding smoothly, incorrect presser foot pressure. | Adjust tension, use appropriate needle, ensure fabric is not pulled/pushed, adjust presser foot pressure. |
| Maskine starter ikke | Power cord not plugged in, foot pedal not connected, power switch off, bobbin winder engaged. | Check all connections, turn power on, disengage bobbin winder. |
Specifikationer
Technical specifications for the Necchi N82 Automatic Sewing Machine:
| Feature | Detalje |
|---|---|
| Mærke | Necchi |
| Modelnummer | N82 |
| Farve | Hvid |
| Produktmål (L x B x H) | 38 x 30 x 17 cm |
| Varens vægt | 6 kg |
| Materiale | Plast |
| Syprogrammer | 14 (including 8 stitch points) |
| Knaphulstype | 4-trins automatisk |
| Strømkilde | Elektrisk med ledning |
| Automatisk sluk | Ingen |
| GTIN | 08031204113885 |
Garanti og support
For warranty information, please refer to the warranty card included with your purchase or contact your retailer.
If you require technical assistance or have questions regarding the operation or maintenance of your Necchi N82 sewing machine, please contact Necchi customer support or your authorized service center.