Indledning
This manual provides instructions for the setup, operation, and maintenance of your Youshiko Large LCD Radio Controlled Wall and Desk Clock, Model YC8055. This clock is designed to provide accurate time, date, indoor temperature, and humidity readings. It automatically synchronizes with the MSF radio time signal from the UK, ensuring precise timekeeping and automatic adjustments for Daylight Saving Time.
Sikkerhedsoplysninger
- Use only the specified battery type (2 x AA Mignon LR06).
- Bland ikke gamle og nye batterier eller forskellige typer batterier.
- Sørg for, at batterierne er isat med korrekt polaritet (+/-).
- Fjern udtjente batterier omgående for at forhindre lækage.
- Udsæt ikke uret for ekstreme temperaturer, direkte sollys eller høj luftfugtighed.
- Hold uret væk fra stærke magnetfelter.
- Clean the clock with a soft, dry cloth. Do not use abrasive cleaners or liquids.
Pakkens indhold
- Youshiko Large LCD Radio Controlled Wall and Desk Clock (Model YC8055)
- Integrated stand for desk placement
- Vægmonteringshuller
Note: 2 x AA batteries are not included and must be purchased separately.
Produkt overview
Displaylayout
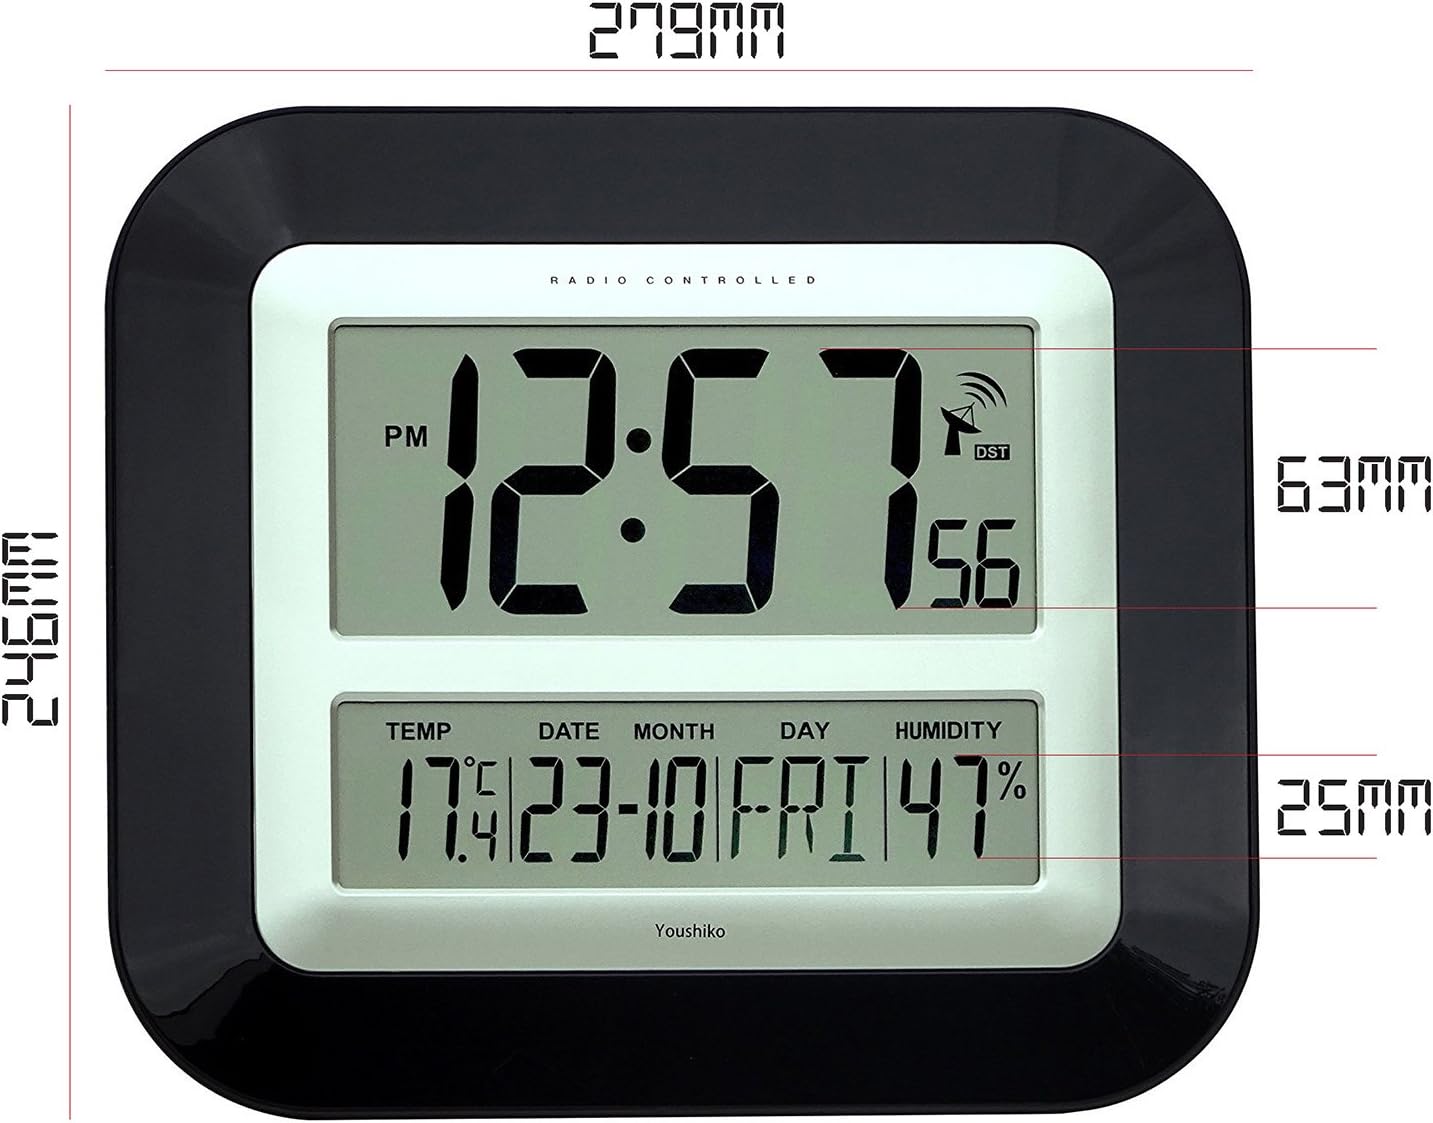
The large LCD screen provides clear visibility of time, date, temperature, and humidity. The display is designed for easy readability in various indoor environments.

Billede: Front view of the Youshiko YC8055 clock display, showing the time, date, day, temperature, humidity, and radio signal indicator. Dimensions are overlaid, indicating a height of 279mm and width of 246mm for the main unit, with display sections measuring 63mm and 25mm in height respectively.
Knapper og kontroller
The control buttons are located on the back of the unit for setting and adjusting various functions.

Billede: Bag view of the Youshiko YC8055 clock, highlighting the control buttons: SET, ALARM, UP (▲), DOWN (▼), WAVE, and SNOOZE. The battery compartment is also visible at the bottom center.
Stand and Mounting Options
The clock can be placed on a desk using its integrated stand or mounted on a wall using the provided hanging holes.
Billede: Side view of the Youshiko YC8055 clock, illustrating the extended integrated stand for stable desk placement.
Opsætning
1. Batteriinstallation
- Åbn batteridækslet på bagsiden af uret.
- Insert 2 x AA (LR6) batteries, ensuring correct polarity (+ and -).
- Luk batterirummets dæksel forsvarligt.
2. Initial Radio Signal Reception
Upon battery insertion, the clock will automatically attempt to receive the MSF radio time signal. This process may take a few minutes (typically less than 3 minutes). During this time, an antenna symbol will usually appear on the display, indicating it is searching for the signal. Once the signal is received, the clock will automatically set the correct time, date, and adjust for Daylight Saving Time (DST) if applicable.
If the clock does not set itself within a few minutes, try placing it near a window for better signal reception. Radio-controlled clocks can sometimes struggle to pick up signals in certain rooms or locations due to interference or building materials.
3. Radio Control Systems
This clock is designed for the UK and Ireland market, utilizing the MSF signal. For other regions, different radio control systems may be in use.

Billede: Diagram illustrating the two main radio control systems in Europe: MSF for the UK and Ireland (transmitters in Cumbria, UK) and DCF-77 for the rest of Europe (transmitters in Mainflingen, Germany). It advises choosing the correct system for your location.
4. Manual Time/Date Adjustment (if needed)
In rare cases where the radio signal cannot be received, or if you wish to manually adjust certain settings, follow these steps:
- To change 12h/24h display format: Tryk og hold på [Sæt] button until the display shows either '12h' or '24h'. Use the [▲] (Op) eller [▼] (Down) buttons to toggle to your desired setting. Press [Sæt] again to confirm. Continue pressing [Sæt] a few more times until the clock returns to displaying the time.
- Other manual settings (e.g., time zone, specific time/date) may be available by repeatedly pressing the [Sæt] knap. Brug [▲] og [▼] knapper til at justere værdier.
Drift
Tidsvisning
The clock displays hours, minutes, and seconds. It can be set to either a 12-hour format (with AM/PM indicator) or a 24-hour format.
Dato- og dagsvisning
The lower section of the display shows the current date (day and month) and the day of the week.
Visning af temperatur og fugtighed
The clock continuously monitors and displays the indoor temperature (in Celsius or Fahrenheit) and relative humidity. While providing a general indication, these readings are not intended for scientific accuracy.
Alarm funktion
The clock includes an alarm with a snooze function.
- Indstilling af alarm: Tryk på [ALARM] button to enter alarm setting mode. Use the [▲] og [▼] knapperne for at indstille det ønskede alarmtidspunkt. Tryk på [ALARM] igen for at bekræfte.
- Aktivering/deaktivering af alarm: Tryk på [ALARM] button briefly outside of setting mode to toggle the alarm on or off. An alarm icon will appear on the display when activated.
- Snooze-funktion: Når alarmen lyder, skal du trykke på [SNOOZE] button to temporarily silence the alarm. The alarm will sound again after a short interval.
Opretholdelse
Rensning
Wipe the clock with a soft, dry cloth. Do not use liquid cleaners, sprays, or abrasive materials, as these can damage the display or casing.
Udskiftning af batteri
When the display dims or the clock stops functioning, replace the batteries. Follow the battery installation steps in the Setup section. It is recommended to replace both batteries simultaneously.
Fejlfinding
| Problem | Mulig årsag | Løsning |
|---|---|---|
| Clock does not display time or is incorrect. | Batteries are low or incorrectly inserted. No radio signal received. | Check battery polarity and replace if necessary. Move the clock to a location near a window and allow it to search for the signal. Manually set the time if signal reception remains an issue. |
| Antenna symbol is flashing or not displayed. | Clock is searching for or has lost the radio signal. | Ensure the clock is placed in an optimal location for signal reception (e.g., near a window, away from electronic interference). Allow several minutes for synchronization. |
| Temperatur-/fugtighedsaflæsningerne virker unøjagtige. | Environmental factors or general indication. | The temperature and humidity displays provide general indications and are not calibrated for scientific precision. Ensure the clock is not in direct sunlight or near heat/cold sources. |
| Alarmen lyder ikke. | Alarm is not activated or volume is too low (if adjustable). | Ensure the alarm function is turned on (check for alarm icon on display). This model has a fixed alarm volume. |
Specifikationer
| Feature | Detalje |
|---|---|
| Mærke | Youshiko |
| Modelnummer | YC8055 |
| Display Type | Digital LCD |
| Tidsformat | 12t / 24t valgbar |
| Radiostyring | MSF (UK & Ireland) 60 kHz |
| Funktioner | Time, Date, Day of Week, Indoor Temperature, Indoor Humidity, Alarm with Snooze |
| Temperaturenhed | Celsius / Fahrenheit selectable |
| Strømkilde | 2 x AA (LR6) batterier (medfølger ikke) |
| Monteringsmuligheder | Wall mount or Desk stand |
| Dimensioner (H x B x D) | 27.9 cm x 24.6 cm x 3.0 cm (ca. 11 x 9.7 x 1.2 tommer) |
| Materiale | Plastic with clear glass lens |
| Farve | Sort |
| Indendørs/Udendørs brug | Indendørs |
| UPC/GTIN | 635346122354 |
Garanti og support
For warranty information and customer support, please refer to the documentation provided with your purchase or contact Youshiko customer service directly. Keep your proof of purchase for any warranty claims.