Indledning
The REXING V1 is a state-of-the-art 4K Ultra HD Car Dash Cam designed to provide reliable and high-quality video recording of your journeys. Featuring a discreet design, Wi-Fi connectivity, and advanced functionalities like G-Sensor and Parking Monitor, the V1 ensures comprehensive surveillance and peace of mind on the road. This manual provides detailed instructions for setup, operation, and maintenance of your REXING V1 dash cam.
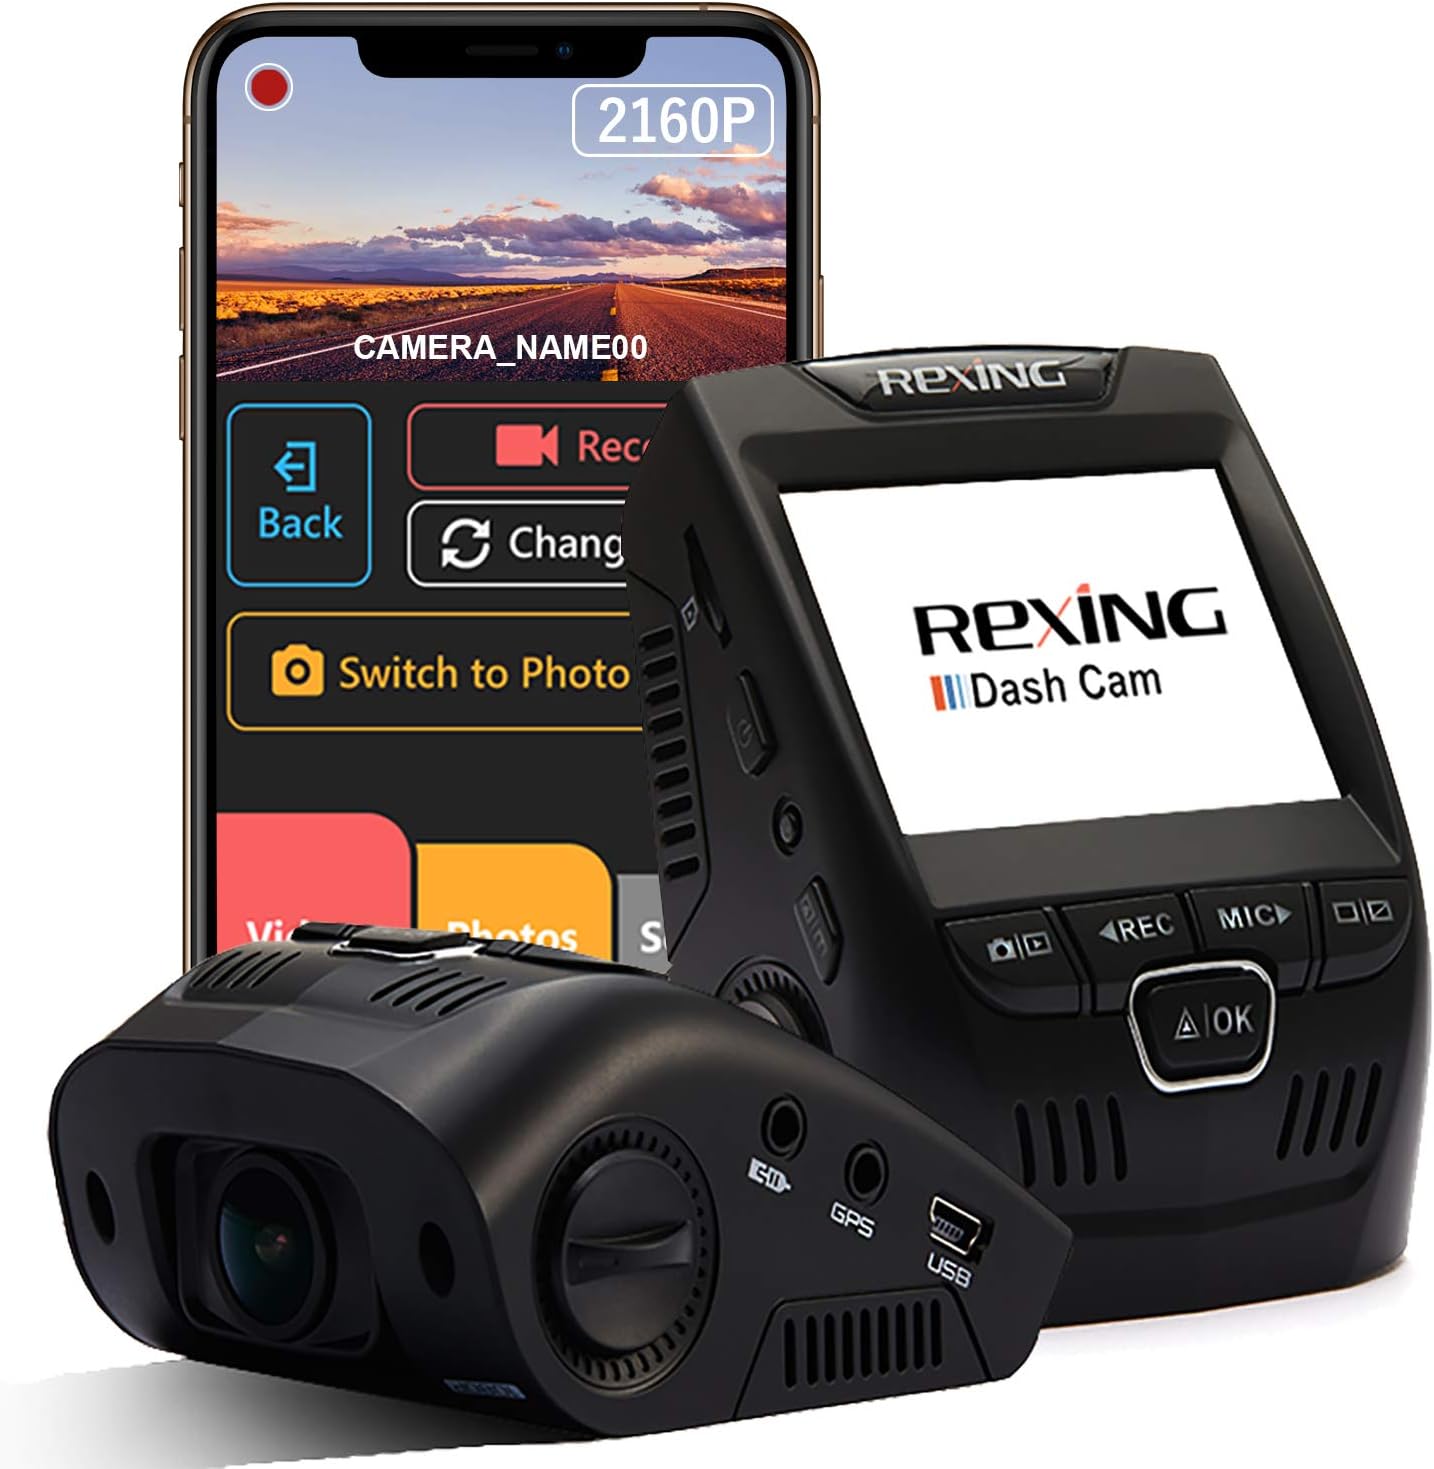
Image: The REXING V1 Dash Cam, showcasing its compact design alongside a smartphone displaying the companion mobile application for wireless control and video management.
Hvad er der i æsken
Upon unboxing your REXING V1 Dash Cam, please verify that all the following components are included:
- Rexing V1 Dash-kamera
- 3M selvklæbende montering
- Strømkabel til bilen (12 fod)
- USB computer cable
- Manual (dette dokument)
Nøglefunktioner
4K Ultra HD Video Recording
The REXING V1 captures stunning 2160p video quality, ensuring clear and detailed footage even when driving at high speeds. This high resolution provides four times the detail of standard 1080p recordings, crucial for capturing license plates and other important details.

Image: Visual representation highlighting the superior clarity of 4K (2160p) video resolution compared to 1080p, as seen on the dash cam display.
170-Degree Ultra Wide Angle Lens & WDR
Equipped with a 7-layer glass lens, the V1 offers a 170-degree wide-angle view, capturing a broad perspective of your surroundings. Wide Dynamic Range (WDR) technology optimizes exposure, ensuring balanced and clear footage in various lighting conditions, from bright daylight to low-light environments.

Image: An icon illustrating the expansive 170-degree wide-angle coverage of the dash cam's lens.
Supercapacitor & Parking Monitor
The V1 utilizes a supercapacitor, providing enhanced durability and resistance to extreme temperatures (-20°F to 176°F), reducing the risk of overheating and extending the device's lifespan. The Parking Monitor feature automatically records a 20-second video upon detecting vibration, or can capture 24/7 time-lapse footage. A smart hardwire kit (sold separately) is required to activate the parking mode.

Image: Icons indicating the dash cam's temperature resistance and the presence of a supercapacitor for reliable performance.
Wi-Fi-forbindelse
Wirelessly connect your mobile device to the dash cam using the dedicated app. This allows you to view, save, and share your recordings conveniently without needing to remove the memory card.

Image: A Wi-Fi icon demonstrating wireless connectivity, with social media logos suggesting easy sharing of footage.
Loop Recording and G-Sensor
Loop recording ensures continuous operation by automatically overwriting the oldest unlocked videos when the memory card is full. The built-in G-Sensor detects collisions, automatically locking the current video footage to prevent it from being overwritten, thus preserving critical evidence.

Image: Icons representing the 24/7 parking mode, motion detection, G-Sensor, and loop recording features of the dash cam.
Opsætningsvejledning
1. Prepare the Micro SD Card
Before first use, insert a high-endurance micro SD card (up to 256GB, Class 10 or higher recommended) into the dash cam's SD card slot. It is recommended to format the SD card within the dash cam's settings before initial use to ensure optimal performance.
2. Monter dashcam'et
Clean the desired mounting area on your windshield. Attach the 3M adhesive mount to the dash cam, then firmly press the mount onto the windshield, ideally behind your rearview mirror for a discreet setup. Ensure the lens has a clear view af vejen.

Image: The REXING V1 dash cam installed discreetly behind a car's rearview mirror, demonstrating its low-profile design.
3. Tilslut strøm
Connect the in-car power cable (12ft) to the dash cam and plug the other end into your vehicle's 12V power outlet (cigarette lighter socket). Route the cable neatly along the windshield edge and dashboard to avoid obstruction.
4. Første opstart og indstillinger
Once connected to power, the dash cam will typically power on automatically when the vehicle starts. Follow the on-screen prompts to set the date, time, and preferred recording settings. Adjust the lens angle for optimal road coverage.
5. Wi-Fi-appforbindelse
Download the REXING Connect App from your mobile device's app store. Enable Wi-Fi on your dash cam and connect your phone to the dash cam's Wi-Fi network. This allows for wireless viewing, saving, and sharing of footage.
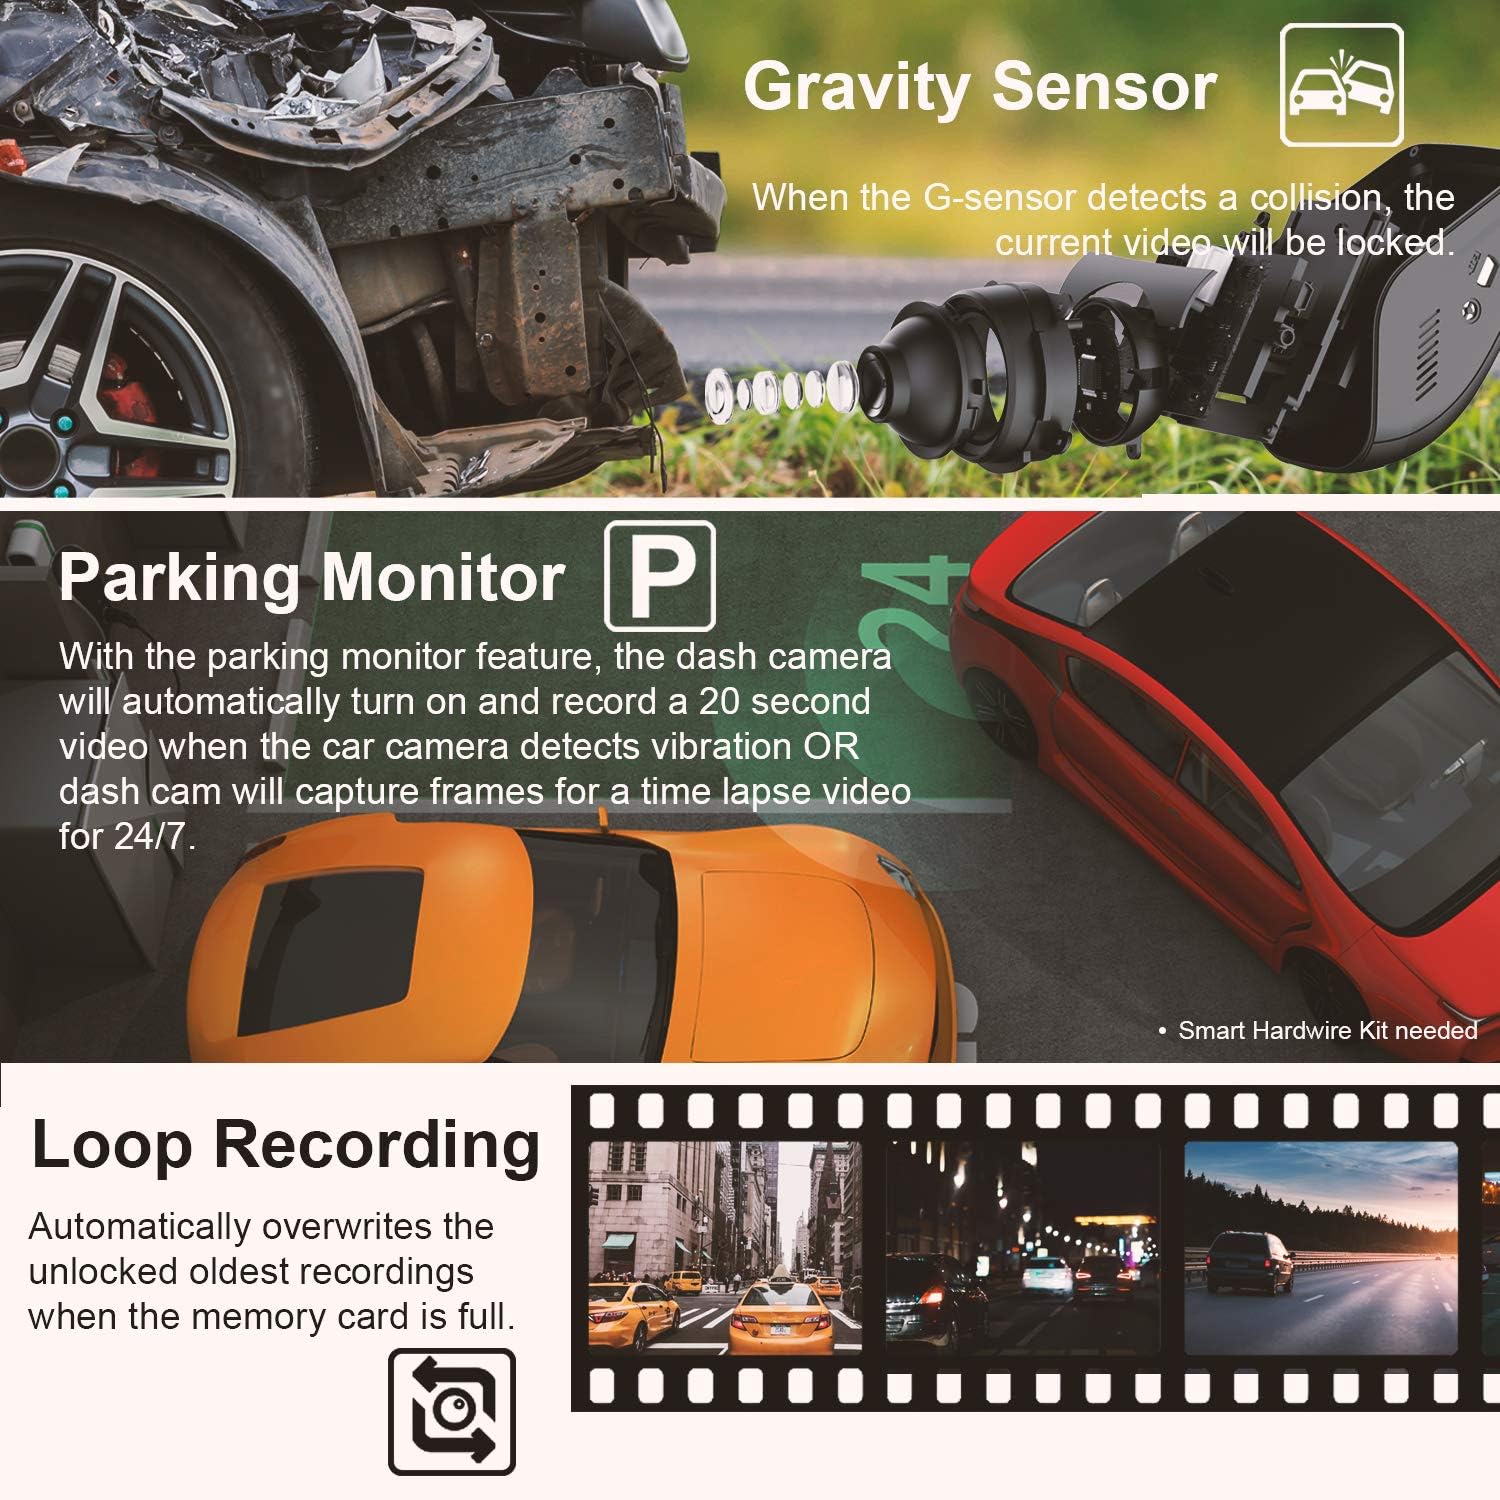
Image: A hand holding a smartphone, showing the REXING Connect app with options to record, change view, switch to photo mode, and access videos/photos/settings.
Betjeningsvejledning
Automatisk optagelse
The REXING V1 automatically begins recording when powered on. Footage is saved in 1, 2, or 3-minute intervals, depending on your settings. When the memory card is full, the oldest unlocked files are automatically overwritten by new recordings (Loop Recording).
G-sensor (optagelse i nødstilfælde)
In the event of a sudden impact or collision, the built-in G-Sensor will detect the event and automatically lock the current video file. This prevents the footage from being overwritten by loop recording, ensuring critical incident data is preserved.
Parkeringsmonitor
When properly installed with a smart hardwire kit (sold separately), the Parking Monitor feature activates when your vehicle is parked. It will automatically turn on and record a 20-second video if it detects vibration. Alternatively, it can capture 24/7 time-lapse video for continuous surveillance.
Wi-Fi App Usage
Use the REXING Connect App to access live view, playback recorded videos, download files to your phone, and adjust settings. This provides a convenient way to manage your dash cam without needing to interact directly with the device's small screen.
Video: An official product video demonstrating the REXING V1 dash cam's features and ease of use, including its discreet design and video quality.
Optional GPS Logger
If you have the optional GPS logger, you can playback your video using the comprehensive GPS Logger software interface on a computer. This software displays real-time information about your speed, location (via Google Maps), and driving route alongside your video footage.

Image: An icon illustrating the GPS tracking feature, showing a map with location pins and a speed indicator.
Opretholdelse
- SD-kortadministration: Regularly format your micro SD card (at least once a month) to maintain optimal recording performance and prevent data corruption. Back up any important footage før formatering.
- Rensning: Use a soft, dry cloth to clean the dash cam's lens and screen. Avoid abrasive cleaners or solvents.
- Temperatureksponering: While the supercapacitor provides excellent temperature resistance, prolonged exposure to extreme direct sunlight or freezing temperatures when parked can still affect the device's longevity. If possible, remove the dash cam from the windshield during extended parking in harsh conditions.
- Firmwareopdateringer: Check the official REXING website periodically for firmware updates. Keeping your dash cam's firmware updated can improve performance and add new features.
Fejlfinding
| Problem | Mulig løsning |
|---|---|
| Dashcam tænder ikke. |
|
| Optagelse stopper eller footage er korrupt. |
|
| Problemer med Wi-Fi-forbindelse. |
|
| Adhesive mount not holding. |
|
| Dårlig videokvalitet om natten. |
|
For more detailed troubleshooting, please refer to the official User Manual available for download her.
Specifikationer
| Feature | Detalje |
|---|---|
| Produktdimensioner | 2 x 2.5 x 3 tommer |
| Varens vægt | 5 ounce |
| Modelnummer | REX-V1 |
| Batterier | 1 Lithium Polymer batteri påkrævet |
| Videooptagelsesopløsning | 2160p (4K Ultra HD) |
| Linsevinkel | 170 grader |
| Support til opbevaring | Up to 256GB Micro SD (high-endurance recommended) |
| Driftstemperatur | -20°F to 176°F (Supercapacitor) |
| Forbindelse | Wi-Fi |
| Særlige funktioner | Loop Recording, G-Sensor, Parking Monitor (requires hardwire kit) |
| Monteringstype | 3M selvklæbende montering |
Garanti og support
REXING products are designed for quality and reliability. For specific warranty information, please refer to the documentation included with your product or visit the official REXING website. REXING offers customer support for product inquiries and technical assistance.
Protection plans are available for purchase separately to extend coverage beyond the standard warranty. These include 2-Year, 3-Year, and Complete Protect plans.
For further assistance, please contact REXING customer support or refer to the comprehensive user guide available on their webwebsted.


