Indledning
Denne manual indeholder detaljerede instruktioner til korrekt installation, brug og vedligeholdelse af din Smartline 12 ft x 24 ft ovale swimmingpoolforing. Denne kraftige, 25-gauge jomfruvinylforing er designet til overjordiske pools med stålside og en væghøjde på 52 tommer og har et toscansk mønster og Unibead-stil for alsidig installation. Overholdelse af disse retningslinjer vil sikre optimal ydeevne og levetid for din poolforing.
Produkt overview
Nøglefunktioner
- Dimensioner: 12 ft x 24 ft oval, egnet til pools med en væghøjde på 52 tommer.
- Materiale: 25 gauge kraftig jomfruvinyl for overlegen holdbarhed.
- Stil: Unibead-design, der muliggør installation af både J-krog og standardperle.
- Mønster: Toscansk, med en kombination af trekant- og rombeformede sten, der danner et chevronbølgemønster.
- Konstruktion: Har 100% jomfruvinyl, dobbeltsvejsede sømme og varmebundet konstruktion for øget styrke.
- Beskyttelse: Udstyret med Lamiclear-teknologi, inklusive en akryl-topcoat og et UV-bestandigt tryklag, der beskytter mod slid, kemikalier og UV-falmning.
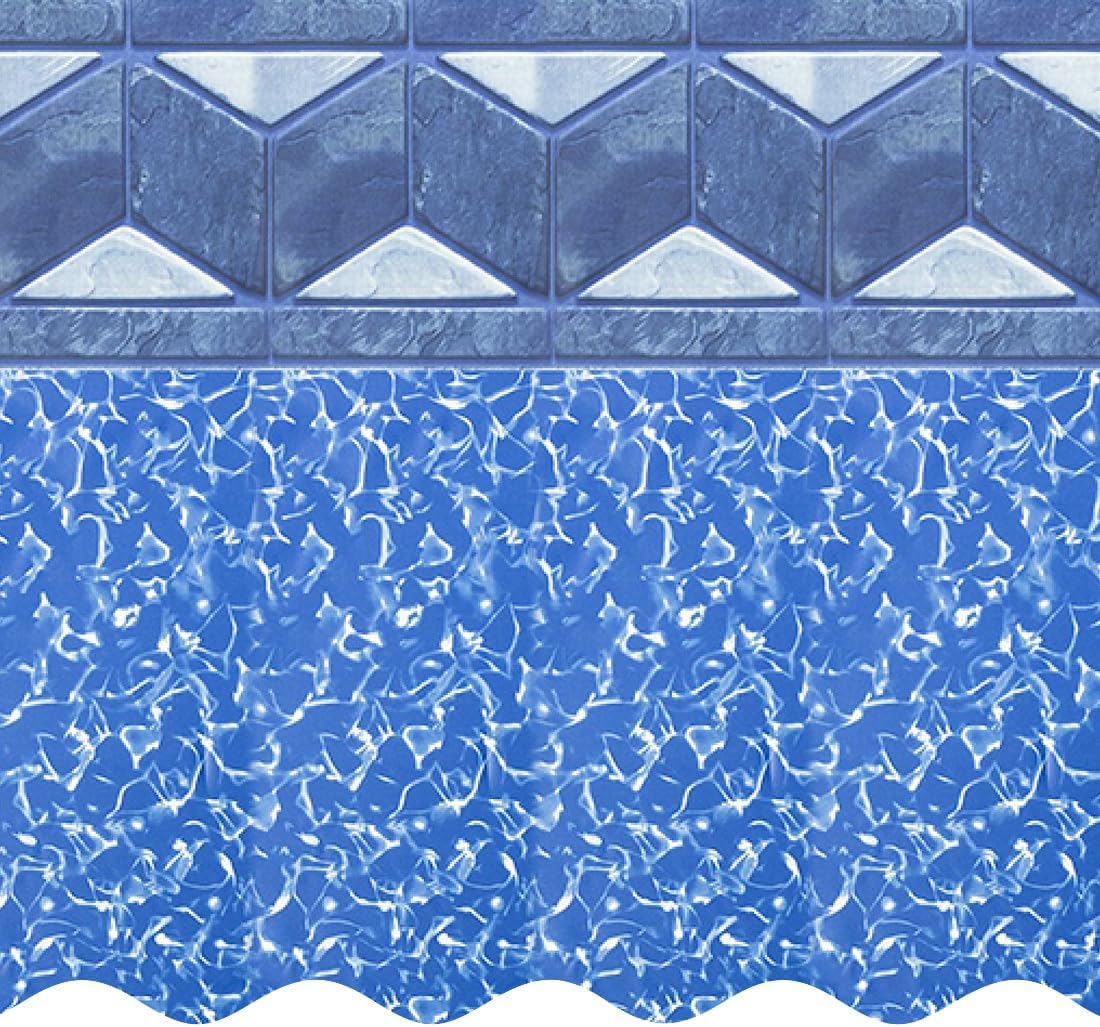
Billede: Nærbillede af Smartline Tuscan Unibead poolliner, vistasing dens karakteristiske mønster.
Inkluderede komponenter
- 12 m x 24 m oval Unibead poolliner (toscansk mønster)
- Skimmerpakninger
- Returpakninger

Billede: Illustration, der viser de medfølgende skimmer- og returpakninger, som er afgørende for korrekt installation af liner omkring poolåbninger.
Opsætning og installation
Tjekliste før installation
- Bekræft poolens mål: Sørg for, at din pool er oval på 12 m x 24 m med en væghøjde på 52 cm. Mål ydervæggen fra jorden til under den øverste rækværk for at få højden, og fra midtpunktet på tværs af de længste og bredeste ender for at få de ovale dimensioner.
- Forbered pooloverfladen: Poolbunden skal være flad, glat og fri for snavs, skarpe genstande eller rødder.
- Tjek vejrforholdene: Ideel installationstemperatur er mellem 21-27 grader Celsius. Undgå blæsende forhold.
- Saml værktøjer: Du kan have brug for en hobbykniv (til fjernelse af J-krogen), målebånd og en blød børste eller kost.
Installationstrin
- Udpak og varm foring: Tag forsigtigt lineren ud af emballagen. Læg lineren i direkte sollys i mindst en time. Dette gør det muligt for det nye vinylmateriale at varme op og blive mere bøjeligt, hvilket gør det lettere at strække og tilpasse under installationen, hvilket hjælper med at forhindre rynker.
- Placer foringen: Placer dugen i midten af poolen, og sørg for, at bundsømmen er centreret, og at dugen er jævnt fordelt.
- Installer Unibead Liner:
- Til overlappende pools (J-krog): Åbn blot J-krogdelen af Unibead-lineren og skub den over den øverste kant af poolvæggen. Sørg for, at den sidder sikkert fast langs hele omkredsen.
- For pools med perlebesætning (standard perlebesætning): Find rillen eller rillemærket på J-krogdelen af foringen. Fjern forsigtigt J-krogen ved at skære langs denne rille. Dette vil kun efterlade standardperlen, som derefter indsættes i din pools perleopsamlingsåbning. Sørg for, at perlen sidder helt fast i opsamlingsstedet.
- Udglat rynker: Når foringen er fastgjort, skal du begynde at udglatte eventuelle rynker fra midten og udad. Du kan bruge en blød kost eller dine hænder.
- Begynd at fylde poolen: Begynd at fylde poolen med vand. Fortsæt med at udglatte eventuelle resterende rynker, efterhånden som vandstanden stiger. Vandets vægt vil hjælpe med at presse pooldugen mod poolvæggene og bunden.
- Installer skimmer og returfittings: Når vandstanden når skimmer- og returåbningerne, skal du forsigtigt skære foringen ud i disse områder. Installer de medfølgende skimmer- og returpakninger og fittings i henhold til din pools specifikke instruktioner. Sørg for en vandtæt forsegling.
- Fortsæt med at fylde: Fyld poolen til det anbefalede driftsniveau.
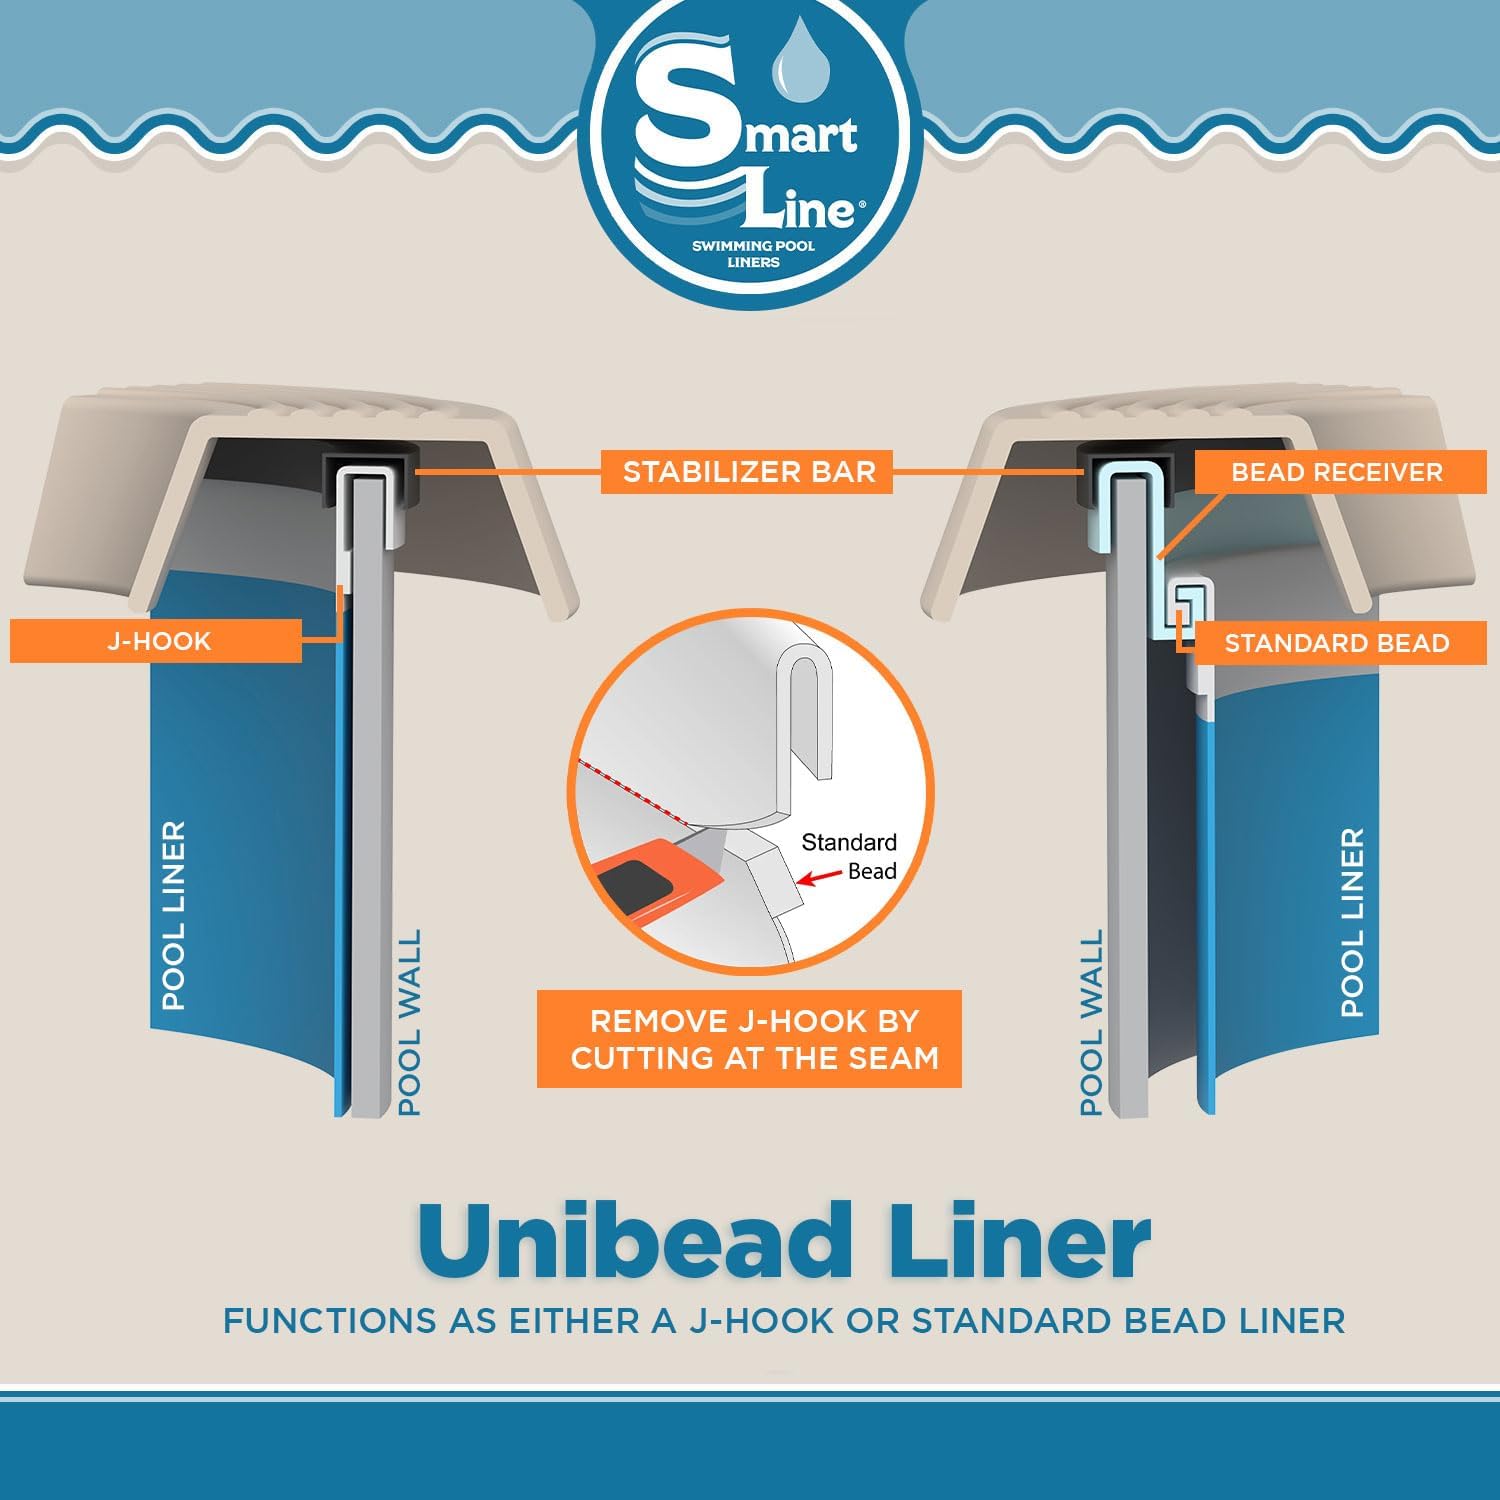
Billede: Diagram, der illustrerer Unibead-linerens dobbelte funktionalitet, og viser, hvordan den kan bruges som en J-krog eller konverteres til en standardperle ved at skære langs sømmen.
Vigtig bemærkning: Denne liner er designet til overjordiske pools med stålside. Den vil ikke Fungerer med Intex- eller Pop-up-pools.
Opretholdelse
Almen pleje
- Kemisk balance: Test og vedligehold regelmæssigt korrekt poolvandkemi. Ubalancerede kemikalier kan nedbryde foringsmaterialet over tid.
- Rensning: Brug bløde børster og rengøringsmidler, der er specielt designet til vinylforinger til pools. Undgå slibende rengøringsmidler eller skarpe genstande, der kan beskadige foringens overflade.
- UV beskyttelse: Foringen er fremstillet med UV-bestandige egenskaber (Lamiclear-teknologi) for at minimere falmning. Langvarig udsættelse for direkte sollys og barske kemikalier kan dog stadig påvirke dens udseende i mange år.
- Slidforebyggelse: Sørg for, at der ikke er skarpe genstande i poolen eller på pooldækket, der kan gnide mod eller punktere dugen.

Billede: Visuel sammenligning, der demonstrerer Smartline-linernes falmebestandighed på grund af UV-beskyttelse i modsætning til ubeskyttede liner.
Fejlfinding
Fælles problemer
- Rynker efter fyldning: Små rynker kan lægge sig, når lineren strækker sig. Sørg for, at lineren blev ordentligt varmet op og glattet under den første påfyldning. Hvis det er vedvarende, kan du overveje delvis dræning og udjævning igen, eller kontakte en poolprofessionel.
- Lækager: Undersøg foringen for synlige revner eller huller. Kontroller omkring skimmer og returfittings for korrekt tætning. Små huller kan ofte repareres med et vinyllapningssæt. Ved større skader eller vedvarende lækager kan professionel hjælp være nødvendig.
- Falmning/misfarvning: Selvom foringen har UV-beskyttelse, kan langvarig udsættelse for barske kemikalier eller ekstremt sollys forårsage en vis falmning over tid. Sørg for, at den rette kemiske balance opretholdes.
Specifikationer
Tekniske data
| Attribut | Detalje |
|---|---|
| Modelnummer | 17034 RA |
| Dimensioner | 12 fod x 24 fod oval |
| Kompatibilitet mellem væghøjde | 52 tommer |
| Måler | 25 Gauge |
| Materiale | Kraftig jomfruvinyl |
| Stil | Unibead (kompatibel med J-krog og standardperler) |
| Mønster | Toscana |
| Pakkedimensioner | 40 x 13.5 x 6.5 tommer |
| Varens vægt | 56 pund |
| Fabrikant | SmartLine |
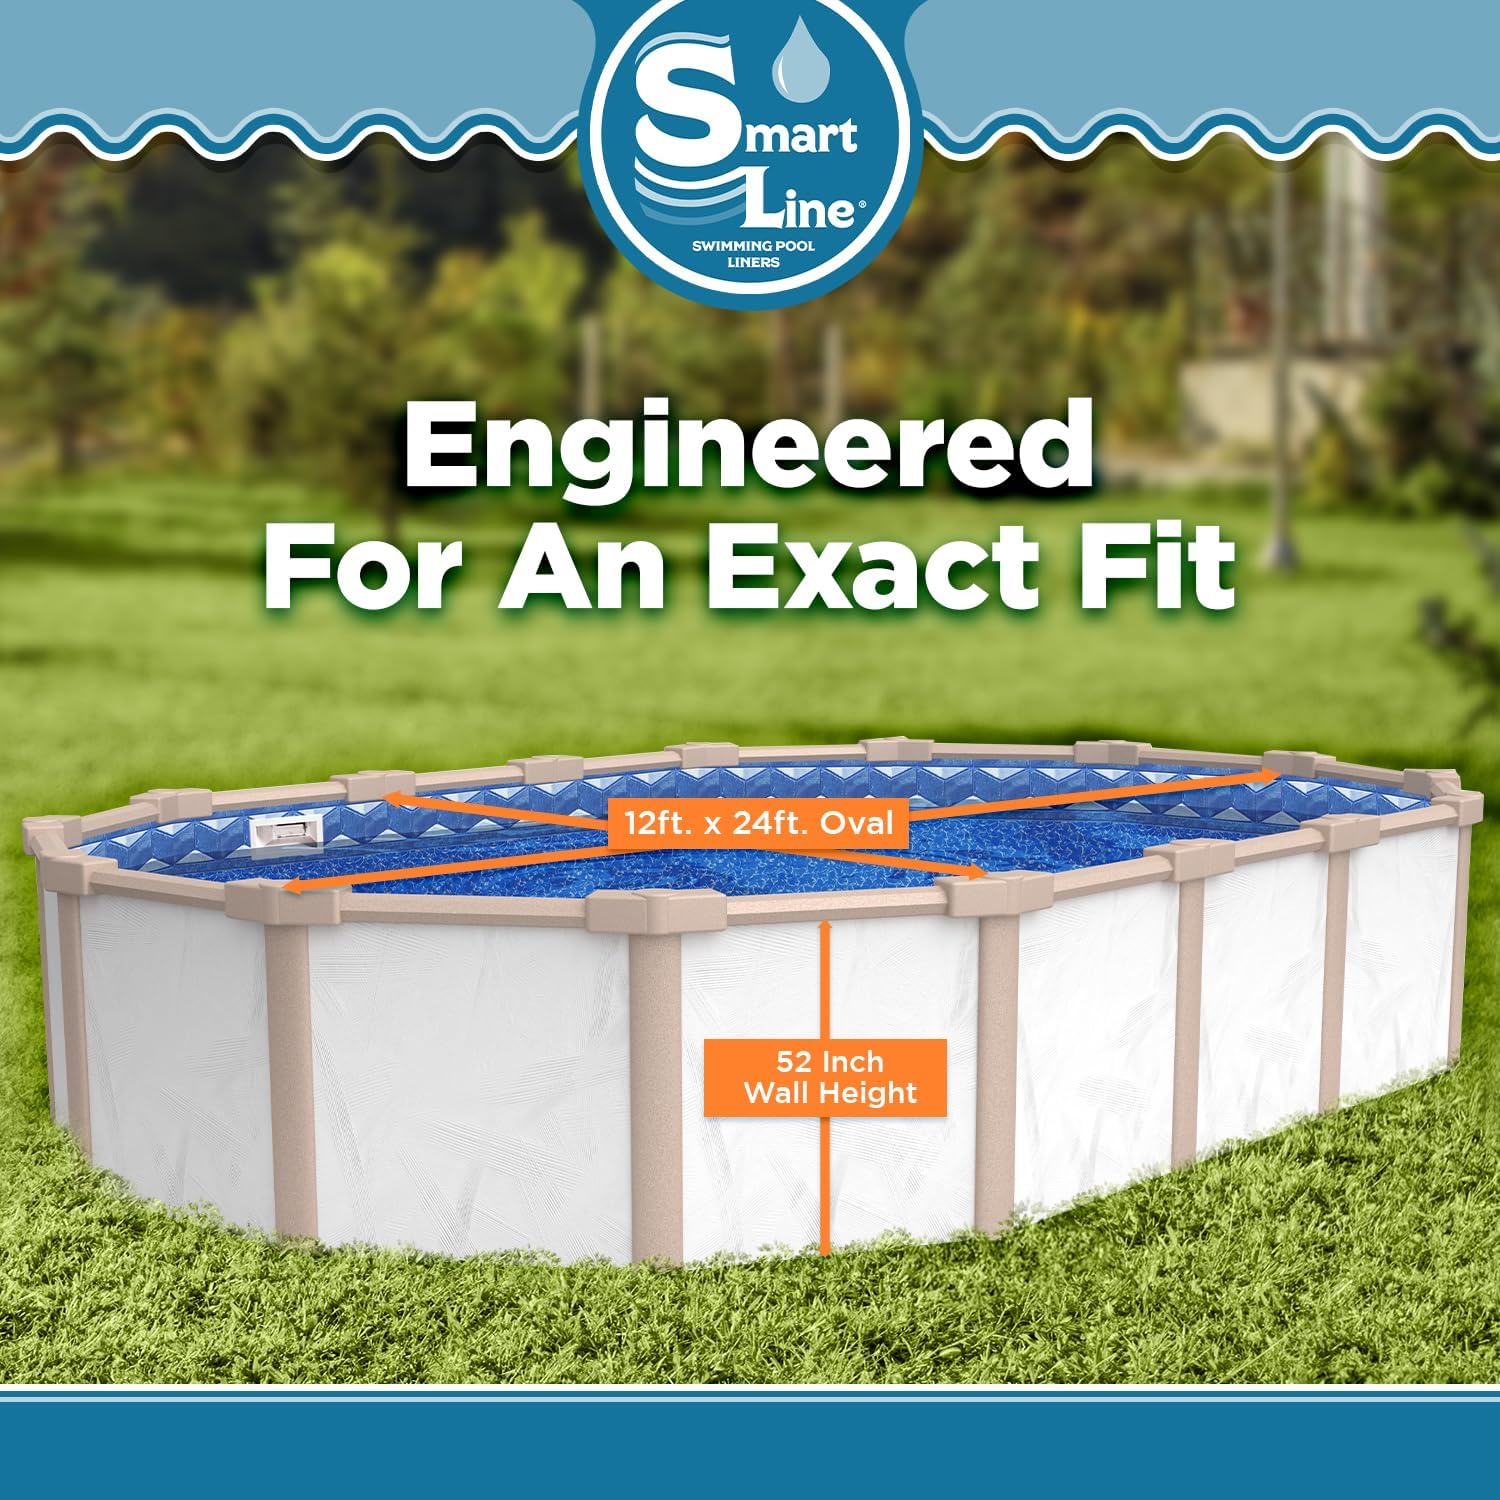
Billede: Illustration, der beskriver den nøjagtige tilpasningsteknik til den ovale pool på 12 m x 24 m med en væghøjde på 52 cm.
Garantioplysninger
Smartline poolforingen inkluderer en 25 års begrænset garantiDenne garanti beskytter mod materiale- og fabrikationsfejl. For specifikke vilkår, betingelser og reklamationsprocedurer henvises til garantidokumentationen, der fulgte med dit køb, eller kontakt Smartlines kundesupport.

Billede: Grafik, der fremhæver Smartline-foringens 25-årige levetid, 100 % jomfruvinyl, dobbeltsvejsede sømme og varmebundne konstruktion.
Kundesupport
For yderligere assistance, teknisk support eller garantikrav, kontakt venligst Smartline kundeservice. Se kontaktoplysningerne på produktemballagen eller den officielle Smartline-side. webwebsted. Når du kontakter support, bedes du have dit modelnummer (17034RA) og købsoplysninger klar.