
1. Introduktion
This manual provides detailed instructions for the assembly, operation, maintenance, and troubleshooting of your TOOLPORT 10x13 ft. Storage Tent. Please read all instructions carefully before beginning assembly or use to ensure safe and correct installation and to maximize the lifespan of your product.
The TOOLPORT storage tent is designed to provide a reliable and versatile space for various storage needs, offering protection against seasonal weather conditions. It features a robust steel frame and a high-quality PVC tarpaulin.

Image 1.1: Fully assembled TOOLPORT 10x13 ft. Storage Tent.
2. Sikkerhedsretningslinjer
Adhere to the following safety guidelines to prevent injury and damage to the tent:
- Valg af websted: Choose a level, stable surface for assembly. Avoid areas prone to strong winds, flooding, or overhead obstructions.
- Vejrforhold: Do not attempt assembly during strong winds, heavy rain, or lightning. Disassemble the tent if extreme weather conditions are anticipated.
- Forankring: Always secure the tent firmly to the ground using the provided stakes and ropes. Insufficient anchoring can lead to structural failure in adverse weather.
- Monteringspersonale: Assembly typically requires at least two adults. Ensure all participants are aware of the assembly steps and safety precautions.
- Værktøjer: Use appropriate tools for assembly, such as a hammer for stakes and wrenches for bolts.
- Brandsikkerhed: Keep all heat sources, open flames, and flammable materials away from the tent fabric. The PVC material is not fireproof.
- Inspektion: Regularly inspect the frame, connections, and tarpaulin for any signs of wear, damage, or loose parts. Address any issues promptly.
- Snebelastning: The tent is not designed for heavy snow loads. Remove accumulated snow from the roof promptly to prevent collapse.
3. Pakkens indhold
Before starting assembly, verify that all components listed below are present and undamaged. If any parts are missing or damaged, contact customer support.
- Steel Frame Components (poles, connectors)
- Base Frame Components
- Roof Tarpaulin (single piece)
- Side Walls (individual, approx. 6.5 ft sections)
- Gable Walls with Entrances
- Reb
- Indsatser
- Samlingsvejledning (denne manual)
4. Monteringsvejledning
Følg disse trin omhyggeligt for korrekt montering. Det anbefales at være mindst to personer til denne proces.
4.1. Rammesamling
- Unpack all steel frame components and lay them out according to the included diagram.
- Begin by assembling the base frame. Connect the base frame poles using the appropriate connectors.
- Attach the vertical poles to the base frame connectors. Ensure all connections are secure.
- Assemble the roof structure by connecting the roof poles and supports.
- Lift the roof structure onto the vertical poles and secure all connections with bolts.

Image 4.1: The complete steel frame structure before tarpaulin installation.

Image 4.2: Close-up of interior frame connections, showing roof supports.

Image 4.3: Detail of a secure pole connection point during assembly.

Image 4.4: Detail of the galvanized steel pole material.
4.2. Montering af presenning
- Carefully unfold the roof tarpaulin and drape it over the assembled roof frame. Ensure it is centered and evenly distributed.
- Attach the roof tarpaulin to the frame using the provided fasteners or straps.
- Install the gable walls at each end of the tent. These typically feature roll-up entrances.
- Attach the individual sidewalls between the vertical poles. These sections are approximately 6.5 ft wide and can be adjusted as needed.
4.3. Forankring
Proper anchoring is critical for the stability and safety of the tent.
- Secure the base frame to the ground using the provided stakes. Drive stakes firmly into the ground through the base plates.
- Attach ropes to the designated points on the tent structure and secure them to additional ground stakes, pulling taut to provide extra stability.

Image 4.5: Detail of the base plate connection to the ground.

Billede 4.6: Eks.ample of securing the tent with ground stakes.
5. Usage and Customization
The TOOLPORT storage tent offers flexible usage options:
- Indgange: The gable walls feature entrances that can be rolled up and secured, allowing for easy access.
- Sidevægge: The individual sidewall sections can be removed or adjusted to create open sides or specific access points as needed.
- Opbevaring: The tent is suitable for storing vehicles, equipment, tools, and other items that require protection from the elements.

Billede 5.1: Interiør view of the tent demonstrating ample storage space and height.
6. Pleje og vedligeholdelse
Regular care and maintenance will extend the life of your storage tent:
- Cleaning Tarpaulin: Clean the PVC tarpaulin with mild soap and water. Avoid harsh chemicals or abrasive brushes that could damage the material. Rinse thoroughly and allow to dry completely before storage.
- Rammeinspektion: Periodically check all frame connections and bolts to ensure they remain tight and secure. Inspect poles for any signs of rust or damage.
- Presenningsinspektion: Check the tarpaulin for tears, punctures, or excessive wear. Repair small damages promptly with appropriate repair kits to prevent them from worsening.
- Forankringstjek: Regularly verify that all stakes and ropes are securely in place and taut, especially after strong winds or heavy rain.
- Vinterpleje: In areas with snow, regularly remove snow accumulation from the roof to prevent structural strain and potential collapse.

Image 6.1: Detail of the durable PVC tarpaulin material.
7. Fejlfinding
Dette afsnit omhandler almindelige problemer, du kan støde på:
- Teltet er ustabilt: Ensure all frame connections are tightened. Verify that all ground stakes are fully inserted and ropes are taut. Check for level ground.
- Vandlækage: Inspect the roof tarpaulin for any tears or holes. Ensure the tarpaulin is properly tensioned and overlaps correctly at all seams.
- Vanskeligheder med samling: Refer back to the assembly instructions and diagrams. Ensure all parts are correctly identified and oriented. Do not force connections.
- Beskadigede dele: If any part of the frame or tarpaulin is damaged, do not attempt to use the tent. Contact customer support for replacement parts.
8. Tekniske specifikationer
| Feature | Specifikation |
|---|---|
| Mærke | TOOLPORT |
| Modelnummer | 7243 |
| Varetypenavn | Storage tent |
| Størrelse | 10x13 ft. (3.0m x 4.0m) |
| Produktmål (L x B x H) | 400 cm L x 300 cm B x 290 cm H (157.48" L x 118.11" B x 114.17" H) |
| Farve | Hvid |
| Rammemateriale | Metal (Steel poles approx. Ø 1.5 in., Connectors approx. Ø 1.65 in.) |
| Presenningmateriale | PVC (Tensile strength: 750 N*) |
| Vandmodstandsniveau | Vandtæt |
| Beskyttelse mod ultraviolet lys | 50+ |
| Varens vægt | 79.5 kilo |
| Påkrævet samling | Ja |
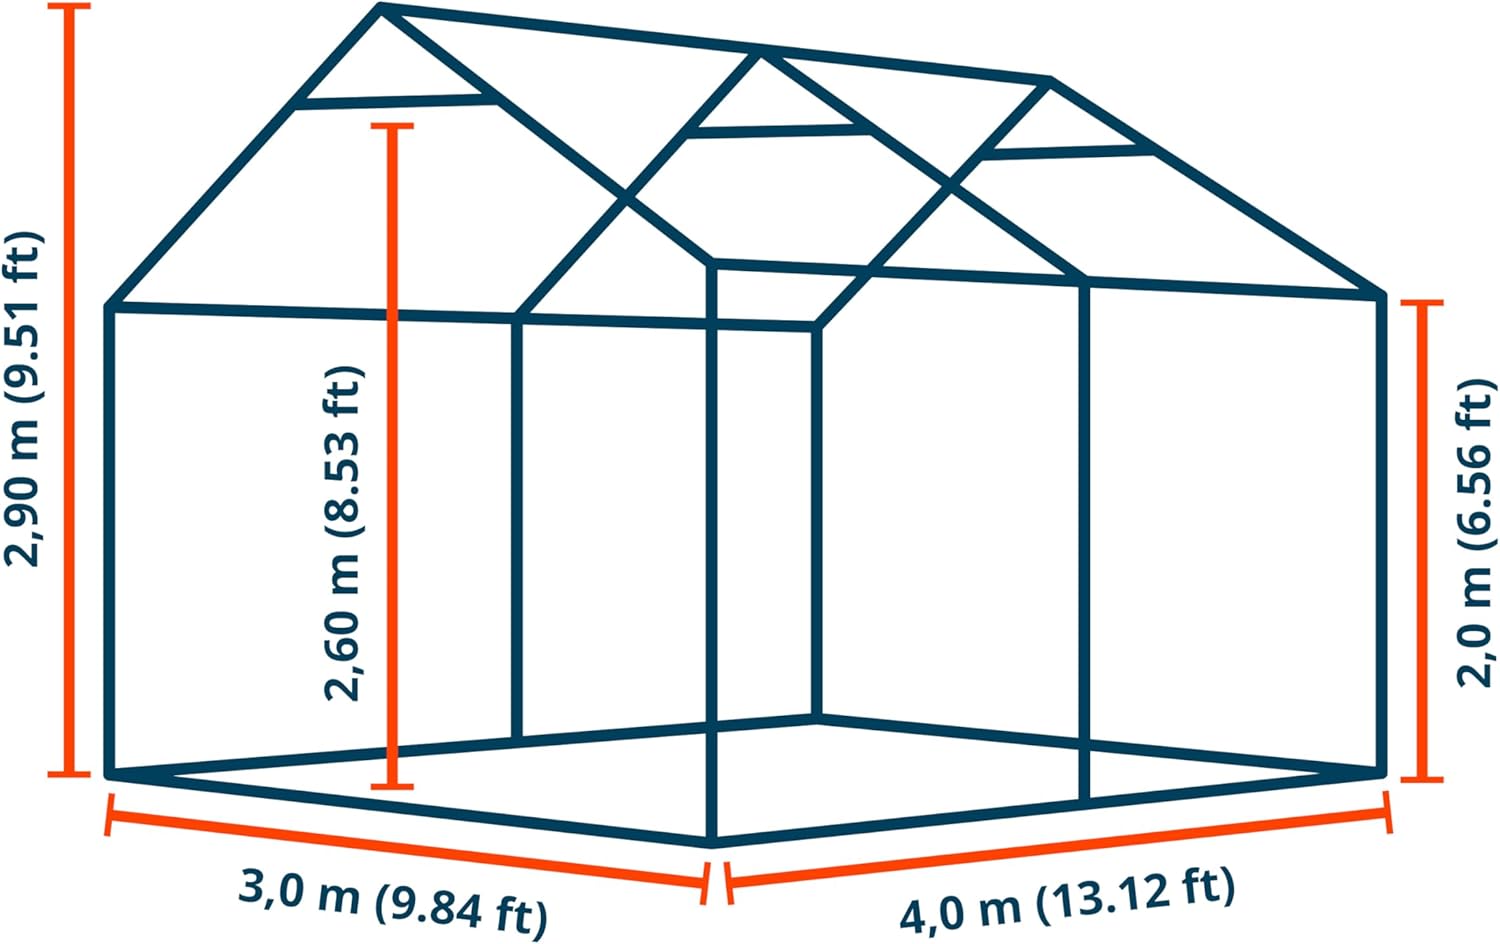
Image 8.1: Dimensional diagram of the storage tent.
9. Garanti og support
For warranty information and details regarding your TOOLPORT storage tent, please refer to the manufacturer's official warranty document.
Manufacturer Warranty Description: https://manuals.plus/m/4e2b2d6b1df36973eb78637d1a03f2ca3ece89839fd4f968910514f5a6da5120
For further assistance, technical support, or to order replacement parts, please contact TOOLPORT customer service through their official webwebstedet eller forhandleren, hvor produktet blev købt.