
1. Produktet er slutview
The HP ProDisplay P17A is a 17-inch LED-backlit LCD monitor designed for general computing tasks. It features a 5:4 aspect ratio with a maximum resolution of 1280 x 1024 pixels, providing clear and consistent visuals. This monitor is equipped with both VGA and HDMI connectivity options, offering versatility for various system configurations. Its compact design and energy-efficient LED backlighting make it suitable for a range of environments.

Figur 1: Forside view of the HP ProDisplay P17A monitor, showcasindens display og stativ.
2. Opsætningsvejledning
2.1 Udpakning af monitoren
Fjern forsigtigt alle komponenter fra emballagen. Sørg for, at følgende dele er til stede:
- HP ProDisplay P17A Monitor
- Monitor Stand (base and neck)
- Strømkabel
- VGA Cable (may vary by region/package)
- HDMI Cable (may vary by region/package)
2.2 Samling af stativet
- Placer skærmen med forsiden nedad på en blød, ren overflade for at forhindre ridser.
- Attach the stand neck to the back of the monitor, aligning the tabs and pushing until it clicks into place.
- Attach the stand base to the bottom of the stand neck, securing it with the captive screw if present.
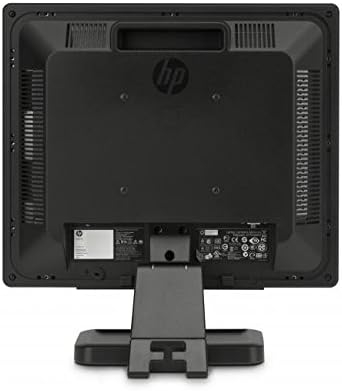
Figur 2: Bagside view of the monitor, illustrating the stand attachment point and various connectivity ports.
2.3 Tilslutningskabler
- Strømtilslutning: Tilslut strømkablet til skærmens strømindgang og derefter til en jordet stikkontakt.
- Videoforbindelse:
- For VGA: Connect one end of the VGA cable to the VGA port on the monitor and the other end to the VGA port on your computer. Tighten the screws on the VGA connector.
- For HDMI: Connect one end of the HDMI cable to the HDMI port on the monitor and the other end to the HDMI port on your computer.
- Sørg for, at alle forbindelser er sikre.
3. Betjeningsvejledning
3.1 Tænd/sluk
Press the power button located on the front bezel of the monitor to turn it on or off. The power indicator light will illuminate when the monitor is on.
3.2 Justering af skærmindstillinger (OSD-menu)
The On-Screen Display (OSD) menu allows you to adjust various monitor settings. Use the buttons on the front bezel to navigate and select options.
- Menu-knap: Åbner OSD-menuen.
- Navigationsknapper (+ / - or Up/Down): Move through menu options and adjust values.
- Vælg/OK knap: Bekræfter et valg eller åbner en undermenu.
- Afslut-knap: Afslutter den aktuelle menu eller OSD.
Almindelige justerbare indstillinger inkluderer:
- Lysstyrke/kontrast: Justerer den samlede luminans og forskellen mellem lyse og mørke områder.
- Farvekontrol: Allows adjustment of color temperature, RGB levels, or preset color modes.
- Indgangsvalg: Manually switches between VGA and HDMI input sources.
- Billedkontrol: Adjusts sharpness, aspect ratio, and auto-adjustment for analog signals.
- Ledelse: Power-saving options, OSD timeout, language selection.
4. Vedligeholdelse
4.1 Rengøring af monitoren
- Sluk altid skærmen og tag netledningen ud, inden rengøring.
- Brug let en blød, fnugfri klud damprengøres med vand eller et ikke-slibende skærmrensemiddel.
- Sprøjt ikke rengøringsmiddel direkte på skærmen eller skærmen casing.
- Avoid using benzene, thinner, ammonia-based cleaners, or abrasive materials, as these can damage the surface.
4.2 Generel pleje
- Undgå at placere skærmen i direkte sollys eller i nærheden af varmekilder.
- Sørg for tilstrækkelig ventilation omkring skærmen.
- Bloker ikke ventilationsåbninger.
- Protect the screen from sharp objects or excessive pressure.
5. Fejlfinding
Before contacting support, try the following basic troubleshooting steps:
5.1 Intet billede på skærmen
- Ensure the monitor's power cable is securely connected to both the monitor and a working electrical outlet.
- Verify the power indicator light on the monitor is on. If not, press the power button.
- Check that the video cable (VGA or HDMI) is securely connected to both the monitor and the computer.
- Ensure the correct input source is selected on the monitor (use the OSD menu to switch inputs).
- Genstart din computer.
5.2 Dårlig billedkvalitet
- Fuzzy or Blurry Image: Sørg for, at skærmopløsningen på din computer er indstillet til skærmens native opløsning (1280 x 1024).
- Forkerte farver: Adjust color settings through the OSD menu or your computer's display settings.
- Image Off-Center/Incorrect Size (VGA only): Use the "Auto Adjust" function in the OSD menu.
- Flimrende: Check the refresh rate setting on your computer; ensure it is set to 60 Hz.
5.3 Monitor Not Responding to Buttons
- Unplug the monitor's power cable, wait 10 seconds, then plug it back in and try again.
- Sørg for, at ingen knapper sidder fast.
6. Tekniske specifikationer
| Feature | Specifikation |
|---|---|
| Mærke | HEWLETT PACKARD |
| Modelnavn | HP P17A |
| Modelnummer | F4M97AAABA |
| Skærmstørrelse | 17 tommer |
| Display Type | LED baggrundsbelyst LCD |
| Indfødt opløsning | 1280 x 1024 (SXGA) |
| Aspektforhold | 5:4 |
| Kontrastforhold | 1000:1 |
| Opdateringshastighed | 60 Hz |
| Svartid | 5 millisekunder |
| Viewi vinkel | 170 grader |
| Forbindelse | 1x VGA, 1x HDMI |
| Strømforbrug | 25 watt (maksimum) |
| Varedimensioner (D x B x H) | 8.12" D x 14.85" B x 15.24" H |
| Varens vægt | 8.2 pund |
| Monteringstype | Vægmontering (VESA-kompatibel) |
| Yderligere funktioner | Anti Glare Screen |

Figure 3: Dimensions of the HP ProDisplay P17A monitor.
7. Garanti og support
7.1 Garantioplysninger
This product is often sold as a refurbished item. Refurbished products typically come with a limited warranty provided by the refurbisher or seller. Please refer to your purchase documentation for specific warranty terms and conditions, including duration and coverage details.
7.2 Teknisk support
For technical assistance, troubleshooting beyond this manual, or warranty claims, please contact the vendor or HP customer support. Have your monitor's model number (F4M97AAABA) and serial number ready when contacting support.
You can find additional support resources, drivers, and documentation on the official HP support webwebsted.