
Dorman 932-306
Dorman 932-306 Drivaksel CV-led Instruktionsmanual
Mærke: Dorman | Model: 932-306
Indledning
This manual provides essential information for the proper installation, operation, and maintenance of your Dorman 932-306 Drive Shaft CV Joint. This component is designed as a direct replacement to restore the driveshaft to proper functioning in compatible Jeep models. It addresses common issues by allowing replacement of only the failed joint, rather than the entire assembly.
Vigtig sikkerhedsmeddelelse:
Always ensure the vehicle is properly supported and secured before beginning any work. Wear appropriate personal protective equipment (PPE), including safety glasses and gloves. If you are not confident in your ability to perform this installation, it is recommended to seek professional assistance from a qualified mechanic.
Produkt overview
The Dorman 932-306 Drive Shaft CV Joint Repair Kit includes all necessary components to replace a damaged constant velocity joint on your vehicle's driveshaft. This kit is engineered for a direct fit, ensuring compatibility and ease of installation.
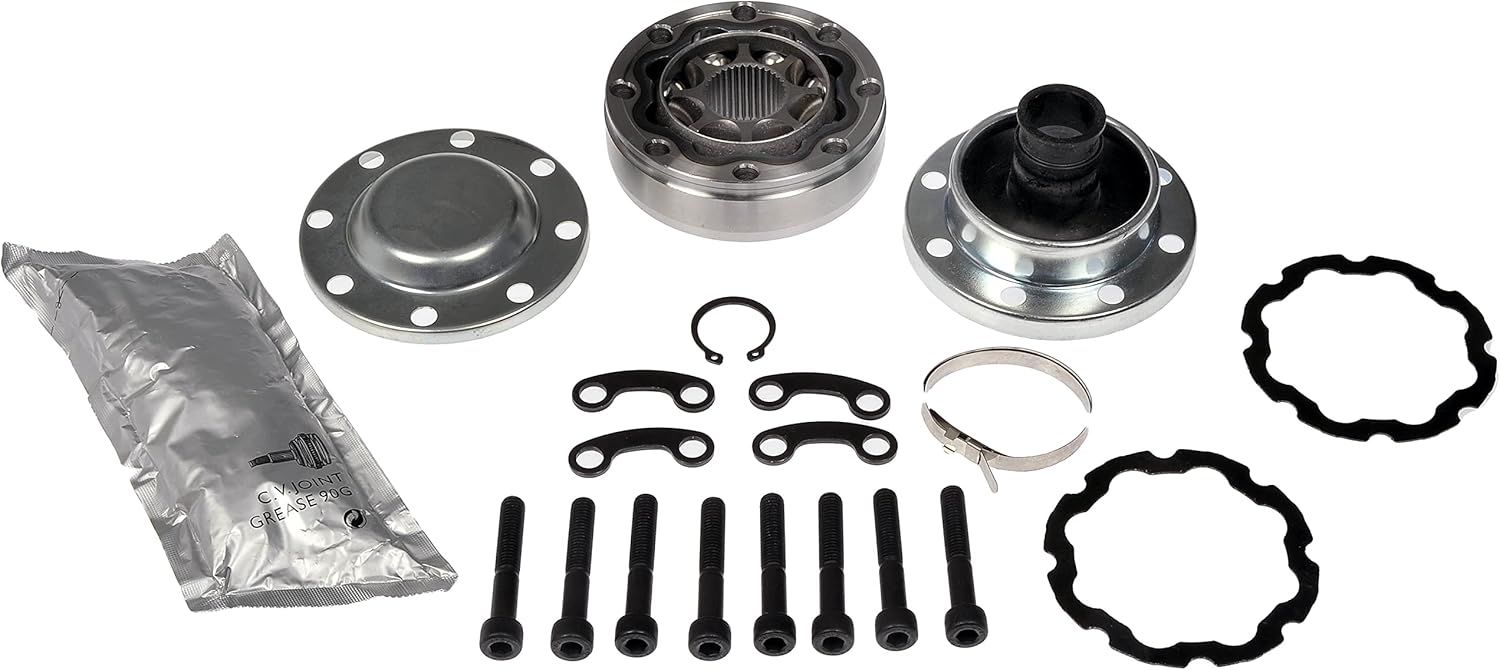
Figure 1: Complete Dorman 932-306 Drive Shaft CV Joint Kit, showing the CV joint, grease, boot clamp, retainer ring, gaskets, ganged washers, and bolts.

Figur 2: Demonteret view of the Dorman 932-306 CV Joint components, highlighting the main joint body and its covers.
Reservedelsliste
The Dorman 932-306 Drive Shaft CV Joint Repair Kit typically includes the following components:
- 1 Drive Shaft CV Joint
- 1 Tube of Grease
- 1 Boot Clamp
- 1 Holdering
- 2 Pakninger
- 4 Ganged Washers
- 8 bolte

Figur 3: Detaljeret view of the CV joint's internal ball bearings and cage, crucial for smooth power transfer.

Figure 4: The included bolts and retainer plates, essential for securing the CV joint.

Figure 5: The gaskets and boot clamp, vital for sealing the joint and protecting it from contaminants.
Opsætning og installation
Installation of a driveshaft CV joint requires mechanical aptitude and specialized tools. It is highly recommended to consult a professional service manual for your specific vehicle model for detailed, step-by-step instructions. The following is a general overview and not a substitute for a vehicle-specific repair guide.
- Køretøjsforberedelse: Safely lift and support the vehicle using jack stands on a level surface. Engage the parking brake.
- Driveshaft Removal: Locate the driveshaft connected to the differential and transmission. Mark the driveshaft and differential flange for proper reassembly alignment. Remove the bolts securing the driveshaft to the differential and transmission. Carefully remove the driveshaft from the vehicle.
- Old CV Joint Removal: Secure the driveshaft in a vise. Remove the boot clamps and slide the boot back. Clean excess grease. Remove the retaining ring and carefully separate the old CV joint from the driveshaft.
- Inspektion: Inspect the driveshaft splines and mating surfaces for any damage or wear. Clean thoroughly.
- New CV Joint Installation: Apply the provided grease to the new CV joint. Slide the new CV joint onto the driveshaft splines, ensuring it seats correctly. Install the new retaining ring.
- Boot and Clamp Installation: Position the new boot over the joint and secure it with the new boot clamp. Ensure a tight seal to prevent contamination.
- Driveshaft Reinstallation: Align the driveshaft with the marks made during removal. Reinstall the driveshaft to the differential and transmission using the new bolts and gaskets provided. Torque all bolts to the manufacturer's specifications.
- Afsluttende kontrol: Lower the vehicle. Check for proper driveshaft rotation and ensure there are no loose components or leaks.
Note: Improper installation can lead to premature failure of the CV joint or other drivetrain components. Always refer to your vehicle's service manual for exact torque specifications and procedures.
Driftsprincipper
The Constant Velocity (CV) joint is a critical component of your vehicle's driveshaft, particularly in independent suspension systems. Its primary function is to transmit power from the transmission to the wheels at a constant rotational speed, regardless of the angle of the driveshaft. This allows for smooth power delivery even as the suspension moves up and down and the wheels turn.
The Dorman 932-306 CV Joint is designed to maintain this constant velocity, preventing vibrations and ensuring efficient power transfer to the wheels. Its robust steel construction contributes to reliable performance and a long service life.
Opretholdelse
Regular inspection and proper maintenance can extend the life of your CV joint:
- Visuel inspektion: Periodically inspect the CV joint boots for any signs of tears, cracks, or punctures. A damaged boot can allow dirt, water, and debris to enter the joint, leading to premature wear and failure.
- Grease Check: If a boot is damaged, the grease inside the joint may leak out. Look for grease splatters around the wheel well or undercarriage. If a boot is compromised, it should be replaced immediately, and the joint should be re-greased with appropriate CV joint grease.
- Støjovervågning: Pay attention to any unusual noises coming from the driveshaft area, especially during turns or acceleration. Clicking, popping, or clunking sounds can indicate a failing CV joint.
Fejlfinding
| Symptom | Mulig årsag | Løsning |
|---|---|---|
| Clicking or popping noise when turning. | Worn outer CV joint. | Inspect and replace the CV joint. |
| Clunking noise on acceleration or deceleration. | Worn inner CV joint or loose driveshaft bolts. | Inspect and replace the CV joint or tighten bolts to spec. |
| Vibration during driving, especially at higher speeds. | Worn CV joint, unbalanced driveshaft, or damaged driveshaft components. | Inspect CV joints and driveshaft for wear or damage. Replace as needed. Ensure proper balance. |
| Grease leaking from the boot. | Damaged or torn CV joint boot. | Replace the CV joint boot and re-grease the joint. If joint is contaminated, replace the joint. |
Hvis fejlfindingstrinene ikke løser problemet, anbefales det at kontakte en certificeret biltekniker.
Specifikationer
- Mærke: Dorman
- Model: 932-306
- Materiale: Stål
- Form: Rund
- Varens vægt: 2.6 pund
- Produktdimensioner: 4.6 x 4.6 x 7.9 tommer
- UPC: 019495722472
- Producentens varenummer: 932-306
- OEM-delnumre: SK932306; 52123553AA; 52123555AA; 52123557AA; 52123558AA; 52853317AC; 52853319AC; 52853321AC; 52853329AC; 52853330AC; 52853336AC; 52853338AD; 52853346AD; 52853349AC; 52853350AC; 68022101AD; 68022102AD; 68022104AC; 68022105AC; 68022107AC
Additional Information & Features
Dorman's OE FIX driveshafts offer a cost-effective and convenient solution for driveshaft repairs. Unlike some original equipment driveshafts that use non-serviceable staked joints, Dorman driveshafts are built with replaceable U-joints, simplifying future service and reducing costs.
Each Dorman driveshaft is 100% brand new, engineered and validated in the United States, and balance-checked to ensure smooth operation right out of the box.
Video: Dorman Drive Shafts Overview. This video highlights the features and benefits of Dorman's driveshaft products, including their new construction, engineering, balancing, and replaceable U-joints, offering a better alternative to traditional repair methods.
Garanti og support
The Dorman 932-306 Drive Shaft CV Joint is backed by a limited lifetime warranty, ensuring long-term reliability and peace of mind. For specific warranty details or technical support, please refer to the official Dorman webhjemmeside eller kontakt deres kundeservice direkte.
Returpolitik: This product typically has a 30-day refund/replacement policy when purchased from Amazon.
For yderligere hjælp kan du besøge Dorman-butikken på Amazon.
Ask a question about this manual
Ask about setup, troubleshooting, compatibility, parts, safety, or missing instructions. Manuals+ will review the question and use this page’s manual context to help answer it.