Flysky FS GT-2B 2.4GHz
Flysky FS-GT2B 2.4GHz 3 Channel RC Transmitter with FS-GR3E Receiver User Manual
Model: FS GT-2B 2.4GHz
Indledning
The Flysky FS-GT2B is a 2.4GHz 3-channel radio control system designed for RC cars and boats. It utilizes the Automatic Frequency Hopping Digital System (AFHDS) technology, ensuring reliable and interference-free operation. This system operates within the 2.400GHz to 2.4835GHz frequency range, divided into 160 wave bands, providing excellent anti-jamming capabilities and high receiving sensitivity. The transmitter features a built-in antenna and is powered by a rechargeable 3.7V Li-ion battery, offering low power consumption and stable performance.

Image: Flysky FS-GT2B Transmitter and FS-GR3E Receiver. This image displays the complete radio control system, including the pistol-grip transmitter and the compact FS-GR3E receiver, along with a binding plug and antenna tube.
Sikkerhedsoplysninger
- Brug altid din RC-model på en sikker og ansvarlig måde.
- Ensure the transmitter battery is fully charged before each use to prevent loss of control.
- Hold senderen og modtageren væk fra fugt og ekstreme temperaturer.
- Do not attempt to modify or disassemble the components, as this may void the warranty and cause malfunction.
- Always turn on the transmitter first, then the receiver. When turning off, turn off the receiver first, then the transmitter.
- Avoid operating your RC model near other radio equipment or in areas with high electromagnetic interference.
Pakkens indhold
Bekræft, at alle nedenstående varer er inkluderet i din pakke:
- 1x Flysky FS-GT2B Radio Controller (Transmitter)
- 1x Flysky FS-GR3E Receiver
- 1x USB Cable for charging
- 1x 3.7V 800mAh Transmitter Battery (Li-ion Polymer)
- 1x Removable Handle
- 1x Antenna Tube
- 1x Code Matching Line (Binding Plug)
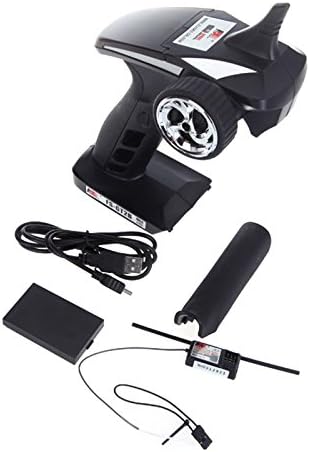
Image: Contents of the Flysky FS-GT2B package. This image shows the transmitter, receiver, USB charging cable, battery, and binding plug, illustrating all components included in the product box.
Produkt overview
Transmitter (FS-GT2B)
The FS-GT2B transmitter features an ergonomic pistol-grip design for comfortable handling and precise control.
Billede: Forside view of the Flysky FS-GT2B Transmitter. This diagram highlights the main components: Control Box, 2.4G Antenna, Steering Wheel, Throttle Trigger, and Battery Box.
- 1. Control Box: Houses the internal electronics and controls.
- 2. 2.4G Antenna: Integrated antenna for 2.4GHz signal transmission.
- 3. Steering Wheel: Controls the steering of the RC model.
- 4. Throttle Trigger: Controls the forward and reverse movement (throttle) of the RC model.
- 5. Battery Box: Compartment for the rechargeable Li-ion battery.
Billede: Side og bagside view of the Flysky FS-GT2B Transmitter controls. This diagram shows the various adjustment knobs and switches located under the protective cover, as well as the USB charging port.
- 6. ST REV (Steering Reverse): Reverses the steering channel direction.
- 7. POWER LED: Indikerer strømstatus.
- 8. ST TRIM (Steering Trim): Justerer styrets neutrale position.
- 9. POWER SW (Power Switch): Tænder/slukker senderen.
- 10. CHG (Charge Port): Micro USB-port til opladning af det interne batteri.
- A. TH REV (Throttle Reverse): Reverses the throttle channel direction.
- B. POWER CHECK: Button to check battery level.
- C. BIND: Button used during the binding process.
- D. D/R (Dual Rate): Justerer den maksimale styrevinkel.
- E. TH TRIM (Throttle Trim): Adjusts the neutral position of the throttle.
- F. USB: Micro USB opladningsport.
- CH3 Button: Located on the grip, controls the third channel.

Image: Close-up of the CH3 button on the Flysky FS-GT2B Transmitter. This button activates or deactivates the third channel, typically used for auxiliary functions like lights or gear shifts.
Receiver (FS-GR3E)
The FS-GR3E is a compact 3-channel receiver designed to work seamlessly with the FS-GT2B transmitter.
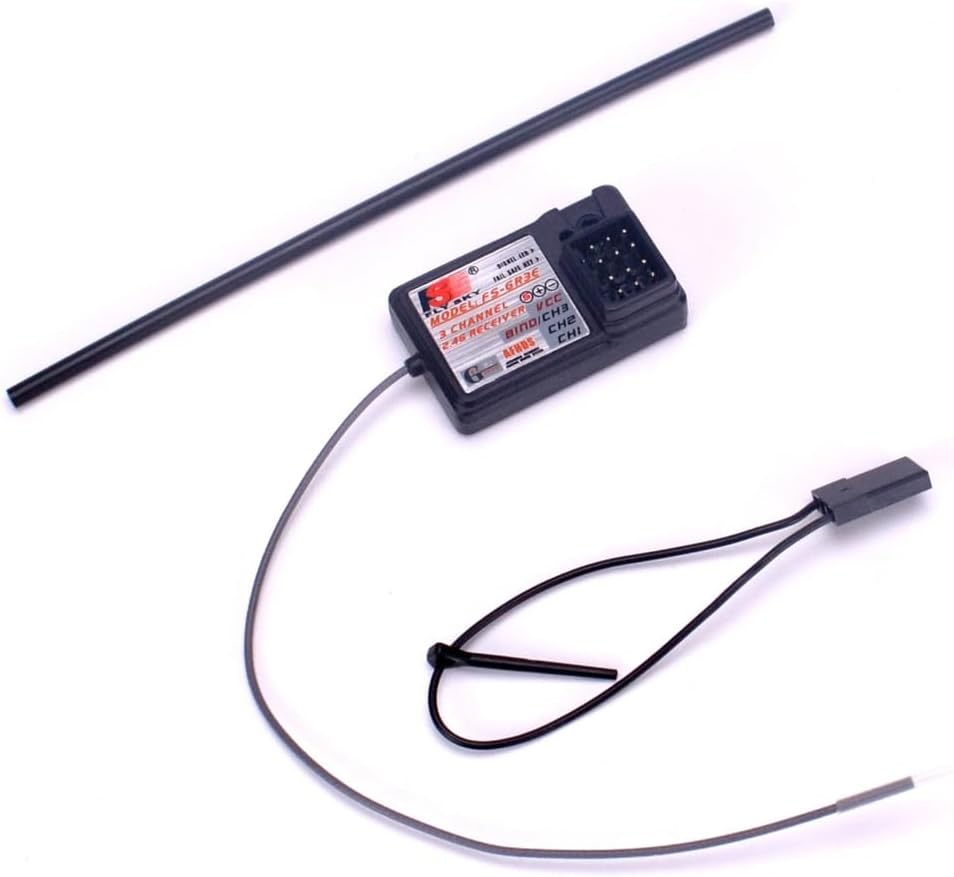
Image: Flysky FS-GR3E Receiver. This image shows the compact 3-channel receiver with its antenna and binding port, ready for installation in an RC model.
- Kanaler: 3 Channels (CH1: Steering, CH2: Throttle, CH3: Auxiliary)
- BIND-port: Used for binding the receiver to the transmitter.
- Antenne: Single antenna for signal reception.
Opsætning
1. Transmitter Battery Installation and Charging
The FS-GT2B transmitter comes with a built-in rechargeable 3.7V Li-ion battery.
- Åbn batteridækslet, der er placeret i bunden af senderen.
- Ensure the included 3.7V 800mAh Li-ion battery is correctly inserted with the polarity matching the markings inside the compartment.
- Luk batterirummets dæksel.
- To charge the transmitter, connect the supplied USB cable to the Micro USB port (labeled CHG or F) on the transmitter and the other end to a USB power source (e.g., computer USB port, USB wall adapter).
- The POWER LED will indicate charging status (refer to the LED indicator section for details).

Billede: View of the battery compartment on the Flysky FS-GT2B Transmitter. This shows the open compartment where the rechargeable Li-ion battery is inserted.

Image: Close-up of the USB charging port on the Flysky FS-GT2B Transmitter. This port is used to recharge the internal battery.
2. Modtagertilslutning
Connect the FS-GR3E receiver to your RC model's electronic speed controller (ESC) and steering servo.
- Connect the ESC's throttle cable to the CH2 port på modtageren.
- Connect the steering servo's cable to the CH1 port på modtageren.
- If using an auxiliary device (e.g., lights, winch), connect its cable to the CH3 havn.
- Ensure all connections are made with correct polarity (signal, positive, negative).
- Mount the receiver securely in your RC model, ensuring the antenna is positioned away from metal parts and as straight as possible for optimal range. Use the provided antenna tube if necessary.
3. Bindingsproces (kodematchning)
Binding is the process of linking the transmitter and receiver so they can communicate. This only needs to be done once per receiver.
- Ensure the transmitter is turned SLUKKET.
- Insert the provided binding plug (code matching line) into the BINDE port on the FS-GR3E receiver.
- Power on the RC model (and thus the receiver) via the ESC. The receiver's LED should start flashing rapidly, indicating it's in binding mode.
- Mens du holder nede BINDE button on the transmitter (located under the protective cover), turn on the transmitter.
- The transmitter's POWER LED and the receiver's LED should both become solid, indicating a successful bind.
- Release the BIND button on the transmitter.
- Turn off the receiver (by turning off the RC model's power).
- Fjern bindingsproppen fra modtageren.
- Turn on the transmitter, then turn on the receiver. The system should now be linked and ready for operation.
Betjeningsvejledning
Grundlæggende kontrol
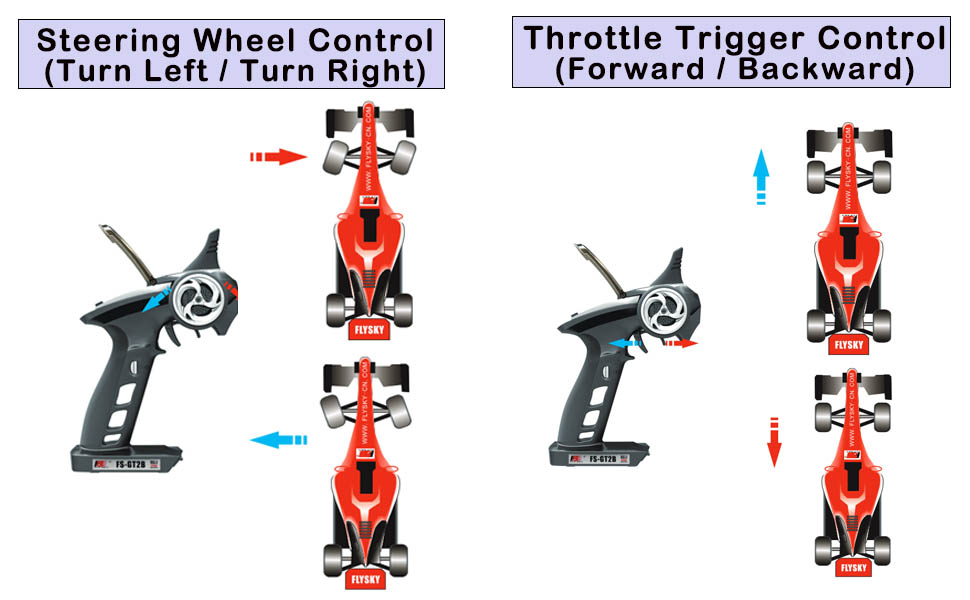
- Rat: Rotate the steering wheel clockwise to turn right, and counter-clockwise to turn left.
- Gashåndtag: Pull the trigger towards you for forward movement (acceleration). Push the trigger away from you for braking or reverse movement.

Image: Diagram illustrating Steering Wheel Control. This image shows how rotating the steering wheel left or right corresponds to the RC vehicle's steering direction.
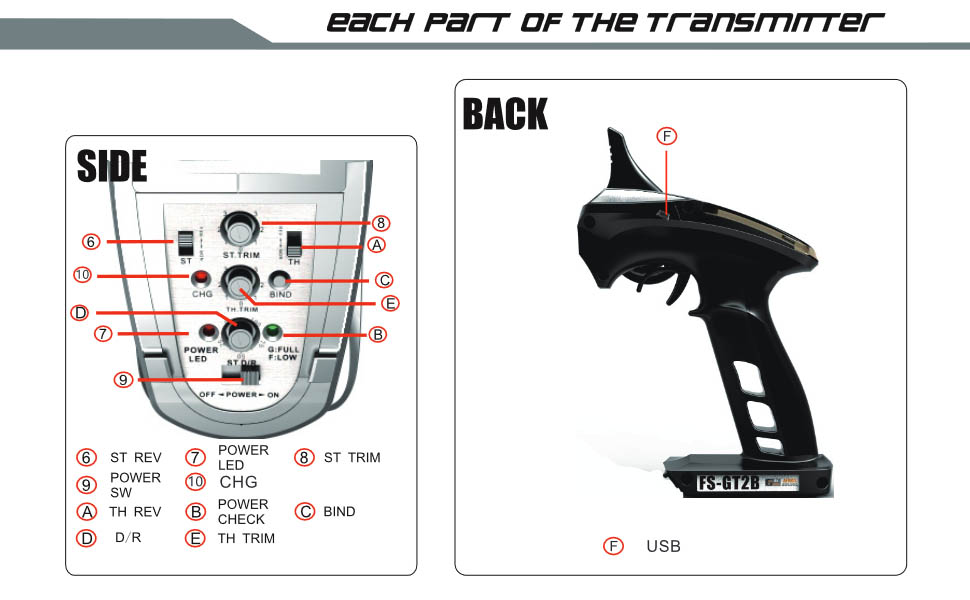
Image: Diagram illustrating Throttle Trigger Control. This image demonstrates how pulling the trigger controls forward motion and pushing it controls reverse/braking.
Adjustments (Under Protective Cover)
Lift the protective cover on the top of the transmitter to access the adjustment knobs and switches.

Billede: View of the Flysky FS-GT2B Transmitter with the protective cover open, revealing the adjustment controls. This image clearly shows the trim knobs, reverse switches, and dual rate dial.
- ST TRIM (Styretøjsindstilling): Use this knob to fine-tune the steering neutral position. If your RC model pulls to one side when the steering wheel is centered, adjust this trim until it drives straight.
- TH TRIM (Throttle Trim): Use this knob to fine-tune the throttle neutral position. If your RC model creeps forward or backward when the throttle trigger is released, adjust this trim until it remains stationary.
- ST REV (Steering Reverse Switch): Flips the direction of the steering channel. If your model steers left when you turn the wheel right, flip this switch.
- TH REV (Throttle Reverse Switch): Flips the direction of the throttle channel. If your model goes in reverse when you pull the trigger forward, flip this switch.
- D/R (Dobbelt hastighed): Adjusts the maximum steering angle. Turning this knob allows you to limit how much the wheels turn, which can be useful for controlling sensitivity or preventing over-steering.
- CH3 Button: This button controls the third channel. Its function depends on what auxiliary device is connected to CH3 on the receiver. It typically acts as an on/off switch or a two-position switch.
Opretholdelse
- Rensning: Brug en blød, tør klud til at rengøre senderen og modtageren. Undgå at bruge opløsningsmidler eller skrappe kemikalier.
- Opbevaring: Opbevar systemet et køligt, tørt sted væk fra direkte sollys og ekstreme temperaturer.
- Batteripleje:
- Charge the transmitter battery regularly, even if not in use, to maintain its health.
- Do not overcharge or deep discharge the Li-ion battery.
- Hvis batteriet opbevares i længere tid, skal det oplades til cirka 50% kapacitet.
- Antenne: Ensure the receiver antenna is not cut, bent sharply, or damaged, as this can significantly reduce range.
Fejlfinding
| Problem | Mulig årsag | Løsning |
|---|---|---|
| Ingen strøm til senderen | Batteri ikke opladet eller forkert installeret. | Charge the transmitter battery. Check battery polarity. |
| No control over RC model | Not bound, receiver not powered, or connections incorrect. | Perform binding process again. Ensure receiver is powered and all cables are correctly connected. |
| RC model moves in wrong direction | Channel reverse switch is set incorrectly. | Adjust ST REV or TH REV switch on the transmitter. |
| RC model does not drive straight or stop at neutral | Trimindstillingerne er slået fra. | Adjust ST TRIM or TH TRIM knobs until the model operates correctly. |
| Limited range or intermittent signal | Receiver antenna placement, interference, or low battery. | Ensure receiver antenna is straight and clear of metal. Avoid operating near other 2.4GHz devices. Charge transmitter battery. |
Specifikationer
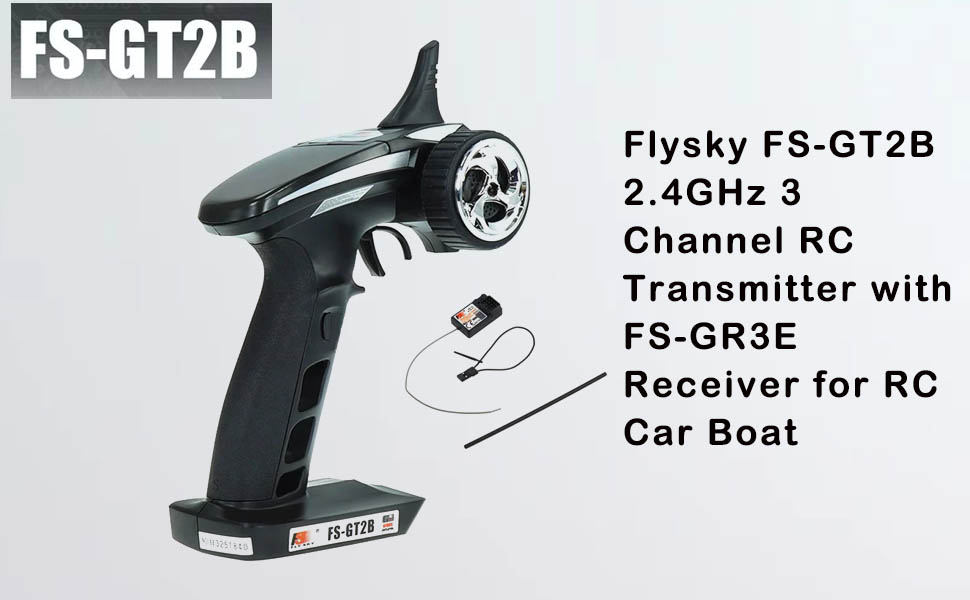
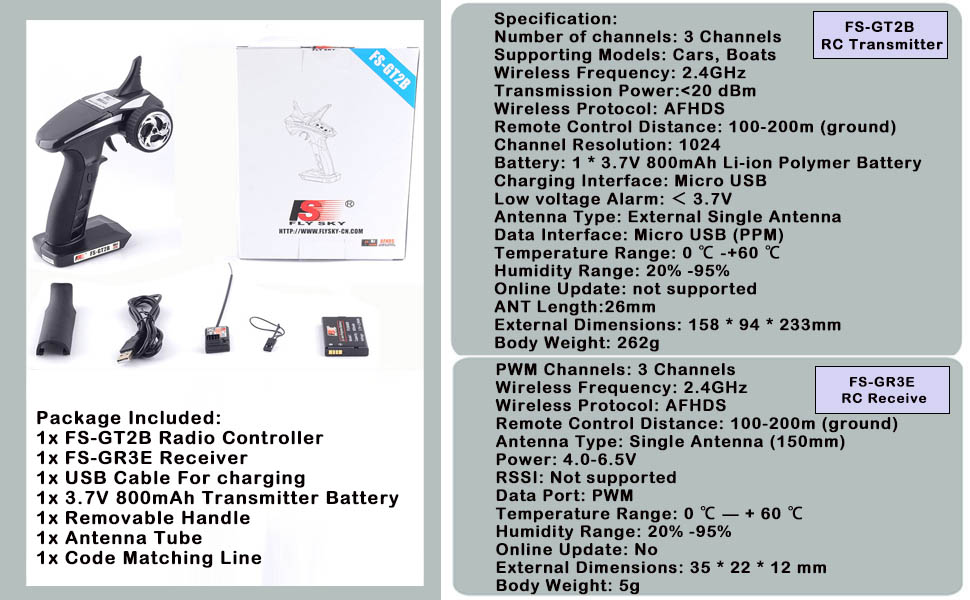
Image: Detailed specifications for the Flysky FS-GT2B Transmitter and FS-GR3E Receiver. This image provides a comprehensive list of technical parameters for both components.
FS-GT2B RC Transmitter
- Antal kanaler: 3 kanaler
- Supporting Models: Biler, både
- Trådløs frekvens: 2.4 GHz
- Transmissionseffekt: <20 dBm
- Trådløs protokol: AFHDS (Automatisk frekvenshoppende digitalt system)
- Fjernbetjening afstand: 100-200m (ground)
- Kanalopløsning: 1024
- Batteri: 1x 3.7V 800mAh Li-ion Polymer Battery (included)
- Opladningsgrænseflade: Micro USB
- Lav voltage Alarm: <3.7V
- Antenne type: External Single Antenna (built-in design)
- Data interface: Micro USB (PPM)
- Temperaturområde: 0°C ~ +60°C
- Fugtighedsområde: 20 % ~ 95 %
- Online opdatering: Ikke understøttet
- ANT Length: 26 mm
- Eksterne dimensioner: 158 x 94 x 233 mm (6.2 x 3.7 x 9.2 tommer)
- Kropsvægt: 262 g (0.58 lbs)
FS-GR3E RC Receiver
- PWM kanaler: 3 kanaler
- Trådløs frekvens: 2.4 GHz
- Trådløs protokol: AFHDS
- Fjernbetjening afstand: 100-200m (ground)
- Antenne type: Single Antenna (150mm)
- Magt: 4.0-6.5V
- RSSI: Ikke understøttet
- Dataport: PWM
- Temperaturområde: 0°C ~ +60°C
- Fugtighedsområde: 20 % ~ 95 %
- Online opdatering: Ingen
- Eksterne dimensioner: 35 x 22 x 12 mm (1.4 x 0.9 x 0.5 tommer)
- Kropsvægt: 5 g (0.01 lbs)

Image: Flysky Receiver Compatibility Chart. This table shows which Flysky receivers are compatible with various Flysky transmitters, including the FS-GT2B.
Garanti og support
For warranty information and technical support, please refer to the official Flysky webwebstedet eller kontakt din lokale forhandler. Gem din købskvittering som købsbevis i tilfælde af garantikrav.
For yderligere hjælp kan du besøge Flysky-butik på Amazon.
Ask a question about this manual
Ask about setup, troubleshooting, compatibility, parts, safety, or missing instructions. Manuals+ will review the question and use this page’s manual context to help answer it.