
Ivation 0124RED
Ivation Oversized Large Digital Wall Clock User Manual
Model: 0124RED | Brand: Ivation
1. Introduktion
Welcome to the user manual for your new Ivation Oversized Large Digital Wall Clock. This manual provides detailed instructions for setting up, operating, maintaining, and troubleshooting your clock. Please read this manual thoroughly to ensure proper use and longevity of your device.
Key features of your clock include:
- Large, easy-to-read LED display with jumbo 3.25-inch digits.
- Six adjustable brightness levels for optimal visibility in various lighting conditions.
- Convenient remote control for easy adjustments.
- Built-in time memory to preserve settings during power loss.
- Versatile design for both shelf and wall mounting.
2. Produktet er slutview
Familiarize yourself with the components of your Ivation Digital Wall Clock.
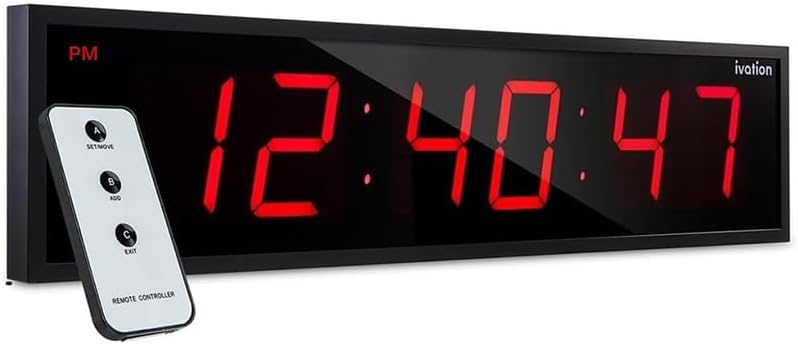
Figur 2.1: The Ivation Oversized Large Digital Wall Clock displaying time and seconds, accompanied by its remote control. The clock features a sleek black frame and vibrant red LED digits, indicating AM/PM status.

Figur 2.2: A diagram illustrating the dimensions of the Ivation Digital Wall Clock. It shows the clock is 24 inches wide, with a display height of 3.25 inches for the digits, and a total height of 6 inches. The depth is 1.75 inches. Labels indicate AM/PM and 12/24-hour time display capabilities.

Figur 2.3: A close-up of the remote control included with the Ivation Digital Wall Clock. The remote has three main buttons: 'A SET/MOVE', 'B ADD', and 'C EXIT', allowing for convenient adjustment of clock settings from a distance.
3. Opsætning
3.1 Udpakning
Carefully remove all components from the packaging. Ensure you have the clock unit, remote control, 10-foot AC power adapter, and mounting hardware (screws and wall anchors).
3.2 Monteringsmuligheder
Your Ivation Digital Wall Clock is designed for both shelf placement and wall mounting.

Figur 3.1: This image displays the included 10-foot power cord and the mounting hardware (screws and wall anchors) provided for installing the Ivation Digital Wall Clock. The back of the clock unit is also visible, showing the power input and mounting holes designed for flush wall installation.
3.2.1 Vægmontering
- Vælg en passende placering på væggen, og sørg for, at den er inden for rækkevidde af en stikkontakt.
- Using the clock's built-in mounting holes as a template, mark the positions for drilling on the wall.
- Drill pilot holes and insert the provided wall anchors if necessary (for drywall).
- Insert the screws into the anchors/holes, leaving a small portion protruding to hang the clock.
- Carefully align the clock's mounting holes with the screws and slide the clock down to secure it.
3.2.2 Shelf Placement
Simply place the clock on a flat, stable surface such as a shelf, desk, or table. Ensure it is positioned where the display is clearly visible and the power cord can reach an outlet without strain.
3.3 Strømtilslutning
Connect the provided 10-foot AC power adapter to the power input port on the back of the clock. Plug the adapter into a standard electrical outlet. The clock display will illuminate.
4. Betjeningsvejledning
4.1 Indstilling af klokkeslæt
The time can be set using either the remote control or the buttons located on the back of the clock.
4.1.1 Brug af fjernbetjeningen
- Tryk på 'A SET/MOVE' button on the remote. The hour digits will begin to flash.
- Brug 'B ADD' button to adjust the hour. Press repeatedly to cycle through hours.
- Trykke 'A SET/MOVE' igen for at gå til minutcifrene.
- Brug 'B ADD' knappen for at justere minutterne.
- Trykke 'A SET/MOVE' again to move to the AM/PM setting (if in 12-hour mode). Use 'B ADD' at skifte.
- Trykke 'C EXIT' to save the settings and exit the time setting mode.
4.1.2 Using Back-Panel Controls
Refer to the labels on the back of your clock for specific button functions (e.g., 'SET', 'UP', 'DOWN'). The process is similar to the remote control, cycling through hours, minutes, and AM/PM with dedicated buttons.
4.2 Justering af lysstyrke
Your clock features six adjustable brightness levels to suit various environments.

Figur 4.1: This image demonstrates the six adjustable brightness levels of the Ivation Digital Wall Clock. The clock displays time with varying intensity, from dim to very bright, illustrating its adaptability to different lighting conditions.
Sådan justeres lysstyrken:
- Using the remote control, locate the dedicated brightness adjustment buttons (if available) or cycle through brightness levels using the 'ADD' button after entering a specific setting mode (refer to remote instructions).
- Alternatively, use the brightness control buttons on the back of the clock unit.
4.3 Time Memory Feature
The clock is equipped with a built-in battery retention system. This feature ensures that your time and settings are preserved during a power outage, eliminating the need for reprogramming once power is restored.

Figur 4.2: The Ivation Digital Wall Clock mounted on a wall in a classroom or lecture hall, demonstrating its large, clear display and high visibility from a distance. The clock shows the time and seconds, making it suitable for large spaces.
5. Vedligeholdelse
5.1 Rengøring
To clean the clock, gently wipe the display and frame with a soft, dry, or slightly damp cloth. Avoid using abrasive cleaners, solvents, or spray cleaners directly on the clock, as these can damage the finish or electronic components.
5.2 Opbevaring
If storing the clock for an extended period, unplug it from the power source. Store it in a cool, dry place away from direct sunlight and extreme temperatures.
6. Fejlfinding
If you encounter any issues with your Ivation Digital Wall Clock, please refer to the following common problems and solutions:
| Problem | Mulig årsag | Løsning |
|---|---|---|
| Clock display is off or blank. | No power connection; power outage; defekt adapter. | Ensure the power adapter is securely plugged into both the clock and a working electrical outlet. Check if the outlet has power. If there was a power outage, the clock should retain time due to its memory feature. |
| Tiden er forkert eller går ikke fremad. | Time not set correctly; internal malfunction. | Re-set the time using the remote control or back-panel buttons as described in Section 4.1. If the issue persists, try unplugging the clock for a few minutes and then plugging it back in. |
| Fjernbetjeningen virker ikke. | Dead battery in remote; obstruction; remote out of range. | Replace the battery in the remote control. Ensure there are no obstructions between the remote and the clock's sensor. Operate the remote within a reasonable range and point it directly at the clock. |
| Skærmen er for svag eller for lys. | Lysstyrkeniveauet skal justeres. | Adjust the brightness settings using the remote control or the buttons on the back of the clock (refer to Section 4.2). |
7. Specifikationer
| Feature | Detalje |
|---|---|
| Mærke | Ivation |
| Modelnummer | 0124RED |
| Display Type | Digital LED |
| Farve | Red (also available in Blue) |
| Produktdimensioner | 24 cm B x 8 cm H |
| Varens vægt | 3.76 pund |
| Strømkilde | Elektrisk med ledning |
| Speciel funktion | Silent Clock, Time Memory, Adjustable Brightness |
| Monteringstype | Vægmontering, hyldemontering |
| Materiale | Plastic, Metal Frame |
| UPC | 815361018416 |
8. Garanti og support
8.1 Garantioplysninger
This Ivation Digital Wall Clock comes with a Limited Warranty. Please refer to the product packaging or the official Ivation website for specific terms and conditions of the warranty, including coverage period and what is covered.
8.2 Kundesupport
For further assistance, technical support, or warranty claims, please contact Ivation customer service. Contact information can typically be found on the product packaging, the official Ivation webwebstedet eller via din forhandlers supportkanaler.
You may also find additional resources and a downloadable PDF version of the user manual at the official Ivation support page or via the link provided with your purchase documentation.
Ask a question about this manual
Ask about setup, troubleshooting, compatibility, parts, safety, or missing instructions. Manuals+ will review the question and use this page’s manual context to help answer it.