1. Introduktion
This manual provides comprehensive instructions for the installation, operation, and maintenance of your Hertz HDP4 4-Channel 1000W Max D-Class Amplifier. Please read this manual thoroughly before attempting installation or operation to ensure proper function and safety.
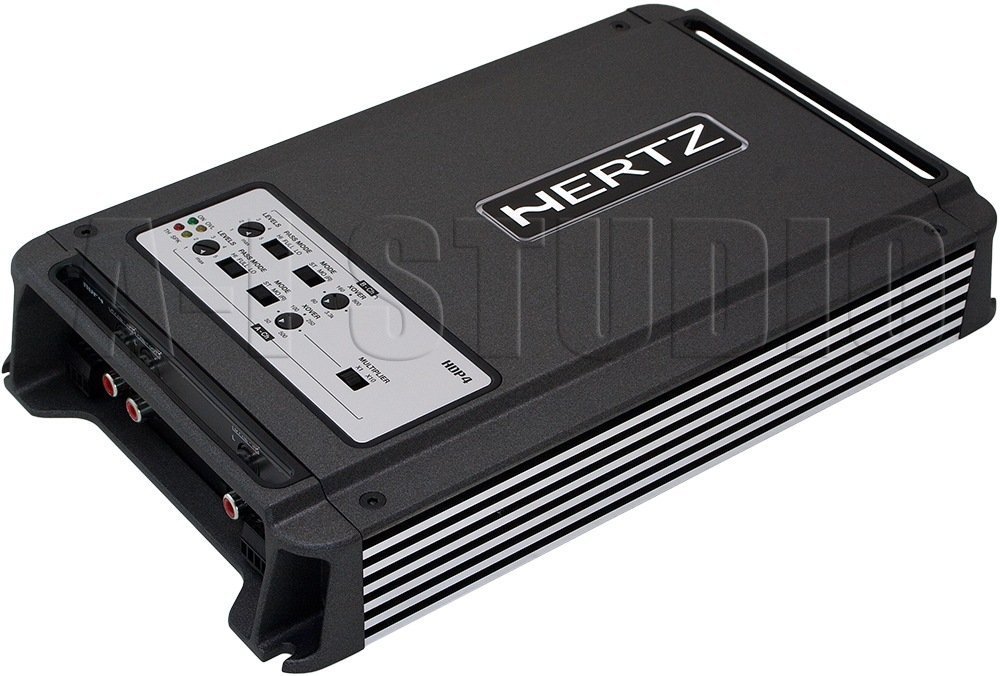
Figur 1.1: Top-down vinklet view of the Hertz HDP4 ampløfter, showcasing dens kompakte sorte casing and control panel on the top surface. The Hertz logo is visible on the main body.
2. Sikkerhedsoplysninger
Overhold altid følgende sikkerhedsforanstaltninger:
- Disconnect the vehicle's battery before any installation or wiring.
- Sørg for, at alle ledninger er korrekt isoleret for at forhindre kortslutninger.
- Monter amplifier securely in a well-ventilated area, away from moisture and direct heat.
- Brug passende ledningsføring til strøm- og jordforbindelser som angivet i installationsafsnittet.
- Kontakt en professionel installatør, hvis du er usikker på nogen del af installationsprocessen.
3. Pakkens indhold
Bekræft at alle varer er til stede i pakken:
- Hertz HDP4 Amplifier enhed
- Monteringsudstyr (skruer, beslag)
- Brugervejledning (dette dokument)
4. Opsætning og installation
4.1 Montering af Amplivligere
Choose a suitable location for mounting the amplifier. It should be a dry, well-ventilated area, protected from direct sunlight and excessive vibration. Ensure there is sufficient space around the amplifier til luftcirkulation.

Figur 4.1: Øverst view of the Hertz HDP4 amplifier, illustrating its compact design and potential mounting points. The amplifier features a textured black finish with the Hertz logo prominently displayed.
- Placer amplifier in the desired mounting location and mark the screw holes.
- Drill pilot holes if necessary, ensuring not to damage any vehicle components.
- Sikre den ampved hjælp af de medfølgende monteringsskruer.
4.2 Ledningsforbindelser
Proper wiring is critical for performance and safety. Refer to the diagram below for power, ground, remote, and speaker connections.

Figure 4.2: Rear panel of the Hertz HDP4 amplifier, detailing the power input (BATT), ground (GND), remote turn-on (REM) terminals, and speaker output terminals (L/R mono for channels A and B). Two 40A fuses are also visible.
- Strøm (BATT): Connect a fused power cable (minimum 8 AWG recommended) directly from the vehicle's positive battery terminal to the BATT terminal on the amplivligere.
- Jord (GND): Connect a ground cable of the same gauge as the power cable from the GND terminal to a clean, unpainted metal point on the vehicle chassis.
- Fjernbetjening (REM): Connect a remote turn-on wire from your head unit's remote output to the REM terminal.
- Højttalerudgange: Connect your speakers to the appropriate L (left) and R (right) terminals for each channel (A and B). Ensure correct polarity. The amplifier supports mono bridging for increased power output to a single speaker or subwoofer.
- Sikringer: De amplifier is equipped with two 40A fuses. Replace only with fuses of the same type and rating.
4.3 Input Connections and Controls
De amplifier offers both RCA (low-level) and High-Level inputs, along with various crossover and gain controls.

Figure 4.3: Input and control panel of the Hertz HDP4 amplifier. This panel includes RCA pre-inputs (A PRE-IN, B PRE-IN), high-level inputs (A HI-IN, B HI-IN), and various adjustment knobs for levels, pass mode, and crossover settings. A switch for HI-IN AUTO TURN-ON is also present.
- RCA Pre-Inputs (A PRE-IN, B PRE-IN): Connect your head unit's RCA outputs to these inputs for low-level signal.
- High-Level Inputs (A HI-IN, B HI-IN): If your head unit does not have RCA outputs, connect speaker-level signals directly to these inputs. The amplifier features an auto turn-on function for high-level inputs.
- Niveauer: Adjust the input sensitivity (gain) to match the output of your head unit. Start with the gain at minimum and slowly increase until desired volume is achieved without distortion.
- Beståelsestilstand: Select the desired crossover mode (e.g., Full, HPF, LPF) for each channel pair.
- Crossover Frequency (XOVER): Adjust the frequency point for the selected crossover mode.
- Multiplikator: Use this switch to multiply the crossover frequency setting by 1 or 10, depending on your system requirements.
5. Betjeningsvejledning
5.1 Indledende opstart
- Når alle tilslutninger er foretaget og verificeret, skal køretøjets batteri tilsluttes igen.
- Tænd din hovedenhed. amplifier should power on automatically (if remote wire is connected or HI-IN AUTO TURN-ON is active).
- Start with the head unit volume low and gradually increase it, listening for clear audio.
5.2 Justering af lydindstillinger
Finjuster amplifier's settings for optimal sound quality:
- Gevinstmatchning: Juster amplifier's gain controls (LEVELS) to match the output voltage of your head unit. This is crucial to prevent distortion.
- Crossover-indstillinger: Set the crossover frequencies (XOVER) and pass modes (PASS MODE) according to the specifications of your speakers. For full-range speakers, a high-pass filter (HPF) is often used to protect them from low bass frequencies. For subwoofers, a low-pass filter (LPF) is used.
6. Vedligeholdelse
To ensure the longevity and optimal performance of your Hertz HDP4 ampLifier, følg disse vedligeholdelsesretningslinjer:
- Rensning: Rengør med jævne mellemrum ampRengør ydersiden af apparatet med en blød, tør klud. Brug ikke skrappe kemikalier eller slibende rengøringsmidler.
- Ventilation: Sørg for, at amplifier's cooling fins are free from dust and obstructions to maintain proper heat dissipation.
- Forbindelser: Regularly check all wiring connections for tightness and corrosion. Loose connections can lead to poor performance or damage.
- Sikringer: If a fuse blows, replace it only with a fuse of the exact same type and rating (2 x 40A). Using an incorrect fuse can cause severe damage to the amplifier or vehicle electrical system.

Figure 6.1: Bottom panel of the Hertz HDP4 amplifier, displaying the serial number label and important caution notes regarding insulated screws. This area should be kept clean and free from obstructions.
7. Fejlfinding
Hvis du oplever problemer med din ampLifier, se følgende tabel, før du kontakter support:
| Problem | Mulig årsag | Løsning |
|---|---|---|
| Ingen strøm / Ampkøleren tænder ikke | Sprunget sikring, løs strøm-/stel-/fjernbetjeningsledning, defekt fjernbetjeningsudgang til hovedenhed. | Check and replace fuses. Verify all power, ground, and remote connections are secure. Test remote wire for 12V signal. |
| Ingen lyd | Loose RCA/speaker wires, incorrect input selection, amplifier in protection mode, faulty speakers. | Check all signal and speaker connections. Ensure correct input mode is selected. Check for protection light. Test speakers. |
| Forvrænget lyd | Gain set too high, incorrect crossover settings, poor quality audio source, damaged speakers. | Reduce gain. Adjust crossover settings. Test with a different audio source. Inspect speakers for damage. |
| Amplifier overophedes | Insufficient ventilation, impedance mismatch, prolonged high-power operation. | Sørg for korrekt luftgennemstrømning omkring ampVerificér, at højttalerimpedansen stemmer overens amplifier's capabilities. Reduce volume or operating time. |
8. Specifikationer
Technical specifications for the Hertz HDP4 4-Channel 1000W Max D-Class Amplivligere:
- Model: HDP4
- Mærke: HERTZ
- Type: 4-Channel D-Class Amplivligere
- Maks effekt: 1000W (as per product title, specific RMS not provided in data)
- Produktmål (L x B x H): 11.18 x 6.73 x 1.83 tommer
- Vægt: 6.35 pund
- Voltage: 14.4 volt (drift)
- Monteringstype: Overflademontering
- Sikringer: 2 x 40A
- ASIN: B00AWBU1FQ
9. Garantioplysninger
Hertz products are designed and manufactured to the highest quality standards. For specific warranty terms and conditions, please refer to the warranty card included with your product or visit the official Hertz webwebsted. Behold din købskvittering som købsbevis i tilfælde af garantikrav.
10. Support
For technical assistance, troubleshooting beyond this manual, or warranty inquiries, please contact Hertz customer support through their official website or authorized dealer. Ensure you have your product model (HDP4) and serial number ready when contacting support.
Official Hertz Webwebsted: www.hertzaudiovideo.com