OneConcept MG3-V12-WH_SML
OneConcept V-12 Stereo System
Brugermanual
Model: MG3-V12-WH_SML
Indledning
This manual provides detailed instructions for the safe and efficient operation of your OneConcept V-12 Stereo System. Please read this manual thoroughly before using the device and retain it for future reference.

Billede: Forside view of the OneConcept V-12 Stereo System, showing the main unit with integrated CD player, control buttons, digital display, and two detachable speakers. The system is white and rests on a circular stand.
Sikkerhedsinstruktioner
- Udsæt ikke enheden for regn eller fugt.
- Bloker ikke nogen ventilationsåbninger.
- Sørg for korrekt strømforsyning voltage som angivet på enheden.
- Hold enheden væk fra direkte sollys, varmekilder og stærke magnetfelter.
- Forsøg ikke selv at skille enheden ad eller reparere den. Overlad al service til kvalificeret personale.
Opsætning
Udpakning og indhold
Fjern forsigtigt alle komponenter fra emballagen. Kontroller, at alle dele er til stede:
- OneConcept V-12 Main Unit
- Two Detachable Speakers
- Strømadapter
- Brugervejledning (dette dokument)
Placeringsmuligheder
The OneConcept V-12 offers versatile placement options:
- Desktop/Shelf Placement: Use the integrated stand for stable placement on any flat surface.
- Vægmontering: The main unit and speakers can be detached from the stand and mounted on a wall using appropriate hardware (not included). Ensure the wall can support the weight of the unit.

Billede: Side view of the OneConcept V-12 Stereo System, highlighting its compact design and the circular stand. This view demonstrates the unit's suitability for various placements.

Image: The OneConcept V-12 Stereo System with its two speakers detached from the central unit. This illustrates the modular design, allowing for flexible speaker placement or wall mounting.
Connecting Power and Speakers
- Tilslut strømadapteren til DC IN-porten på bagsiden af hovedenheden.
- Sæt strømadapteren i en almindelig stikkontakt.
- Connect the speaker cables from the detachable speakers to the corresponding speaker output jacks on the back of the main unit. Ensure correct polarity.

Billede: Bagside view of the OneConcept V-12 Stereo System, showing the speaker cable connections and the main power input. This view also highlights the ventilation grilles on the back of the unit and speakers.

Image: Top-down rear view of the OneConcept V-12 Stereo System, focusing on the manual switches for AM/FM radio selection and the main mode selector (AUX, Radio, CD, Alarm). Also visible is the tuning wheel.
Betjeningsvejledning
Grundlæggende kontrol
- STRØM TIL/FRA: Tryk på MAGT knappen for at tænde eller slukke for enheden.
- BIND: Brug VOL+ og VOL- knapper for at justere lydstyrken.
- KØRSELSVEJLEDNING: Tryk på MODE button to cycle through available input sources: CD, USB, SD, FM Radio, AM Radio, AUX.
CD/MP3-afspilning
- Tryk på ÅBN/LUK knappen for at åbne CD-skuffen.
- Placer en cd eller MP3-cd på spindlen med etiketsiden opad.
- Tryk på ÅBN/LUK knappen igen for at lukke bakken.
- Ensure the unit is in CD mode. Playback should begin automatically.
- Brug SPRINGE knapper (◀◀ / ▶▶) for at navigere i spor.
- Trykke AFSPIL/PAUSE for at pause eller genoptage afspilning.
- Trykke STOP for at stoppe afspilningen.

Image: The OneConcept V-12 Stereo System with its front-loading CD tray open, revealing the disc compartment. The detached speakers are also visible, emphasizing the system's modularity.
USB/SD-afspilning
- Sæt et USB-flashdrev i USB-porten eller et SD-kort i SD-kortstikket.
- Tryk på MODE knappen, indtil "USB" eller "SD" vises.
- Enheden vil automatisk registrere og begynde at afspille kompatibel lyd. files (MP3).
- Brug GENTAG/PROG button for repeat modes and programming playback.
- Brug ALBUM button to navigate between folders (albums) on the storage device.
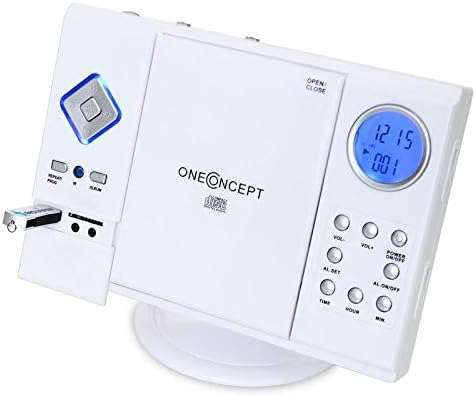
Image: Close-up of the left side of the OneConcept V-12 Stereo System, clearly showing a USB flash drive inserted into its dedicated port. This highlights the system's USB playback capability.

Billede: Detaljeret view of the OneConcept V-12 Stereo System's left panel, featuring the USB port, SD card slot, and two 3.5mm audio jacks (likely headphone out and AUX in). This image emphasizes the various connectivity options.
Radiobetjening (FM/AM)
- Switch the AM/FM selector on the back of the unit to the desired band.
- Tryk på MODE knappen, indtil "Radio" vises.
- Brug TUNING wheel on the back of the unit to manually tune to a station.
- For better reception, extend the FM wire antenna fully.
AUX-indgang
Connect an external audio device (e.g., smartphone, MP3 player) to the AUX IN jack using a 3.5mm audio cable (not included). Press the MODE button until "AUX" is displayed. Audio from the connected device will play through the stereo system.
Alarm funktion
The unit features an alarm function. Refer to the buttons on the right side of the main unit for setting the alarm:
- AL. SET: Press to enter alarm setting mode.
- TIME / HOUR / MIN: Use these buttons to set the alarm time.
- AL. ON/OFF: Press to activate or deactivate the alarm.
Opretholdelse
Rensning
- Tag altid stikket ud af stikkontakten før rengøring.
- Brug en blød, tør klud til at tørre de udvendige overflader af.
- Brug ikke slibende rengøringsmidler, voks eller opløsningsmidler, da de kan beskadige finishen.
- Brug en specialiseret CD-linserenser til CD-linser.
Opbevaring
Hvis enheden opbevares i længere tid, skal den afbrydes til strømmen og opbevares et køligt, tørt sted, væk fra direkte sollys og ekstreme temperaturer.
Fejlfinding
| Problem | Mulig årsag | Løsning |
|---|---|---|
| Ingen strøm | Netledningen er ikke korrekt tilsluttet. | Kontroller netledningens forbindelse til enheden og stikkontakten. |
| Ingen lyd | Volume too low; incorrect mode selected; speaker cables loose. | Increase volume; select correct input mode; check speaker connections. |
| CD/USB/SD afspiller ikke | Disc/device inserted incorrectly; incompatible file format; dirty disc. | Reinsert disc/device correctly; ensure MP3 format; clean disc; try another disc/device. |
| Dårlig radiomodtagelse | Antennen er ikke strakt ud; svagt signal. | Fully extend FM wire antenna; reposition unit for better signal. |
Specifikationer
| Feature | Detalje |
|---|---|
| Mærke | OneConcept |
| Modelnummer | MG3-V12-WH_SML |
| Farve | Hvid |
| Forbindelsesteknologi | USB |
| Særlige funktioner | CD changer, Alarm function |
| Kompatible enheder | MP3 player, Smartphone |
| Højttaler type | Stereoanlæg |
| Surround Sound Kanalkonfiguration | 2.0 |
| Understøttede standarder | MP3 |
| Varedimensioner (L x B x H) | 28 x 20 x 33 centimeter |
| Varens vægt | 2.4 kilo |
| Strømkilde | Elektrisk med ledning |
Garanti og support
This product is covered by a standard return policy. For specific warranty details and support, please refer to your point of purchase or the official OneConcept webwebsted. Gem din købskvittering for garantikrav.
For technical assistance or inquiries, please contact OneConcept customer support, providing your product model number (MG3-V12-WH_SML) and a detailed description of the issue.
Ask a question about this manual
Ask about setup, troubleshooting, compatibility, parts, safety, or missing instructions. Manuals+ will review the question and use this page’s manual context to help answer it.