1. Sikkerhedsinstruktioner
Always observe basic safety precautions when operating electrical tools to reduce the risk of fire, electric shock, and personal injury. Read all instructions carefully before use.
- Personligt beskyttelsesudstyr: Always wear appropriate personal protective equipment, including safety glasses, hearing protection, and work gloves. Dust masks are recommended for dry drilling operations.
- Arbejdsområde: Keep the work area clean and well-lit. Cluttered or dark areas invite accidents. Ensure adequate ventilation.
- Elektrisk sikkerhed: Do not expose power tools to rain or wet conditions. Do not abuse the cord. Keep the cord away from heat, oil, sharp edges, or moving parts. This machine is equipped with an integrated safety switch (RCD/GFCI) for enhanced electrical protection.
- Fastgør maskinen: The machine generates significant torque. Always ensure the drilling machine and its stand are securely anchored to the work surface before operation to prevent rotation and injury.
- Overbelastningsbeskyttelse: The machine features an electronic overload protector and a safety clutch. If the drill bit binds or the motor is overloaded, the clutch will engage to protect the motor. Reduce feed pressure if this occurs.
- Vandforsyning: For wet drilling, ensure the water supply connection is secure and free from leaks. Avoid spraying water directly onto electrical components.
- Stabilitet: Ensure the support base is stable and level before starting any drilling operation.
2. Produktet er slutview
The TIMBERTECH Diamond Core Drilling Machine KEBO01 is a powerful tool designed for professional and DIY renovation projects, capable of drilling precise holes through concrete, reinforced concrete, asphalt, and other hard construction materials. It supports both wet and dry drilling applications.
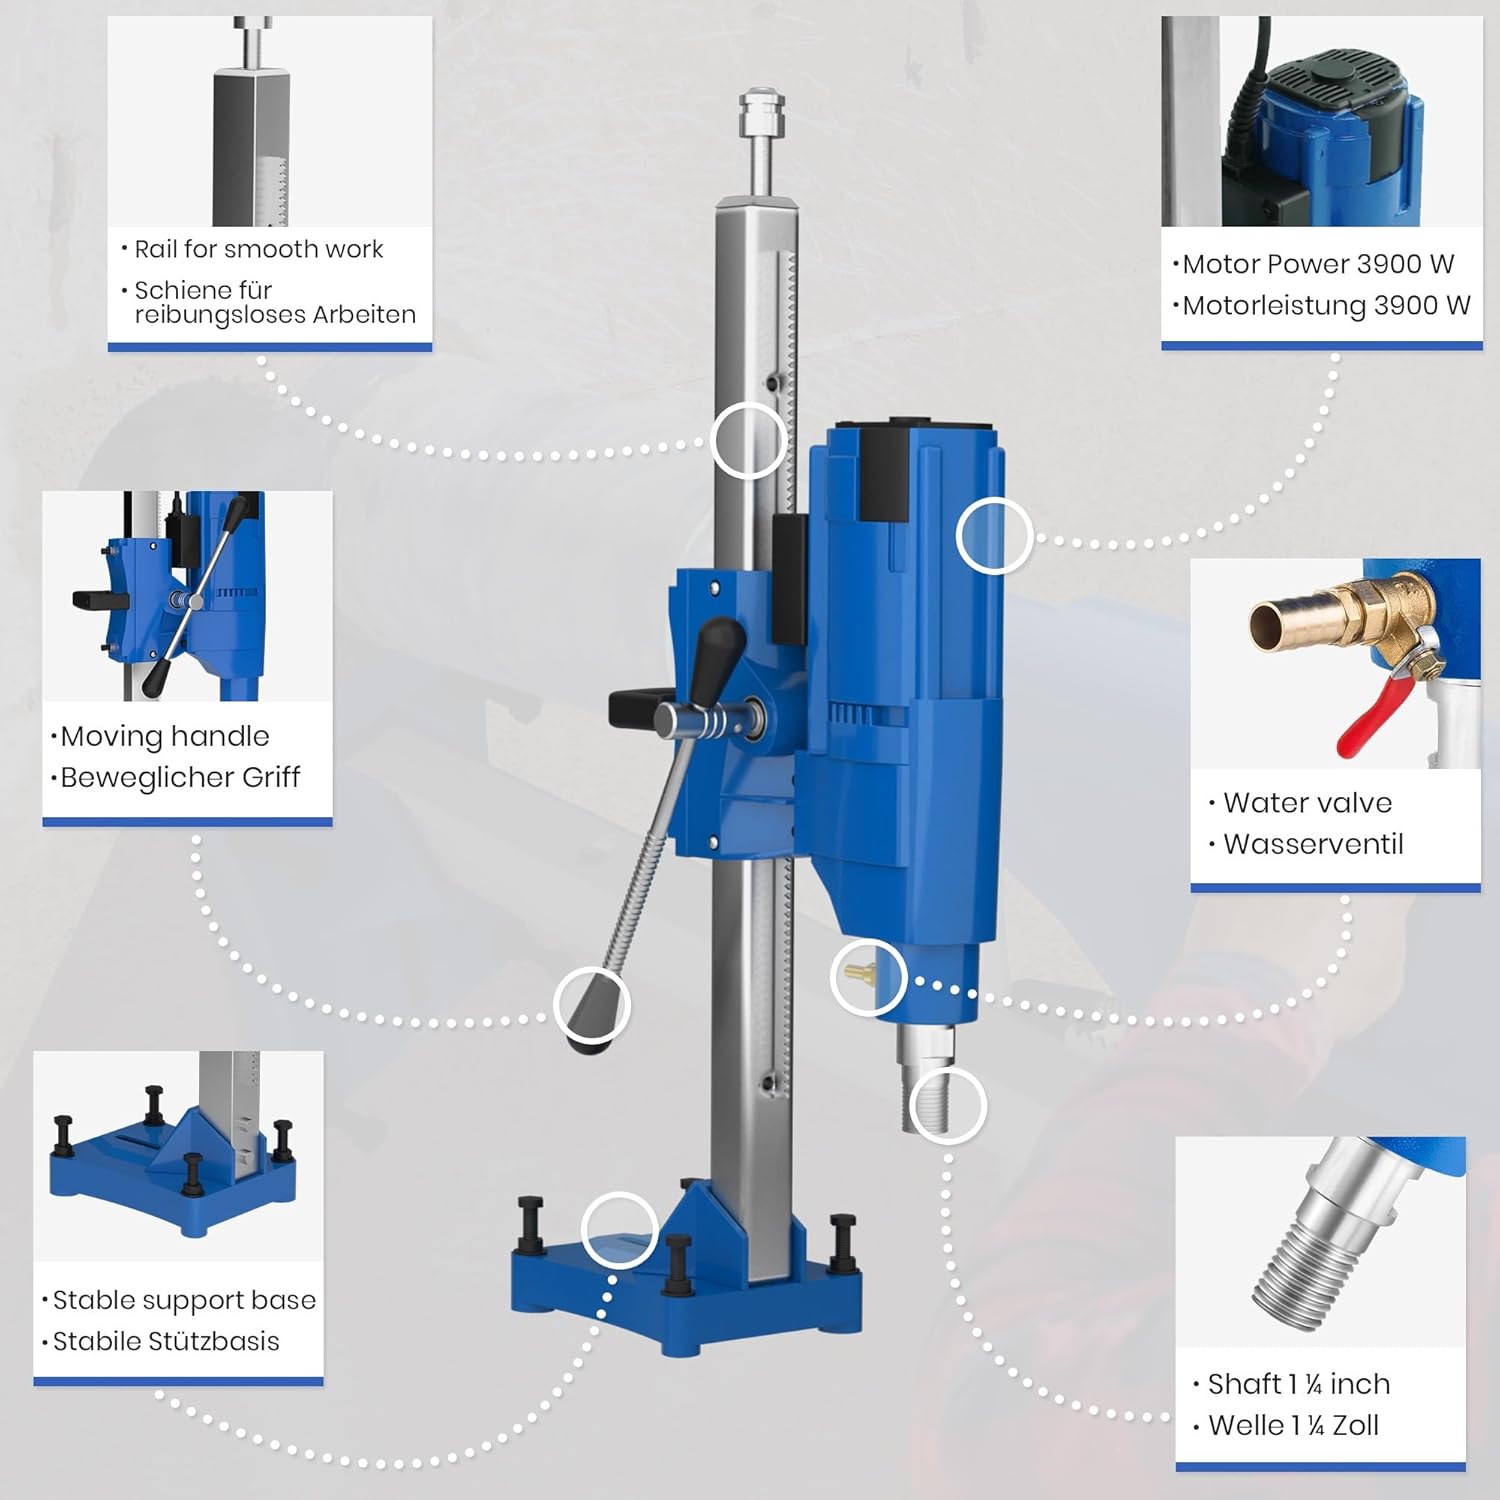
Figur 2.1: Labeled components of the Diamond Core Drilling Machine.
Nøglefunktioner:
- Kraftig motor: Equipped with a 3900 W motor for demanding drilling tasks.
- Alsidig boring: Suitable for both wet and dry drilling applications.
- Wide Drilling Range: Capable of drilling holes with diameters from 15 mm to 205 mm.
- Sikkerhedsfunktioner: Includes an integrated safety switch and electronic overload protection.
- Robust konstruktion: Stable support base and durable metal components for reliable operation.
- Integrated Water Supply: Features a cooling water hose with a tap connector for efficient wet drilling.
3. Tekniske specifikationer
The following table details the technical specifications of the TIMBERTECH Diamond Core Drilling Machine KEBO01.

Figur 3.1: Product dimensions and included components.
| Specifikation | Værdi |
|---|---|
| Mærke | TIMBERTECH |
| Modelnummer | KEBO01 |
| Strømkilde | Elektrisk med ledning |
| Max Power | 2500 Watt (Motor Power: 3900 W) |
| Voltage | 220-240 V (AC) |
| Frekvens | 50/60 Hz |
| Max rotationshastighed | 580 rpm (700 rpm listed in description) |
| Antal hastigheder | 1 |
| Maks. borediameter | 205 mm |
| Min Drilling Diameter | 63 mm |
| Drill Bit Connection | 1 ¼ tomme |
| Materiale | Metal |
| Produktmål (L x B x H) | 36 x 24 x 84 cm |
| Varens vægt | 21 kg |
| Inkluderede komponenter | Core drill, Support base, 2 Carbon brushes, Cooling water hose with tap connector, Safety switch |
Note: There is a discrepancy in power ratings between the product title/feature bullets (3900W) and the detailed specifications (2500W). The 3900W refers to the motor's peak power, while 2500W is the rated continuous power. Similarly, rotation speed is listed as 580 rpm in some places and 700 rpm in others; 580 rpm is the maximum operational speed.
4. Opsætning
Korrekt opsætning er afgørende for sikker og effektiv drift.
4.1. Assembly of the Stand and Drill
- Pak alle komponenter ud, og sørg for, at de er fri for skader.
- Attach the drilling machine to the support stand. Ensure all mounting bolts are tightened securely.
- Adjust the height and angle of the drill on the stand as required for your application.
4.2. Securing the Machine
Due to the high torque generated, the machine must be firmly anchored.
- Use appropriate heavy-duty anchors (not included) to secure the support base to the drilling surface.
- Ensure the stand is perpendicular to the drilling surface for accurate holes. The base features adjustable leveling screws for precise alignment.
4.3. Installing the Core Drill Bit

Figur 4.1: Drill bit connection and available diameters.
- Ensure the machine is unplugged before installing or changing drill bits.
- Select a diamond core drill bit with a 1 ¼ inch connection suitable for your desired drilling diameter (15 mm to 205 mm). Drill bits are sold separately.
- Thread the core drill bit onto the machine's shaft. Tighten it firmly using appropriate wrenches (not included).
4.4. Connecting the Water Supply (for Wet Drilling)
- Attach the provided cooling water hose to the water inlet valve on the machine.
- Connect the other end of the hose to a suitable water tap. A tap connector is required and not included with the machine.
- Sørg for, at alle forbindelser er tætte for at forhindre lækager.
5. Betjeningsvejledning
Følg disse trin for sikker og effektiv boring.
5.1. Kontroller før drift
- Verify that the machine is securely anchored and the drill bit is properly installed.
- Ensure the work area is clear of obstructions and personnel.
- For wet drilling, confirm the water supply is connected and the valve is closed.
- Check that the power cord is in good condition and connected to a suitable power outlet.
5.2. Start af maskinen

Figur 5.1: Safety switch for ON/OFF control.
- Press the green 'ON' button on the safety switch to start the machine.
- Allow the drill bit to reach full speed before engaging the material.
5.3. Drilling Process (Wet Drilling)
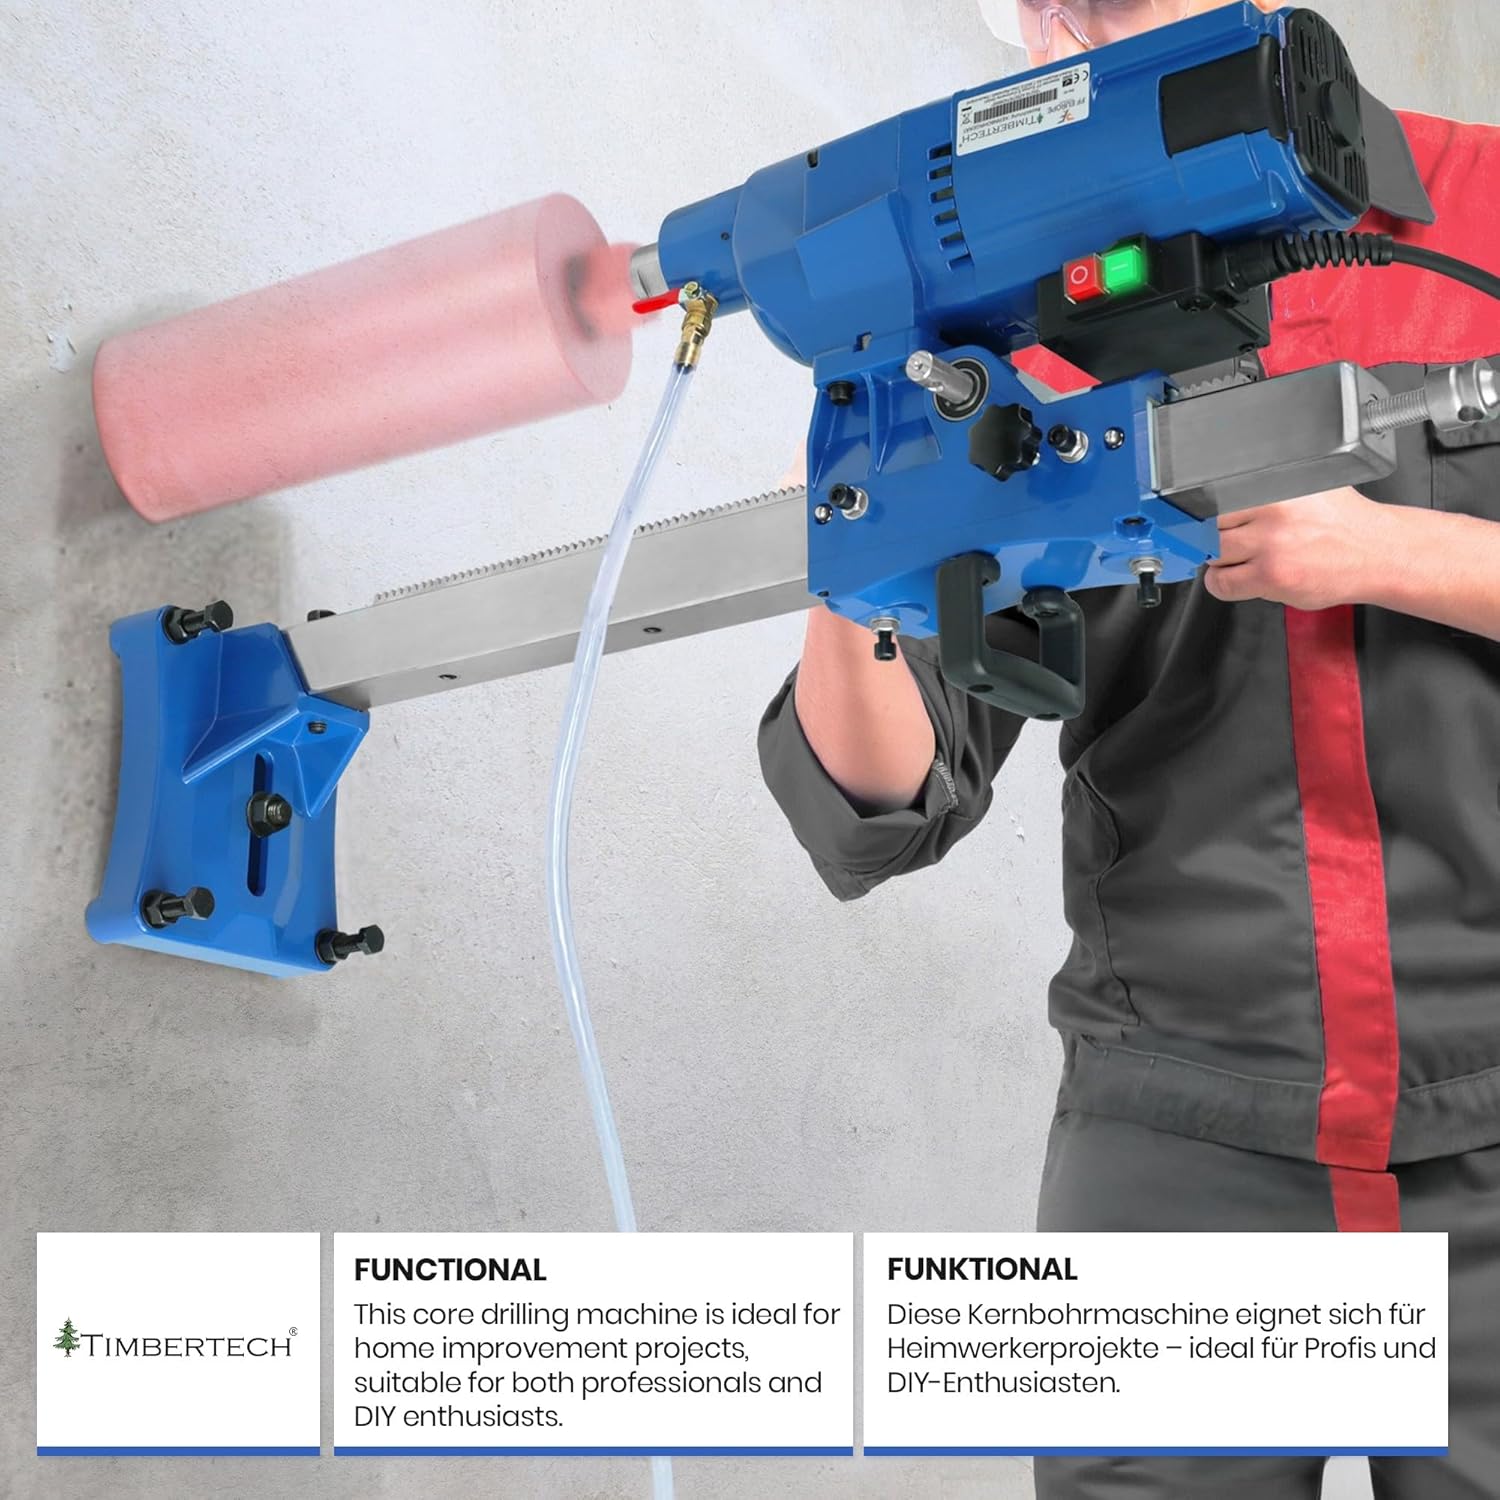
Figur 5.2: Wet drilling in progress with water cooling.
- Once the drill is running, slowly open the water valve to allow a steady flow of cooling water to the drill bit. Adjust the flow to create a slurry, not excessive splashing.
- Using the feed handle, slowly advance the drill bit into the material. Apply consistent, moderate pressure. Avoid excessive force, which can lead to overheating or binding.
- Maintain a steady feed rate. If the motor sounds strained or the clutch engages, reduce the feed pressure.
- Continue drilling until the desired depth is reached or the core is cut through.
5.4. Drilling Process (Dry Drilling)

Figur 5.3: Dry drilling operation.
- Dry drilling is suitable for certain materials and situations where water is not feasible. Ensure you use dry-specific diamond core bits.
- Operate the machine with consistent, moderate pressure.
- Periodically withdraw the drill bit from the hole to allow dust to clear and the bit to cool.
- Always wear a dust mask and ensure good ventilation during dry drilling.
5.5. Stopping the Machine and Removing the Core
- Once drilling is complete, retract the drill bit from the hole.
- Close the water valve (if wet drilling).
- Press the red 'OFF' button on the safety switch to turn off the machine.
- Carefully remove the drilled core from the drill bit or the hole. You may need specialized tools to extract stubborn cores.
6. Vedligeholdelse
Regelmæssig vedligeholdelse sikrer din boremaskines levetid og optimale ydeevne.
6.1. Rensning
- After each use, disconnect the machine from the power supply.
- Clean the machine, especially the drill bit and shaft, to remove concrete slurry or dust. Use a damp klæde; undgå skrappe kemikalier.
- Ensure the water inlet and outlet are clear of debris.
6.2. Udskiftning af kulbørste
- The motor uses carbon brushes, which wear down over time. The machine includes two spare carbon brushes.
- When the motor performance decreases or sparks become excessive, the carbon brushes may need replacement.
- Refer to a qualified technician or the detailed service manual for instructions on replacing carbon brushes. Always disconnect power before servicing.
6.3. Opbevaring
- Store the machine in a dry, secure location, away from moisture and extreme temperatures.
- Opbevares utilgængeligt for børn.
7. Fejlfinding
Dette afsnit omhandler almindelige problemer, du kan støde på.
| Problem | Mulig årsag | Løsning |
|---|---|---|
| Maskinen starter ikke | No power supply; Safety switch tripped; Faulty power cord/plug; Worn carbon brushes. | Check power connection; Reset safety switch; Inspect power cord; Replace carbon brushes if necessary. |
| Motor stops or clutch engages during drilling | Overload (excessive feed pressure); Drill bit binding; Obstruction in material (e.g., rebar). | Reduce feed pressure; Check drill bit for damage; Clear obstruction if possible. The clutch engaging is a safety feature. |
| Overdreven støj eller vibrationer | Loose drill bit; Worn bearings; Unbalanced drill bit; Normal operation (machine is inherently loud). | Tighten drill bit; Inspect for damage; Use hearing protection. |
| Water leakage from hose connections | Loose connections; Damaged hose/connector; Incorrect tap connector. | Tighten all connections; Replace damaged parts; Ensure correct tap connector is used. |
| Circuit breaker trips upon startup | High inrush current; Insufficient circuit capacity. | Ensure the machine is connected to a circuit with adequate capacity (e.g., 16A). Avoid starting other high-power devices simultaneously. |
8. Garanti og support
For warranty claims, technical support, or spare parts, please contact your retailer or the manufacturer, FF Europe. Keep your purchase receipt as proof of purchase.
Please refer to the original packaging or product documentation for specific warranty terms and conditions applicable to your region.